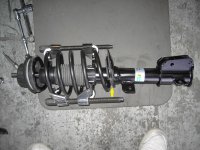
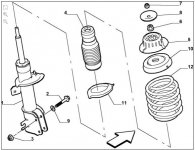
They're a rubber ring that's shaped to fit the bottom of the spring and the top of the spring mounting plate on the shock absorber. They form an insulator between the two. You can just see one fitted in the picture below from when I replaced my shock absorbers, and are item 11 in the diagram below.
The top mountings consist of two parts for each side, a top part (item 5) that fits into the suspension turret under the inner wing, and a bottom part (item 10) that incorporates a needle roller bearing and fits on to the top of the spring. Fiat price for them is about £100 per side, but when I did mine about a year ago, I bought a SKF (I think) kit for both sides for £47 from Shop4Parts. It was Shop4Parts part number S4P6684 but they don't list that now. They show a top front suspension mount kit as part number S4P9191 for £27.54 here:
http://www.shop4parts.co.uk/?name=store&op=Details&ProdID=9191&sku=184036 but I don't know how much is included in that kit. Perhaps it's just one side.
The shock absorber and top mounting parts have to aligned correctly when you assemble them, and also need to be aligned with a hole next to the suspension turret. I've posted about that several times on the forum already, but can post it here again if/when you decide to to the job.
The spring clamps shown in my picture below are not suitable for fitting a new spring because the thread on them is too short to fully release the spring from the clamps. I was only replacing the shock absorbers, top mounting parts and bottom rubber seats, so the spring stayed compressed in the clamps while I did it.
Removing a suspension spring can be very dangerous. Don't attempt it unless you are competent to do the job.
.


 but i'd rather that then mess about trying to press the bushes in and out - that said it would have been a nice job to try so I might see if I can devise a way of extracting the old bush...