Technical Shim Replacement

Currently reading:
Technical Shim Replacement

Joined
May 18, 2008
Messages
292
Points
95
Location
South Wales
Hi,

My service manual syas the tappets need adjusting a good few thousand miles ago, i Know this hasn't been done.

Can any one walk me through how to check the clearences and how to replace the shims?

any help would be much appreciated.

Stu
 
from eper:

naread.exe
 
would be interested also in any info on this as JTD are shim and bucket type although not found any information on the process and shim gap between bucket and cam, have done them on motorbikes but then the detaisl are in the manual but like yourself difficulty finding information for the jtd engine on checking the shims.
 
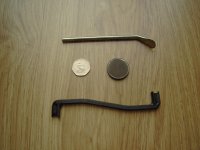
You'll need a few special tools to check and adjust the JTD 8v valve clearances;

Feeler Gauge to measure the existing clearances.
Micrometer to measure the thickness of the existing shims.
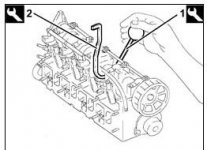
A bent wedge shaped lever to compress the valve spring (I use a bent bicycle tyre lever).
Fiat locking tool to hold the bucket down while removing the old, and refitting the new shims.
.
 

Attachments

  • JTD Tappet Shim Tools.JPG
    JTD Tappet Shim Tools.JPG
    767.2 KB · Views: 743
Davren thats great!

Would you be able to briefly explain how I go about doing the job, and so its on here for reference for others.

Im no mechanic but I'm easger to give it a go.

How do I access the shims? what needs removing etc? what gaps to i measure? etc

sorry to be a nuisance.

Stu
 
Unless you have a good supply of spare shims, you will need to measure and record all 8 valve clearances and existing shims, then calculate which sizes of new shims you need before buying them. The following assumes you don't have such a supply:

You will need a sheet of paper marked 1 to 8 (8 valves) to record the existing clearances and shims.

  1. Remove the engine cover.
  2. Remove the black plastic cam cover and it's rubber gasket.
  3. You may need to remove residual oil from the cam housing to be able to see the top of the shims. (I use a syringe, but you could use paper towel or rags).
  4. Very slowly turn the engine clockwise via the crankshaft pulley until the camshaft lobes of 2 valves are are pointing upwards. (This will not be 2 valves from the same cylinder). Do not turn the engine anti-clockwise or the cambelt may slip. If you miss the 2 valves pointing upwards, continue turning clockwise to the next 2.
  5. For each of the 2 valves, use a metric feeler gauge to measure the clearance between the bottom of the cam lobe and top of the shim. (The feeler gauge blade should be a tight sliding fit). Record the clearance against the appropriate valve number on paper.
  6. For each of the 2 valves, push the wedge tool between the bottom of the cam lobe and the top of the shim, then push it down until one end of the locking tool fits between the camshaft and 1 edge of the bucket (the round metal part that holds the shim). There's a small cutout in the bucket rim. Ensure the cutout is visible from the front of the engine, then slowly raise the wedge tool. The locking tool should remain in place holding the bucket and shim down.
  7. For each of the 2 valves, use a small screwdriver or pointed tool in the cutout to lift the shim out. Be carefull not to disturb the locking tool. (Ensure that no chips of metal have broken off the end of the screwdriver or pointed tool, and remain on top of the bucket). If you have access to a compressor, you could use a blast of compressed air in the cutout to lift the shims. Note which way up the shim is.
  8. For each of the 2 valves, use a micrometer to measure the thickness at the center of the shim. Record the thickness against the apropriate valve number on paper.
  9. For each of the 2 valves, replace the old shim in it's bucket ensuring it's the correct way up, and not tilted, then reinsert the wedge tool, remove the locking tool, then remove the wedge tool.
  10. Repeat from step 4 until you've recorded the clearances and shim thicknesses for all 8 valves.
  11. Valve clearances for a cold engine should be 0.35mm +/- 0.05mm, so for any valves that are within this tolerance, you don't need to proceed past step 5 above.
  12. For any that are out of tolerance, calculate the size of each shim required to get the correct clearance from the measurements you have on paper.
  13. Replace any shims required using the relevant steps of the above procedure. If the new shims have a size marking on them, it should face downwards away from the camshaft lobes.
  14. Refit the cam cover and engine cover. (Best practice it to fit a new cam cover gasket, but as it's a rubber gasket, and providing it's not damaged, the old one should still be serviceable).
New shims are available from Fiat in sizes 3.25 - 4.90mm.
.
 

Attachments

  • Shim Tools.JPG
    Shim Tools.JPG
    19.5 KB · Views: 420
what's the shim diameter davren? and also what's appropriate mileage to do shims on the 8 valve jtd? i've had mine since new done 94000 miles and i keep meaning to get round to doing this but haven't yet.

from having a quick read of your instruction is that right that both inlet and exhaust are the same clearance? that's unusual.

seems strange looking at the camshaft on the stilo being a single one i'm used to doing the valve clearances on my yamaha fj1200
 
Last edited:
I don't have one to hand at the moment, I can get one to measure tomorrow if you really need to know. They're the same size Fiat have used for many years, exactly same as the ones in my old 1987 Croma Turbo ie. There's a picture of one against a 50p in post #6 above if you only need a rough idea of diameter.

eLEARN shows both inlet and exhaust as 0.35mm +/- 0.05mm.

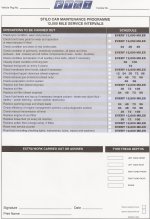
The Fiat service sheet from 2003 shows strange mileage periods for checking the valve clearances, but eLEARN says every 60,000km. I check mine about every 20,000 miles.
.
 

Attachments

  • Stilo Service Sheet.jpg
    Stilo Service Sheet.jpg
    550 KB · Views: 274
thanks davren that's all i need to know as mates got a bucket load of shims from fiats so i can go and rob his stock for sizes i'll need. have you found yours have been out much when you've done them? looks like i'm a bit over the stated schedule then oops. job for this weekend i think.(y)
 
I changed 4 of my shims when I first got the car at 70,000 miles. I recorded the final clearances after I'd done them and they were still well within tolerance when I checked them again at 90,000 miles.

I suspect most of the wear occurs in the first few thousand miles of the engine's life. Perhaps that's why the reccomended mileage periods on the service sheet are so close together for the first 36,000 miles.
 
It would only be available from a Fiat dealer, some of which won't order special tools for retail customers.

Part number of the locking tool is 1860724001. £15.29 +VAT when I bought one in 2008. I think it's about £35 now.

The wedge shaped lever was about £45 in 2008, which is why I made one.
 
Hi Davren,

It's taken me a while to get around to looking at this but i'm about to tackel the beast.

Ive had a look under the black rocker cover and I was wondering how do you turn the crank shaft pully?

I guess it isn't as simple as pulling the cam belt.... so do i need to get a ratchet/spanner to turn the engine over, i think i can see it half way down the engine on the cam belt side but any tips accessing it?

could i remove the driver side wheel and arch liner?

Cheers

Stu
 
Never turn an engine over by the cam belt, or any pulleys other than the crankshaft pulley.

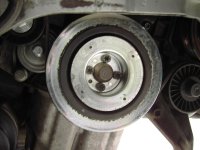
Remove the right side wheel, and engine undertray and use a socket on the centre nut of the crankshaft pulley. Only turn the engine slowly and clockwise. The centre nut is a left hand thread, so turning it clockwise with jerky movements (although unlikely) could loosen it.
 

Attachments

  • New Crank Pulley.JPG
    New Crank Pulley.JPG
    647.9 KB · Views: 56
Back
Top