This guide applies to the 1.6 petrol engine.
Tools needed:
- Socket set.
- Offset ring spanner set.
- Flatheaded screwdriver (for the hose clamps).
- WD40.
- Spare clamps.
- Long nose pliers.
- Coolant.
- Wirestrips (plastic).
Optional "tools" 1:
- Gearbox oil.
- Funnel.
- Garden hose.
Optional tools 2:
- Drill with 24 mm hole saw.
- Sharp knife.
Difficuly set to 2 spanners. Prepare for 2-3 hours for the thermostat change, and 2-3 hours for the engine heater. Time includes reassembling.
HERE WE GO:
1. Remove the engine cover, 4 nuts and shims. Pull the cover straight up.
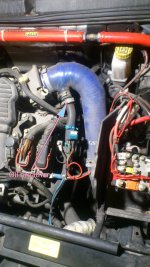
2. (Optional). Remove the battery cover to gain extra working space, 3 large torx bolts. You can use a big flat screwdriver.
3. (Optional). Remove the battery completely for an overnight recharge. If attached, remove the second battery cover for the + pole. Unbolt the big steel clamp holding the battery in place, 2 bolts. You need a socket extender for the rearmost. 2 nuts on the poles need to be loosened. Wiggle the battery clamps off the +/- poles and bend them to the sides. Pull the battery straight up and hook it up to a charger.
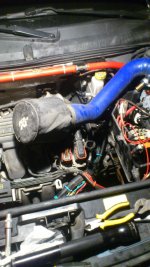
4. Remove the air intake hose. Mine is a GSR type, so the OEM removal will be slightly different. Remember to unclamp the oil breather hose. Unplug the temperature sensor wire, the green plug.
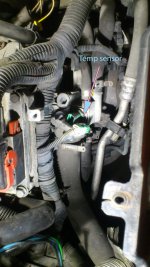
5. Make sure you have many adjustable hose clamps of different sizes. You need at least 3 30-40 mm for the large hoses on the thermostat.
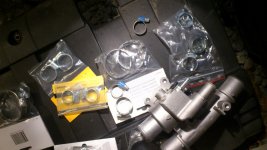
6. Remove the FIAT hose clamps on the 3 upper hoses on the thermostat. Try catching as much coolant as possible as cats will drink it (it's sweet) and die. Bend the hoses away. Remove the last 2 hoses. The pictures also show you need an offset ring spanner to reach on of the nuts, and a socket with a flexible joint. Use pliers to remove (destroy) the OEM clamps. More coolant will flow out, so try catching it in an old oil can etc.
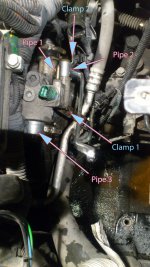
7. There are 2 metal/plastic clamps attached to the thermostat housing. These need to be removed before you continue. The plastic clip on the aircon metal tube needs to be opened before removing the complete clamp unit. This clamp is attached by a nut, and will reveal a second nut after the clamp is removed. The rearmost clamp is a attached with a bolt, and after this is removed you can push the clamp away.
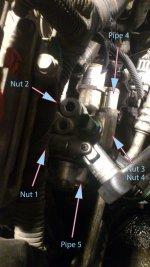
8. The thermostat should now be ready for removal. Unbolt the 3 remaining nuts and shims and pull the thermostat away towards the battery area. It's a bit fiddly as the aircon pipe is obstructing free passageway. Reverse of removal, replace the old thermostat with the new one and mount the hoses with new hose clamps.
9. (Optional). Before putting the air intake back together, use a couple of minutes to top up the oil for the gear box. Use the same hex socket as the sump plug (12 mm) and unscrew the plug on the front of the gearbox. Insert a little funnel in a garden hose and put it into the gearbox. Fill until oil pours out, then refit the plug. Reassemble the air intake with hose and breather back in place.
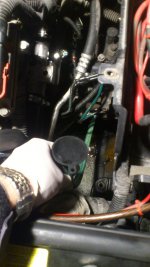
10. To insert a DEFA circulating coolant heater you first need to remove the exhaust manifold cover. (Engine cover has to come off first). You can either remove the lambda probe, or disconnect the wires to it (a plug). 3 nuts need to be removed from the top of the cover. These are self-welded / corroded / hard-heated through time, and difficult to remove without destroying the threads. You need to lubricate with penetrating oil like WD40 and turn back and forth. If they break at a point, you will need new nuts when reassemling, as they won't tear off at the lower part. I only managed to get one nut off completely. Then there are two bolts far down, near the bulkhead. They are quite tricky to get to, and if you have big hands, the gearbox linkage wires will be your opponent. When the 5 fixing points are removed, pull the cover up and away. Take care around the lambda probe and wires if you didn't remove it.
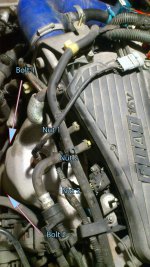
11. The engine coolant heater is a little element with a flange that goes in between the water pump and the attached coolant pipe. The pipe is shown on the picture, in between the two arrowheads. The waterpump is below, and is driven by a belt. I forgot to take a picture of the heating element, but do an Internet search if needed. First, remove the coolant pipe from the pump, 2 bolts. The one towards the car's front is only accessible with a socket (and preferably an extender), you will not be able to get a spanner to it. The bolts aren't very tight and when first loose, they can be unbolted with your fingers. Only one bolt is visible on the picture.
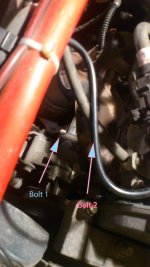
12. Push the coolant pipe rightwards, and insert the heater element as described in the manual. The gasket goes in beween the element and the pipe, not between the element and the water pump. Insert the two bolts (with shims) from the DEFA package, as they are 1 cm longer than the OEM bolts, to provide a tight assembly.
13. Refit the exhaust manifold cover and put the lambda probe back in place / eventually the wires for it.
14. From the DEFA package it is now time to wire the exterior plug to the heater element. Drill a 24 mm hole in the bumper (at a preferred place) and insert the plug (with wire) from the outside. Mount the flange from the inside, it's threaded and is very easy to attach. Route the wire to the heater element, and plug it in.
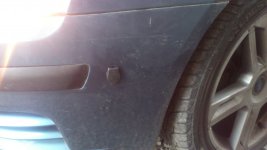
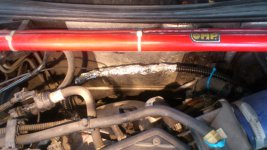
15. Remember to pull the soft heatshield cover over the plug. It's some kind of insulating glass material with a silver cloth wrapped around.
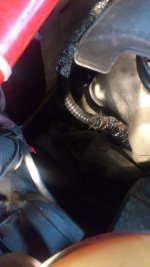
16. Ground the installation, using the already assembled wire. Refit the engine cover and insert the battery if it has been recharged.
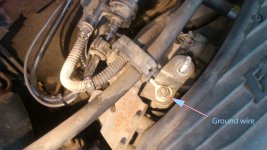
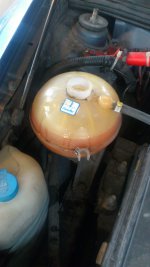
17. Refill the coolant tank and start the engine. There is a little bleeder screw near the bulkhead where the A/C filler points are. Open it a bit by hand, and air / coolant will drip out. Let the car idle, and when the thermostat opens, add more coolant as it will drop significantly when circulating. Close the bleeder if you haven't already.
18. Wait for king Winter to come and approach him with a nice warm engine block with heated coolant. Coolant will not circulate completely as the thermostat will never reach opening temperature, but there will be a natural convection around the system.
Tools needed:
- Socket set.
- Offset ring spanner set.
- Flatheaded screwdriver (for the hose clamps).
- WD40.
- Spare clamps.
- Long nose pliers.
- Coolant.
- Wirestrips (plastic).
Optional "tools" 1:
- Gearbox oil.
- Funnel.
- Garden hose.
Optional tools 2:
- Drill with 24 mm hole saw.
- Sharp knife.
Difficuly set to 2 spanners. Prepare for 2-3 hours for the thermostat change, and 2-3 hours for the engine heater. Time includes reassembling.
HERE WE GO:
1. Remove the engine cover, 4 nuts and shims. Pull the cover straight up.

2. (Optional). Remove the battery cover to gain extra working space, 3 large torx bolts. You can use a big flat screwdriver.
3. (Optional). Remove the battery completely for an overnight recharge. If attached, remove the second battery cover for the + pole. Unbolt the big steel clamp holding the battery in place, 2 bolts. You need a socket extender for the rearmost. 2 nuts on the poles need to be loosened. Wiggle the battery clamps off the +/- poles and bend them to the sides. Pull the battery straight up and hook it up to a charger.

4. Remove the air intake hose. Mine is a GSR type, so the OEM removal will be slightly different. Remember to unclamp the oil breather hose. Unplug the temperature sensor wire, the green plug.

5. Make sure you have many adjustable hose clamps of different sizes. You need at least 3 30-40 mm for the large hoses on the thermostat.

6. Remove the FIAT hose clamps on the 3 upper hoses on the thermostat. Try catching as much coolant as possible as cats will drink it (it's sweet) and die. Bend the hoses away. Remove the last 2 hoses. The pictures also show you need an offset ring spanner to reach on of the nuts, and a socket with a flexible joint. Use pliers to remove (destroy) the OEM clamps. More coolant will flow out, so try catching it in an old oil can etc.

7. There are 2 metal/plastic clamps attached to the thermostat housing. These need to be removed before you continue. The plastic clip on the aircon metal tube needs to be opened before removing the complete clamp unit. This clamp is attached by a nut, and will reveal a second nut after the clamp is removed. The rearmost clamp is a attached with a bolt, and after this is removed you can push the clamp away.

8. The thermostat should now be ready for removal. Unbolt the 3 remaining nuts and shims and pull the thermostat away towards the battery area. It's a bit fiddly as the aircon pipe is obstructing free passageway. Reverse of removal, replace the old thermostat with the new one and mount the hoses with new hose clamps.
9. (Optional). Before putting the air intake back together, use a couple of minutes to top up the oil for the gear box. Use the same hex socket as the sump plug (12 mm) and unscrew the plug on the front of the gearbox. Insert a little funnel in a garden hose and put it into the gearbox. Fill until oil pours out, then refit the plug. Reassemble the air intake with hose and breather back in place.

10. To insert a DEFA circulating coolant heater you first need to remove the exhaust manifold cover. (Engine cover has to come off first). You can either remove the lambda probe, or disconnect the wires to it (a plug). 3 nuts need to be removed from the top of the cover. These are self-welded / corroded / hard-heated through time, and difficult to remove without destroying the threads. You need to lubricate with penetrating oil like WD40 and turn back and forth. If they break at a point, you will need new nuts when reassemling, as they won't tear off at the lower part. I only managed to get one nut off completely. Then there are two bolts far down, near the bulkhead. They are quite tricky to get to, and if you have big hands, the gearbox linkage wires will be your opponent. When the 5 fixing points are removed, pull the cover up and away. Take care around the lambda probe and wires if you didn't remove it.

11. The engine coolant heater is a little element with a flange that goes in between the water pump and the attached coolant pipe. The pipe is shown on the picture, in between the two arrowheads. The waterpump is below, and is driven by a belt. I forgot to take a picture of the heating element, but do an Internet search if needed. First, remove the coolant pipe from the pump, 2 bolts. The one towards the car's front is only accessible with a socket (and preferably an extender), you will not be able to get a spanner to it. The bolts aren't very tight and when first loose, they can be unbolted with your fingers. Only one bolt is visible on the picture.

12. Push the coolant pipe rightwards, and insert the heater element as described in the manual. The gasket goes in beween the element and the pipe, not between the element and the water pump. Insert the two bolts (with shims) from the DEFA package, as they are 1 cm longer than the OEM bolts, to provide a tight assembly.
13. Refit the exhaust manifold cover and put the lambda probe back in place / eventually the wires for it.
14. From the DEFA package it is now time to wire the exterior plug to the heater element. Drill a 24 mm hole in the bumper (at a preferred place) and insert the plug (with wire) from the outside. Mount the flange from the inside, it's threaded and is very easy to attach. Route the wire to the heater element, and plug it in.


15. Remember to pull the soft heatshield cover over the plug. It's some kind of insulating glass material with a silver cloth wrapped around.

16. Ground the installation, using the already assembled wire. Refit the engine cover and insert the battery if it has been recharged.

17. Refill the coolant tank and start the engine. There is a little bleeder screw near the bulkhead where the A/C filler points are. Open it a bit by hand, and air / coolant will drip out. Let the car idle, and when the thermostat opens, add more coolant as it will drop significantly when circulating. Close the bleeder if you haven't already.

18. Wait for king Winter to come and approach him with a nice warm engine block with heated coolant. Coolant will not circulate completely as the thermostat will never reach opening temperature, but there will be a natural convection around the system.

