

You are using an out of date browser. It may not display this or other websites correctly.
You should upgrade or use an alternative browser.
You should upgrade or use an alternative browser.
General My Scudo Build
- Thread starter onodle
- Start date
-
- Tags
- day van scudo build
Currently reading:
General My Scudo Build
I was hoping to get the front seats installed today. However the base I have for the passenger side does not use any of the current mounting points and drilling my own seems to go fine until I hit some closed box section in one of the corners.
Given up today as for the front seat I'm not risking 3 mounting points only. I managed to find one location I think would work with all 4 points but then the passenger is missing some of the footwell and I think it would look naff.
Looking around now to see if I can get a driver side seat base or if I can cut the legs off the bench and make my own seat base. Nothing seems easy now this is the last hurdle before I can finish off the cab and rear and trim everything!
A scrapped Scudo taxi would have these or a company which converts them to taxi's, why not try Ebay?
Can't find one of them companies - if you know of one let me know
")
Ebay only has Ducato bases. Biding on a scudo drivers seat and base now..
As for a scraped taxi yeah getting one for the front is not that easy it seams, I tried 13 written of taxies that where being broken when I first started to hunt for the base and all turned me away
Yeah the holes I think I'm going to cover up.
As for the seat base. I think I can get something to work IF i drill two new mounting holes on the renault base that will allow me to use the current mounting points.
I'll then take off two of the mounting legs off the old passenger seat, weld these to the side of my renault base which gives me the extra bit of length i need to use all the original fixing points. I think that will work.. OR I'm just over complicating it..
Steo M
New member
- Joined
- Nov 10, 2010
- Messages
- 170
- Points
- 32
Well you've come this far which looks like a bit of a mission, if a bit of cutting & welding will make the fitment easier, then go for it.Yeah the holes I think I'm going to cover up.
As for the seat base. I think I can get something to work IF i drill two new mounting holes on the renault base that will allow me to use the current mounting points.
I'll then take off two of the mounting legs off the old passenger seat, weld these to the side of my renault base which gives me the extra bit of length i need to use all the original fixing points. I think that will work.. OR I'm just over complicating it..
This is why those conversion companies charge the big bucks.
Well you've come this far which looks like a bit of a mission, if a bit of cutting & welding will make the fitment easier, then go for it.
This is why those conversion companies charge the big bucks.
Your not half wrong there.. Looks like this will work.
Made two test holes


Seems to offer up OK. I just need a 12 or 13mm drill bit now and typical I cant find any only 10 and 16!


I think ill drill these holes out a bit bigger (after a quick trip to screw fix) add a split washer bolt them in place. Then ill smash off two legs (the seat bench has not sold anyway) ill bolt them to the van then ill drill through the legs and seat bench bolt it all together. Test it all out.
Once I know all is working. I'll take it all apart and weld it together but now I thought of the bolt idea im thinking two HT bolts might do it (per leg)
Got the driver side fitted after testing the wiring on the passenger seat I thought all would be straight forward.
Got the seat in, had to modify the fiat seat base but that was no problem.


Now I can't access the front sliders to bolt them to the base so I thought id wire up the motor to move the seat back however after providing power I get nothing. All motors seem to be dead - I think maybe my connection I'm missing something in the wiring on the passenger seat it was just + / - and + / - and hey presto it works not worried about getting the memory control functions working.
Driver side just tried to connect the battery direct and still nothing so I think its a connector someplace as neither motor fire and there are 2.
Plus side the seat is already in the right position for me. Downside is I can't bolt it at the front anyone got some suggestions? Seat is WAY more comfier than the factory seat.
EDIT - IDEA
Put passenger seat on driver side, wire up, adjust runners / sliders and bolt to sub frame, put the rails back into original position, remove passenger seat re-fit drivers seat.
All sorted apart from now not being able to adjust driver seat but thats a problem for another time will fine an auto electrician i think
Got the seat in, had to modify the fiat seat base but that was no problem.
Now I can't access the front sliders to bolt them to the base so I thought id wire up the motor to move the seat back however after providing power I get nothing. All motors seem to be dead - I think maybe my connection I'm missing something in the wiring on the passenger seat it was just + / - and + / - and hey presto it works not worried about getting the memory control functions working.
Driver side just tried to connect the battery direct and still nothing so I think its a connector someplace as neither motor fire and there are 2.
Plus side the seat is already in the right position for me. Downside is I can't bolt it at the front anyone got some suggestions? Seat is WAY more comfier than the factory seat.
EDIT - IDEA
Put passenger seat on driver side, wire up, adjust runners / sliders and bolt to sub frame, put the rails back into original position, remove passenger seat re-fit drivers seat.
All sorted apart from now not being able to adjust driver seat but thats a problem for another time will fine an auto electrician i think
Last edited:
Out of interest does anyone know what these holes are for?

I assume the ones on the left are for an upper door handle? Can these parts be sourced?
If not I'm thinking I might just fill them in and paint..
Cant see you pictures in any browser now so ill presume you are taling these holes on the inside of the door

If so it little hooks that go on like this
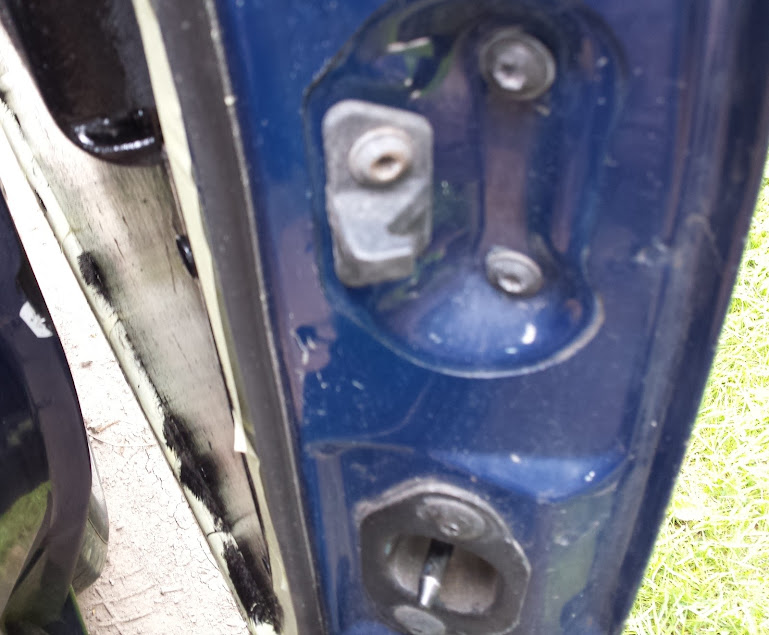
And they hook into this when the door is shut

As said they are on the Taxi and people carrier vans to help prevent drunks falling onto the door what may open when someone falls onto it when cornering.
Ah ha. If i use Microsoft Edge your pictures are a little black box with an X in there. If i right click and select Bing Lookup i can get a small picture but if i try and see the full size i get nothing. However i have now seen the holes and yes. Its for a handle to assist closing the door from the inside.
About a million things going on and one hell of a few days finally got to work on the van. Most of it is just waiting on things to arrive now:
Started off working on the front seat

Modified Renault seat base although I must have been drunk or blind when I done all the fitting as now the seat does not fit EVEN though it did 3 weeks ago when I started this process.. so now I need to get some brackets made up so this is a never ending project!
Looks OK though:

Seat out and now to focus on the back doors.
Originally I was going to cover the entire doors but I decided to paint them up and ill just cover the bottom panel instead I think it will be a little bit nicer considering the back of the van will not be fully decked out and it's a bit more "dog proof"
Extent of the marks and scuffs on the door, both doors are the same

Took some 1500 grit paper, cleaned them up a little, wiped down with a wet wipe and then gave it a coat of primer


Found the paint code its Fiat 249 white base primer as Fiat suggest makes the finished coat look bright white. Hence why I used grey and I can see where I missed, think this is two scratch coats applied:


Going to let the paint fully harden now over night and ill wet sand it down and give it a final coat.
Inside of the van, had to clean all the glue of my shelf units will go into detail when I have these almost finished:


Next job I bought a new head unit but I need to get some ISO adapters, I also intend on fitting 10cm speakers in the back but that's a job for another day. Today I wanted to get the front speakers sorted replacing them with Pioneer.
Door card off:

Not much to see I think there are write up's on here about replacing speakers anyway:
Old

New

Installed

Both speaker wires where white! No marks or black lines nothing just as white as the van! So I decided to connect them back up left connection to left and right to right as they came off the old speaker once the head unit is off ill trace the cables back and see which is which.
For now though as long as I don't blast them it should be fine i think.
Tested speakers sound is amazing (well anything will be better) idle had the old speakers at 8-9 volume these are sitting at 3
While door cards where off time to add some sound deadening

That's all I got done today have to bake a pile of cakes for daughters school!
Started off working on the front seat
Modified Renault seat base although I must have been drunk or blind when I done all the fitting as now the seat does not fit EVEN though it did 3 weeks ago when I started this process.. so now I need to get some brackets made up so this is a never ending project!
Looks OK though:
Seat out and now to focus on the back doors.
Originally I was going to cover the entire doors but I decided to paint them up and ill just cover the bottom panel instead I think it will be a little bit nicer considering the back of the van will not be fully decked out and it's a bit more "dog proof"
Extent of the marks and scuffs on the door, both doors are the same
Took some 1500 grit paper, cleaned them up a little, wiped down with a wet wipe and then gave it a coat of primer
Found the paint code its Fiat 249 white base primer as Fiat suggest makes the finished coat look bright white. Hence why I used grey and I can see where I missed, think this is two scratch coats applied:
Going to let the paint fully harden now over night and ill wet sand it down and give it a final coat.
Inside of the van, had to clean all the glue of my shelf units will go into detail when I have these almost finished:
Next job I bought a new head unit but I need to get some ISO adapters, I also intend on fitting 10cm speakers in the back but that's a job for another day. Today I wanted to get the front speakers sorted replacing them with Pioneer.
Door card off:
Not much to see I think there are write up's on here about replacing speakers anyway:
Old
New
Installed
Both speaker wires where white! No marks or black lines nothing just as white as the van! So I decided to connect them back up left connection to left and right to right as they came off the old speaker once the head unit is off ill trace the cables back and see which is which.
For now though as long as I don't blast them it should be fine i think.
Tested speakers sound is amazing (well anything will be better) idle had the old speakers at 8-9 volume these are sitting at 3
While door cards where off time to add some sound deadening
That's all I got done today have to bake a pile of cakes for daughters school!
Last edited:
Crewie
New member
Excellent progress Matey, Well Done.. :slayer:
I think I will do the same as you with my back doors as they are also letting the side down, being scratched and dinked by whatever was carried by the last owner.
Mind you, I am dying to try having a go at a wrap, so still undecided.
Cheers
Crewie
I think I will do the same as you with my back doors as they are also letting the side down, being scratched and dinked by whatever was carried by the last owner.
Mind you, I am dying to try having a go at a wrap, so still undecided.
Cheers
Crewie
Yes doors where bashed to bits. I didn't bother trying to fill some of the worst damage the primer took care of it. The rear doors I was going to wrap in faux leather but I'll just replace the lower card and cover that less for the dogs to damage and I think it might be a nicer job it's not like I'm planning on sleeping in the van so it's a decent compromise.
As for vinyl wrapping yes I want to do the same I fancy just wrapping the lower half of the van, originally I was going to get the entire van done for £600, but with the price of vinyl I thought id just get a meter or two and have a go myself, as long as it's not a pattern and I was going to go with matt colours to make it a bit easier again I think taking your time is key so might just have a go.
That said if you want to have a go first and I'll learn from your mistakes then I'm cool with that
Salvaged some timber from the allotment need to sand it all but will do for mock up!
Start of back storage for sleeping bags and bedding so the dogs don't sleep on it during transport:


Finger hole added to lift off unit:

Had some rubbish news with work over weekend so have the entire week to blast on with the van now so I plan to finish boarding out the sides this week, then I need to focus on the (eek headliner REALLY not looking forward to that job) and then wrap everything and do the floor
Start of back storage for sleeping bags and bedding so the dogs don't sleep on it during transport:
Finger hole added to lift off unit:
Had some rubbish news with work over weekend so have the entire week to blast on with the van now so I plan to finish boarding out the sides this week, then I need to focus on the (eek headliner REALLY not looking forward to that job) and then wrap everything and do the floor
Got some of the more fiddly things done today (friend came over so bit of a chat so progress a tad slower - that and the glove box caused me endless issues..)
Speaker holes done:

And fitted:

In both units. Next pig of a job was running in the cable as mentioned the glove box was a pain removed 3 screws then it seems the entire lower dash needs to be removed to run the cables in few hidden screws around the place and hidden clips - if anyone needs to know where I can take a photo and highlight


Cables in need to find an ISO adapter now I think for my new head unit.. joy!
Test fitted new floor as well then called it a day (rain started)

Speaker holes done:
And fitted:
In both units. Next pig of a job was running in the cable as mentioned the glove box was a pain removed 3 screws then it seems the entire lower dash needs to be removed to run the cables in few hidden screws around the place and hidden clips - if anyone needs to know where I can take a photo and highlight
Cables in need to find an ISO adapter now I think for my new head unit.. joy!
Test fitted new floor as well then called it a day (rain started)
Headliner
I'm stuck trying to figure out the best way to do this as there seems to be only one mounting point in the centre of the van id have expected to see some metal rails running form side to side every few inches.. anyone got some ideas?
I'm stuck trying to figure out the best way to do this as there seems to be only one mounting point in the centre of the van id have expected to see some metal rails running form side to side every few inches.. anyone got some ideas?
Steo M
New member
- Joined
- Nov 10, 2010
- Messages
- 170
- Points
- 32
What exactly are you using for a headliner, info is a bit sketchy or put up a pic of the inside of the roof?Headliner
I'm stuck trying to figure out the best way to do this as there seems to be only one mounting point in the centre of the van id have expected to see some metal rails running form side to side every few inches.. anyone got some ideas?
Clink on this link http://goo.gl/UitoLg, scroll halfway down, a full hard headliner can be bought or get one from a scrapped taxi.
Similar threads
- Replies
- 6
- Views
- 492