How to replace a rear exhaust rubber mounting
If you need to you can refer to the photos below.
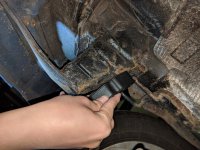
1) As you can see the original rubber mounting on the rear of the exhaust is worn through and this is why the exhaust is 'banging' at the back.
.JPG")
2) Another angle so that you can see where the exhaust has pulled through the rubber mounting. This shows how far the exhaust drops. It is in fact only held up by the centre rubber mounting and the back axle.
.JPG")
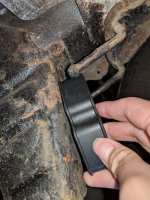
3) This is what a new exhaust rear rubber mounting looks like.
.JPG")
4) You'll probably need at least the jack, an axle stand a wheel brace and a screwwdriver. You may even want to use a stanley knife or similar.
.JPG")
5) ...And don't forget a few drops of washing-up liquid - essential !!
.JPG")
6) First, to make the job easier, jack up the car, place it on an axle stand and remove the jack (for later use).
7) Take the rear wheel off so that you can get a good view of the exhaust mounting.
8) Now, prise off the old rubber mounting. You may need to cut it off - you can use a stanley knife or even a junior hacksaw blade, (just don't cut anything else !).
.JPG")
9) The old and new mountings.
.JPG")
10) Dip your finger in the washing-up liquid and...
.JPG")
11) ...smother all the 'prongs' that the rubber mounting goes on.
.JPG")
12) Push the new rubber moungting onto the bottom two prongs or hooks that are welded to the exhaust - don't push them on too far just yet.
.JPG")
13) Using the jack, push the exhaust upwards to meet the top prongs that are welded to the car body.
.JPG")
14) Once lined up....
.JPG")
15) ...push the rubber mounting onto the top prongs...
.JPG")
16) ...the best way to do this, is to place a finger either side of the hole on one side of the rubber mounting, and push towards the prong...
.JPG")
17) ...until the 'stopper' is fully through, then repeat with the second hole on the other side.
.JPG")
18) Once you've got the rubber mounting seated on all four prongs, lower the jack from the exhaust, replace the wheel, lower the car off the axle stand and....
.JPG")
19) ... there, you've done it.
.JPG")
20) The new rubber mounting is in place.
.JPG")
Takes about 20 minutes with no rushing, no hassle.
If you need to you can refer to the photos below.
1) As you can see the original rubber mounting on the rear of the exhaust is worn through and this is why the exhaust is 'banging' at the back.
2) Another angle so that you can see where the exhaust has pulled through the rubber mounting. This shows how far the exhaust drops. It is in fact only held up by the centre rubber mounting and the back axle.
3) This is what a new exhaust rear rubber mounting looks like.
4) You'll probably need at least the jack, an axle stand a wheel brace and a screwwdriver. You may even want to use a stanley knife or similar.
5) ...And don't forget a few drops of washing-up liquid - essential !!
6) First, to make the job easier, jack up the car, place it on an axle stand and remove the jack (for later use).
7) Take the rear wheel off so that you can get a good view of the exhaust mounting.
8) Now, prise off the old rubber mounting. You may need to cut it off - you can use a stanley knife or even a junior hacksaw blade, (just don't cut anything else !).
9) The old and new mountings.
10) Dip your finger in the washing-up liquid and...
11) ...smother all the 'prongs' that the rubber mounting goes on.
12) Push the new rubber moungting onto the bottom two prongs or hooks that are welded to the exhaust - don't push them on too far just yet.
13) Using the jack, push the exhaust upwards to meet the top prongs that are welded to the car body.
14) Once lined up....
15) ...push the rubber mounting onto the top prongs...
16) ...the best way to do this, is to place a finger either side of the hole on one side of the rubber mounting, and push towards the prong...
17) ...until the 'stopper' is fully through, then repeat with the second hole on the other side.
18) Once you've got the rubber mounting seated on all four prongs, lower the jack from the exhaust, replace the wheel, lower the car off the axle stand and....
19) ... there, you've done it.
20) The new rubber mounting is in place.
Takes about 20 minutes with no rushing, no hassle.