

You are using an out of date browser. It may not display this or other websites correctly.
You should upgrade or use an alternative browser.
You should upgrade or use an alternative browser.
General Front lights.
- Thread starter onthejazz
- Start date
Currently reading:
General Front lights.
- Joined
- Apr 8, 2008
- Messages
- 16,742
- Points
- 3,186
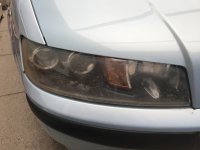
It looks like outside discolouring from that affect most older cars these days
The road grime sand blasting the top coat away allowimg uv damage to occour = milky lenses
Yours is very early stages
Id honestly consider a lens restore kit and ensure the lens is resealed to ensure it lasts a little longer
Please note that without a decent uv sealer itll happen over time again
Ive just had to quick rub my mk2b's recently to bring up the clarity abit again
Ziggy
[ame]https://youtu.be/YwbKZb3SJB4[/ame]
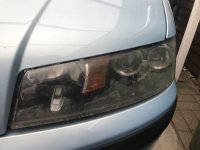
The plastic on the outside of my lights was degraded.
Tried the toothpaste method (baking soda), didn't work very well.
Then tried T-Cut (requires lots of elbow grease), that worked wonders, lights look brand new.
Tried the toothpaste method (baking soda), didn't work very well.
Then tried T-Cut (requires lots of elbow grease), that worked wonders, lights look brand new.
Last edited:
diyspanner
New member
- Joined
- Jan 6, 2015
- Messages
- 95
- Points
- 26
This thread has got me interested.
I had a go at the headlight plastics on my nephew's 2002 Punto recently with 3000 grade Wet n Dry recommended to me by the fella that does my MOTs.
The Wet n Dry didn't have much effect so will try the T-Cut as mentioned above.
I had a go at the headlight plastics on my nephew's 2002 Punto recently with 3000 grade Wet n Dry recommended to me by the fella that does my MOTs.
The Wet n Dry didn't have much effect so will try the T-Cut as mentioned above.
This thread has got me interested.
I had a go at the headlight plastics on my nephew's 2002 Punto recently with 3000 grade Wet n Dry recommended to me by the fella that does my MOTs.
The Wet n Dry didn't have much effect so will try the T-Cut as mentioned above.
Unless you have a polisher, you need to start with the courser wet and dry grades first to remove the biggest scratches and then finer to remove the scratches created by the course grade paper and so forth until they are polished. I spent many many hours doing mine by hand.
I also washed them out inside and with my tap water the water hardly left any marks once dry - made a bit of a difference i think. Probably get better results by adding some fine pieces of rubber to help get some of the harder to remove deposits off.
I notice my lights go thru a condensation cycle in some weather conditions. Just sufficient condensation over a long period of time to begin depositing stuff on the lens.
diyspanner
New member
- Joined
- Jan 6, 2015
- Messages
- 95
- Points
- 26
There's no scratches as such, the lenses seem smooth.
Just need to remove the fog effect.
I presume I can unbolt the headlight unit from the car and remove the plastic to have a clean out inside?
Just need to remove the fog effect.
I presume I can unbolt the headlight unit from the car and remove the plastic to have a clean out inside?
I have a couple of dead daddylonglegs in mine, very frustrating.
Gonna stick the hoover nozzle on there and see if I can get them.
Gonna stick the hoover nozzle on there and see if I can get them.
- Joined
- Sep 7, 2010
- Messages
- 2,388
- Points
- 468
I posted a guide on restoring the outside in the guides section.
Inside: I think you're stuck with this. The clear part seems to be welded/bonded to the housing and there's no way to separate them. You might try poking a "rag on a stick" in where the bulb goes and cleaning it that way.
One of the issues is you can get condensation in the inside, and this leaves dirt when it dries.
The clear part seems to be welded/bonded to the housing and there's no way to separate them.

Unfortunately they are not held together with a glue that melts like some of the other units you see being dismantled on utube.
The glue begins smoking on a hot plate rather than melting at a low temperature.
- Joined
- Apr 8, 2008
- Messages
- 16,742
- Points
- 3,186
I do believe tho the internals can he removed - maybe enough to get in and clean inside up abit
But tbh if ur going thay far - id fit decent 2nd hand units....
If the surface is really rough
T-cut is a fine abrasive
So wont work that well
Iirc i used 1000 first dry
2000 wet
3000 wet
Abarasive polish
Finish polish
And i got much better clarity
I just keeo em.topped up with a hand polish now
Ziggy
FiatPuntoMK2FL
New member
- Joined
- Apr 6, 2017
- Messages
- 3
- Points
- 2
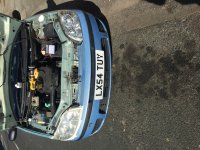
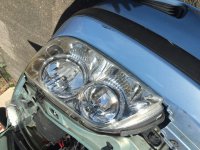
I had the same problem with my front lights after trying a few options such as toothpaste, t-cut and scratch remover it was an okay temp fix.
But I got tired of having to do this every week so invested in an autoglym headlight restoration kit from halfords and I tell you what they came up looking brand new all you need is the kit that cost me £20 and a cordless drill.
I would recommend it to anyone suffering the same problem!
But I got tired of having to do this every week so invested in an autoglym headlight restoration kit from halfords and I tell you what they came up looking brand new all you need is the kit that cost me £20 and a cordless drill.
I would recommend it to anyone suffering the same problem!
Attachments
- Joined
- Feb 10, 2017
- Messages
- 212
- Points
- 55
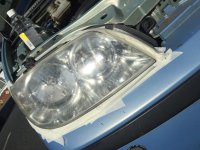
I normally use 2000 grade sand paper and then some cutting compound to finish off. When you wet sand them I use masking tape around the headlights, after a while the lights go a satin finish. Don't worry the cutting compound will polish this away. Either a foam drill pad or a wool polishing pad will work well. A cordless drill will see you right. To finish it off a good coating of wax/sealant will help keep the glass like finish.
Last edited:
- Joined
- Apr 8, 2008
- Messages
- 16,742
- Points
- 3,186
Ensure the product used is uv protectionI normally use 2000 grade sand paper and then some cutting compound to finish off. When you wet sand them I use masking tape around the headlights, after a while the lights go a satin finish. Don't worry the cutting compound will polish this away. Either a foam drill pad or a wool polishing pad will work well. A cordless drill will see you right. To finish it off a good coating of wax/sealant will help keep the glass like finish.
And that its reapplied regularly to help.prevent it happening again
Ziggy
diyspanner
New member
- Joined
- Jan 6, 2015
- Messages
- 95
- Points
- 26
I've done mine with wet n dry and polish.
Started with 400 grit, then 1000, then 1500, then 2000, then 3000.
That got the plastic very smooth and clouded.
Finished the job off with Autoglym polish that left them nice and clear.
Had to do the job in situ because all panel screws are rusted.
My advice is to use 3" polishing wheel when buffing with the polish. A 3" wheel better fits into the corner of light where it wraps in wing.