Replacing the Handbrake cable on a Grande Punto
Tools needed:
Trolley Jack
Axle Stands
13mm Socket
17mm Socket (for your wheels)
Flat head Screw Drivers
10mm Spanner
Pliers
T27 Torque Key
Handbrake Cable
Blocks of wood
Torch or work light
Locking Wheel Bolt Key
Torque Wrench
Copper Grease
WD40
Pliers or Molegrips
Cable Ties
Ratchet
If you have Alloy wheels you will need to dig around the Glove Box to find the box with the Wheel bolt key in.
With a Torque wrench or similar slacken off the wheel bolts whilst the car is on the ground.
Position your trolley jack under the back axle, I know you're supposed to jack it up on the Chassis, but this is easier for when you put the Axle stands underneath.
Place the Axle Stands as near to the outer edge of the Axle
Gently lower the jack, making adjustments if needed.
Release the handbrake
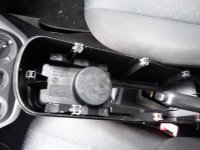
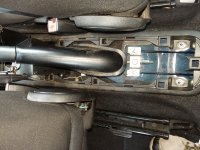
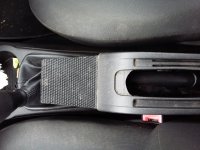
Now with 2 small flat head screwdrivers carefully remove the centre console, place a screwdriver either side at the back & gently apply pressure.
Try not to force it otherwise the clips will break.
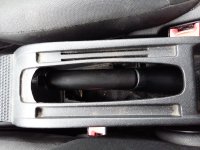
Once you have the centre console off you will see the 2 handbrake cables.
Release the nut enough to get the damaged cable out.
You can do it by hand or with the open end of a 10mm spanner.
Remove the rear wheel at the affected side & put to one side.
Now with your T27 Torque key, remove the 2 small bolts holding the drum on.
Once you have removed the drum place the Torque bolts back into the hub so you don't lose them.
Make a note of how the brakes are set up, I find it easier to take a photo so I know how the brakes are set up.
With your pliers remove the bottom spring & place somewhere safe.
Now with a screwdriver remove the brake shoe retaining clips & place somewhere safe.
Grab a cable tie & carefully tie it around the wheel cylinder to stop the piston from moving.
Now remove the Adjuster & then the top spring. It may be easier to remove the front shoe first to do this.
Now the fiddly part, removing the Handbrake Shoe from the cable.
Once you have the shoes off you can then start looking at taking the cable off.
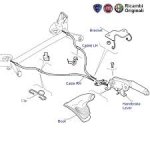
There are 4 points where the cable is sitting in.
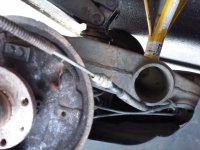
The first is a small metal clip, which stops the cable from coming out of the back plate.
The next is just above the brake pipe on the rear arm. You may need a Screwdriver to open this up enough to get the cable out.
For the next 2 you will need to slide underneath the car.
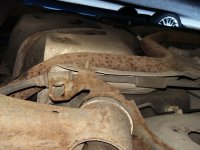
Slide in headfirst & look to your right, you will see a bracket attached to the rear arm.
With a Screwdriver pry the cable out of this.
If you're doing the Driver's side cable, the next bit is where you will need a ratchet & a 13mm socket.
Look towards the front of the car & you will see a small metal bracket, this needs a 13mm socket on & should come out easily.
Then give the cable a good yank & will come out from inside the car.
if the cable won't come out of the bracket then spray some WD40 on it & leave it for 24hrs.
This is where it gets fiddly & annoying.
Carefully feed the new cable into the car, you may need another person to help you.
Put the cable into the bridge inside the car & tighten the nut 1 turn, this will stop the cable falling out.
You will see 2 Rubber Bushes on the cable
Start aligning the cable
Try putting the cable into the point on the rear arm first, as this will make life easier later.
If you need to clamp it down, use a pair of molegrips.
Then put the cable into the point on the underside of the rear arm.
Now the annoying bit, trying to get the cable to go 90 degrees.
Start putting the small metal bracket back in & then you can put the cable into it.
Tighten the bracket up all the way & if the cable is not sitting flush, use a couple of cable ties.
Now time to refit the shoes.
As it's a new spring over the cable, it should be easy to slide back so you can hook the lever onto the cable.
Use a cable tie to hold the shoe.
Sit the adjuster onto of the hub
Put the top spring into the shoes & carefully move them over the hub, taking care not to bash the wheel cylinder.
Use a cable tie if needed to hod the front shoe on.
Refit the bottom spring.
Cut 1 cable tie & put the shoe retaining clip in & repeat for the other shoe.
Now carefully cut the cable tie off from the wheel cylinder.
Adjust the brakes on the adjuster
Remove the torque bolts & put the drum on.
Refit the torque bolts & get someone to gently rotate the drum.
Put your foot on the foot brake & make any adjustments you need before putting the wheel back on.
Adjust the handbrake from inside the car with the 10mm spanner.
Adjust until both brakes are even
Get someone to rotate the rear wheels & gently pull the handbrake lever up until neither road wheel moves.
Once happy refit the centre console, you will need to apply the handbrake as this makes it easier.
Ensure the wheel bolts are hand tight
Jack the car up & remove the Axle stands
Lower the car back down.
Torque the wheels up to 120NM (88LBS)
Test the car.
Pack your tools away & then it's job done.
Tools needed:
Trolley Jack
Axle Stands
13mm Socket
17mm Socket (for your wheels)
Flat head Screw Drivers
10mm Spanner
Pliers
T27 Torque Key
Handbrake Cable
Blocks of wood
Torch or work light
Locking Wheel Bolt Key
Torque Wrench
Copper Grease
WD40
Pliers or Molegrips
Cable Ties
Ratchet
REMOVAL
Apply the handbrake (providing a cable has not snapped)If you have Alloy wheels you will need to dig around the Glove Box to find the box with the Wheel bolt key in.
With a Torque wrench or similar slacken off the wheel bolts whilst the car is on the ground.
Position your trolley jack under the back axle, I know you're supposed to jack it up on the Chassis, but this is easier for when you put the Axle stands underneath.
Place the Axle Stands as near to the outer edge of the Axle
Gently lower the jack, making adjustments if needed.
Release the handbrake
Now with 2 small flat head screwdrivers carefully remove the centre console, place a screwdriver either side at the back & gently apply pressure.
Try not to force it otherwise the clips will break.
Once you have the centre console off you will see the 2 handbrake cables.
Release the nut enough to get the damaged cable out.
You can do it by hand or with the open end of a 10mm spanner.
Remove the rear wheel at the affected side & put to one side.
Now with your T27 Torque key, remove the 2 small bolts holding the drum on.
Once you have removed the drum place the Torque bolts back into the hub so you don't lose them.
Make a note of how the brakes are set up, I find it easier to take a photo so I know how the brakes are set up.
With your pliers remove the bottom spring & place somewhere safe.
Now with a screwdriver remove the brake shoe retaining clips & place somewhere safe.
Grab a cable tie & carefully tie it around the wheel cylinder to stop the piston from moving.
Now remove the Adjuster & then the top spring. It may be easier to remove the front shoe first to do this.
Now the fiddly part, removing the Handbrake Shoe from the cable.
Once you have the shoes off you can then start looking at taking the cable off.
There are 4 points where the cable is sitting in.
The first is a small metal clip, which stops the cable from coming out of the back plate.
The next is just above the brake pipe on the rear arm. You may need a Screwdriver to open this up enough to get the cable out.
For the next 2 you will need to slide underneath the car.
Slide in headfirst & look to your right, you will see a bracket attached to the rear arm.
With a Screwdriver pry the cable out of this.
If you're doing the Driver's side cable, the next bit is where you will need a ratchet & a 13mm socket.
Look towards the front of the car & you will see a small metal bracket, this needs a 13mm socket on & should come out easily.
Then give the cable a good yank & will come out from inside the car.
if the cable won't come out of the bracket then spray some WD40 on it & leave it for 24hrs.
REFITTING
Carefully cut the cable on the new cable.This is where it gets fiddly & annoying.
Carefully feed the new cable into the car, you may need another person to help you.
Put the cable into the bridge inside the car & tighten the nut 1 turn, this will stop the cable falling out.
You will see 2 Rubber Bushes on the cable
Start aligning the cable
Try putting the cable into the point on the rear arm first, as this will make life easier later.
If you need to clamp it down, use a pair of molegrips.
Then put the cable into the point on the underside of the rear arm.
Now the annoying bit, trying to get the cable to go 90 degrees.
Start putting the small metal bracket back in & then you can put the cable into it.
Tighten the bracket up all the way & if the cable is not sitting flush, use a couple of cable ties.
Now time to refit the shoes.
As it's a new spring over the cable, it should be easy to slide back so you can hook the lever onto the cable.
Use a cable tie to hold the shoe.
Sit the adjuster onto of the hub
Put the top spring into the shoes & carefully move them over the hub, taking care not to bash the wheel cylinder.
Use a cable tie if needed to hod the front shoe on.
Refit the bottom spring.
Cut 1 cable tie & put the shoe retaining clip in & repeat for the other shoe.
Now carefully cut the cable tie off from the wheel cylinder.
Adjust the brakes on the adjuster
Remove the torque bolts & put the drum on.
Refit the torque bolts & get someone to gently rotate the drum.
Put your foot on the foot brake & make any adjustments you need before putting the wheel back on.
Adjust the handbrake from inside the car with the 10mm spanner.
Adjust until both brakes are even
Get someone to rotate the rear wheels & gently pull the handbrake lever up until neither road wheel moves.
Once happy refit the centre console, you will need to apply the handbrake as this makes it easier.
Ensure the wheel bolts are hand tight
Jack the car up & remove the Axle stands
Lower the car back down.
Torque the wheels up to 120NM (88LBS)
Test the car.
Pack your tools away & then it's job done.
")