

Here's what you need to do the job with:
Jack + Axle Stands or Ramps or car lift or vehicle inspection pit.
Wheel Chocks.
WD-40 or other penetrative fluid.
Socket set.
Spanner set.
small spanners or sockets (7mm).
Wire Cutters.
Screw driver + and - (panda screw driver).
Wire brush.
Fuel tank Sealer.
Brush on metal paint.
Optional tools:
Welder.
Welding mask
Soft hammer
Underseal
Extension cord
------------------------------------------------------------------------------------------------
**Safety Warning**
We are dealing with Highly Combustible Petrol Liquid and Petrol Vapors. Take special care around the fuel tank at all times, Avoid the use of power tools until the fuel has been safely removed.
Never smoke around any part of the fuel system of a vehicle.
Safety first, wear eye and hand protection.
------------------------------------------------------------------------------------------------
Here's what you can do to fix the fuel tank:
...but before you do, give all the bolts that hold the tank on a good spray with WD-40. if the tank is rusted, it is likey that the bolts will be rusted too. so do what you can to free them up! theres 3x 13mm main bolts, 2 at the front, one at the back and one 10mm bolt that holds the hand brake cable and brake line in place near the centre of the car. give all 4 a good spraying! do it a few times over a few days! also try to wire brush the threads as best as you can. the more clean the threads are, the less likely you will shear any bolts or captive studs off!
Ok.. done that?
Right, onto the actual tank removal:
Jack the car up and secure it with axle stands. (Or use another safe method of getting under the car like ramps, a car lift or a pit. Never trust a hydraulic jack!) stop the vehicle rolling using wheel chocks.
Make sure the fuel level in the tank is as low as possible,
Take the filler pipe off the tank (*read notes) keep the rubber seal safe,
Unbolt the hand brake cable support from the tank so it can move free from it.
Undo all the bolts holding the tank to the car (**read notes), support the tank don't let it fall,
Remove the little breather pipe from the top of the tank,
Remove the two fuel lines and all the 3 wires going to the fuel level indicator,
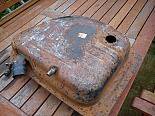
Take the tank off and drain out all the remaining fuel,
(!Optional.. do this if you are going to weld the tank in any way!) fill the tank up with water and drain out (do this a few times)
Take out the fuel level indicator give it a spray with WD-40 to remove any water off it if you chose to flush the tank out (don't loose the little nuts, earthing spade terminal or rubber washer!) ,
Leave it for a while to "dry out" (preferably with a breeze blowing through it so any remaining petrol or if you flushed it with water can evaporate),
(Optional if welding the tank) ...weld the tank where it needs it.
Run a wire brush around the outside of the tank to remove any rust.
Buy a tin of Fuel Tank Sealant, (>Something like this<)
Using gaffa tape, tape up the fuel sender hole and top small breather pipe or plug them with a bung (do not use the fuel sender to plug the hole, the wet tank sealant will kill it!),
Fill the tank up with the fuel tank sealant (all of it) and using gaffa tape, tape up the tank filler pipe.
Now rotate your tank in all directions so the tank sealant "coats" everywhere in the tank,
After you think it is done, remove the tape from the fuel filler and pour the remaining tank sealant back in its tin and replace the lid.
Wait a day for the tank sealant to dry.
(Optional) give the inside of the tank another coating with the tank sealant (do this as may times as you want, i did it 3 times. wait a day for it to dry after each "coat")
Remove all tape from the tank.
Paint the tank using a brush on metal paint as it goes on thicker than spray paint (go nuts.. paint it yellow.. or red! or be boring and paint it black)
(Optional) Why not Underseal under the tank, you have it off.. why not underseal just that section. saves you having to take it off in the future
Replace fuel level indicator, not forgetting the rubber sealing washer or earthing spade terminal.
Bolt back into place under the car making sure you:
....1, fitted the fuel sender correctly with its little earthing spade terminal.
....2, fitted the fuel lines correctly securing them with small jubilee clips.
....3, fitted the breather pipe correctly securing it with a jubilee clip.
....4, fitted the wiring in the correct order.
Refit the filler pipe rubber seal and filler pipe. make sure to press it on a far as you can. if it sticks out to far the rear wheel can rub on this. also it would cause leaks if not on far enough. use some WD-40 to help slip it all together.
Test it with a bit of fuel, to see if you have a good seal around the filer pipe.
If all is good, safely remove the axle stands and lower the car down.
End.
------------------------------------------------------------------------------------------------
Notes:
*on the bolts that hold the fuel tank in, make sure that you clean up / wire brush any thread that the bolt has to travel on. if the thread is rusted or caked up in muck the nut will get it in its threads and be really hard to undo.. possibly shearing off the stud. (you really don't want that to happen!)
**The filler pipe will have a jubilee clip holding it to the tank, my guess is that this will be rusted tight. best thing to do is cut or snap this off and replace it with a new stainless steel one. make sure not to damage the filler pipe in any way. they are hard to find if you need to replace it.
best to replace all pipe fixing clips with new ones.. even on the smaller pipes.
This same method can be used for the later fuel injected pandas. it just has more pipes to deal with.
------------------------------------------------------------------------------------------------
That concludes the walk through of how to repair the metal fuel tank on a early panda, 4x4 or a marbella.
Please comment on this, and feel free to tell me about any errors.
Thanks all,
John Dragon Man.
Jack + Axle Stands or Ramps or car lift or vehicle inspection pit.
Wheel Chocks.
WD-40 or other penetrative fluid.
Socket set.
Spanner set.
small spanners or sockets (7mm).
Wire Cutters.
Screw driver + and - (panda screw driver).
Wire brush.
Fuel tank Sealer.
Brush on metal paint.
Optional tools:
Welder.
Welding mask
Soft hammer
Underseal
Extension cord
------------------------------------------------------------------------------------------------
**Safety Warning**
We are dealing with Highly Combustible Petrol Liquid and Petrol Vapors. Take special care around the fuel tank at all times, Avoid the use of power tools until the fuel has been safely removed.
Never smoke around any part of the fuel system of a vehicle.
Safety first, wear eye and hand protection.
------------------------------------------------------------------------------------------------
Here's what you can do to fix the fuel tank:
...but before you do, give all the bolts that hold the tank on a good spray with WD-40. if the tank is rusted, it is likey that the bolts will be rusted too. so do what you can to free them up! theres 3x 13mm main bolts, 2 at the front, one at the back and one 10mm bolt that holds the hand brake cable and brake line in place near the centre of the car. give all 4 a good spraying! do it a few times over a few days! also try to wire brush the threads as best as you can. the more clean the threads are, the less likely you will shear any bolts or captive studs off!
Ok.. done that?
Right, onto the actual tank removal:
Jack the car up and secure it with axle stands. (Or use another safe method of getting under the car like ramps, a car lift or a pit. Never trust a hydraulic jack!) stop the vehicle rolling using wheel chocks.
Make sure the fuel level in the tank is as low as possible,
Take the filler pipe off the tank (*read notes) keep the rubber seal safe,
Unbolt the hand brake cable support from the tank so it can move free from it.
Undo all the bolts holding the tank to the car (**read notes), support the tank don't let it fall,
Remove the little breather pipe from the top of the tank,
Remove the two fuel lines and all the 3 wires going to the fuel level indicator,
Take the tank off and drain out all the remaining fuel,
(!Optional.. do this if you are going to weld the tank in any way!) fill the tank up with water and drain out (do this a few times)
Take out the fuel level indicator give it a spray with WD-40 to remove any water off it if you chose to flush the tank out (don't loose the little nuts, earthing spade terminal or rubber washer!) ,
Leave it for a while to "dry out" (preferably with a breeze blowing through it so any remaining petrol or if you flushed it with water can evaporate),
(Optional if welding the tank) ...weld the tank where it needs it.
Run a wire brush around the outside of the tank to remove any rust.
Buy a tin of Fuel Tank Sealant, (>Something like this<)
Using gaffa tape, tape up the fuel sender hole and top small breather pipe or plug them with a bung (do not use the fuel sender to plug the hole, the wet tank sealant will kill it!),
Fill the tank up with the fuel tank sealant (all of it) and using gaffa tape, tape up the tank filler pipe.
Now rotate your tank in all directions so the tank sealant "coats" everywhere in the tank,
After you think it is done, remove the tape from the fuel filler and pour the remaining tank sealant back in its tin and replace the lid.
Wait a day for the tank sealant to dry.
(Optional) give the inside of the tank another coating with the tank sealant (do this as may times as you want, i did it 3 times. wait a day for it to dry after each "coat")
Remove all tape from the tank.
Paint the tank using a brush on metal paint as it goes on thicker than spray paint (go nuts.. paint it yellow.. or red! or be boring and paint it black)
(Optional) Why not Underseal under the tank, you have it off.. why not underseal just that section. saves you having to take it off in the future
Replace fuel level indicator, not forgetting the rubber sealing washer or earthing spade terminal.
Bolt back into place under the car making sure you:
....1, fitted the fuel sender correctly with its little earthing spade terminal.
....2, fitted the fuel lines correctly securing them with small jubilee clips.
....3, fitted the breather pipe correctly securing it with a jubilee clip.
....4, fitted the wiring in the correct order.
Refit the filler pipe rubber seal and filler pipe. make sure to press it on a far as you can. if it sticks out to far the rear wheel can rub on this. also it would cause leaks if not on far enough. use some WD-40 to help slip it all together.
Test it with a bit of fuel, to see if you have a good seal around the filer pipe.
If all is good, safely remove the axle stands and lower the car down.
End.
------------------------------------------------------------------------------------------------
Notes:
*on the bolts that hold the fuel tank in, make sure that you clean up / wire brush any thread that the bolt has to travel on. if the thread is rusted or caked up in muck the nut will get it in its threads and be really hard to undo.. possibly shearing off the stud. (you really don't want that to happen!)
**The filler pipe will have a jubilee clip holding it to the tank, my guess is that this will be rusted tight. best thing to do is cut or snap this off and replace it with a new stainless steel one. make sure not to damage the filler pipe in any way. they are hard to find if you need to replace it.
best to replace all pipe fixing clips with new ones.. even on the smaller pipes.
This same method can be used for the later fuel injected pandas. it just has more pipes to deal with.
------------------------------------------------------------------------------------------------
That concludes the walk through of how to repair the metal fuel tank on a early panda, 4x4 or a marbella.
Please comment on this, and feel free to tell me about any errors.
Thanks all,
John Dragon Man.
