DoIDon'tI
Member
- Joined
- Feb 17, 2008
- Messages
- 470
- Points
- 81
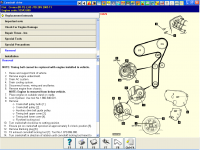
Elearn says you have to take the engine and gearbox out of a 2.4 Croma to change the cambelt - I didn't want to so here's the story of what I did. Make yourself comfortable, this will take some time 
1. Disconnect the battery, jack the front of the car up and remove both front wheels.
2. Remove the engine ECU, airflow meter, air filter lid and air filter housing.
3. Remove the engine undertray and small splash guard in the OS wheelarch.
4. Now the fun begins...the first problem to be faced is the aux belt tensioner. You're meant to turn the hexagon part of the tensioner to release the belt tension but there simply isn't access. Instead, use an extension bar to press down from above the engine onto the top of the tensioner spring cylinder and undo the top cylinder retaining bolt. Once the bolt is out, the tension on the aux belt is released and the belt can be removed. I changed the tensioner, it's held in by a recessed 6mm allen bolt - there isn't room to get conventional tools in there so I ended up welding a 19mm nut round an old 6mm socket and cutting down an allen bar to fit.
5. Remove the six bolts holding the crankshaft pulley on, and remove the pulley. It isn't hard to remove if you gently put a screwdriver behind it, but be careful because it's very heavy..!
6. At the top of the engine, remove the three bolts holding the top cam cover on, then remove the cover - it will come off with a bit of persuasion.
7. Put a trolley jack and big block of wood under the sump and gently take the weight of the engine.
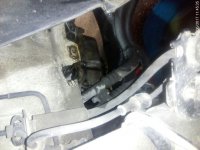
8. Undo the four bolts and one nut on the OS engine mounting and remove the mounting. Be gentle with it and keep it the right way up as it's fluid-filled.
9. From under the car, remove the three bolts attaching the front lower engine mounting to the engine.
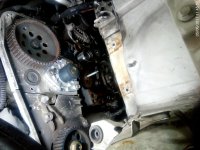
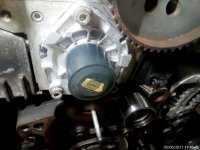
10. On the end of the engine you will see a cast-iron plate covering the cambelt, held in by five bolts. The top three will come out by lifting the engine slightly with the jack, however the bottom two are too long to come out - this is why officially it's an engine-out job.
11. I undid the bolts then cut them with a hacksaw, this allowed me to remove the plate. My father-in-law is a qualified fabricator and welded the bolts back together, he then shortened the 8mm one by 3mm and the 10mm one by 6mm - both bolts go into a cast iron fitting and are not as strength critical as the top three bolts. We cut a channel from the outside edge of the plate to the two lower bolt holes to help with refitting them later.
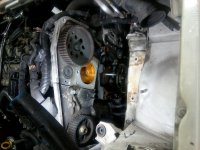
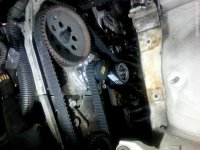
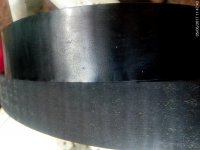
12. The cambelt and associated parts are now accessible, mark the camshaft sprocket and crankshaft sprocket with a paint pen (with corresponding marks on the housings) to preserve the timing relationship. Remove the nut holding the cambelt tensioner, the cambelt can then be removed. At this point you should also replace the water pump and both cambelt tensioners for peace of mind.
13. Fit the new cambelt and tensioners etc, make sure the timing marks you made earlier still line up. The cambelt is tensioned by moving the baseplate of the moving tensioner until the pointer is aligned with the centre of the hole in the baseplate, then tighten the centre nut. Due to access this is a two person job. Turn the crankshaft through two revolutions and recheck the timing marks and belt tension.
14. When refitting the plate on the end of the engine you will also need assistance - put the plate loosely in position, held by the top centre bolt. Get your assistant to put a long lever between the chassis leg and the plate and lever the engine as far across as it will go. Put the lower bolts at an angle in the channel you cut earlier, as the engine moves across you should be able to get them located in the holes and back in.
15. And simply refit...
16. The only point of note during the refit is to make sure you fit the lower front engine mounting before fitting the OS one. Oh, and have some plasters standing by for your knuckles
17. The biggest worry for me was whether it could be done - with the modifications I mentioned it can be, but it's still not an easy job. At least I'll know what to do next time
1. Disconnect the battery, jack the front of the car up and remove both front wheels.
2. Remove the engine ECU, airflow meter, air filter lid and air filter housing.
3. Remove the engine undertray and small splash guard in the OS wheelarch.
4. Now the fun begins...the first problem to be faced is the aux belt tensioner. You're meant to turn the hexagon part of the tensioner to release the belt tension but there simply isn't access. Instead, use an extension bar to press down from above the engine onto the top of the tensioner spring cylinder and undo the top cylinder retaining bolt. Once the bolt is out, the tension on the aux belt is released and the belt can be removed. I changed the tensioner, it's held in by a recessed 6mm allen bolt - there isn't room to get conventional tools in there so I ended up welding a 19mm nut round an old 6mm socket and cutting down an allen bar to fit.
5. Remove the six bolts holding the crankshaft pulley on, and remove the pulley. It isn't hard to remove if you gently put a screwdriver behind it, but be careful because it's very heavy..!
6. At the top of the engine, remove the three bolts holding the top cam cover on, then remove the cover - it will come off with a bit of persuasion.
7. Put a trolley jack and big block of wood under the sump and gently take the weight of the engine.
8. Undo the four bolts and one nut on the OS engine mounting and remove the mounting. Be gentle with it and keep it the right way up as it's fluid-filled.
9. From under the car, remove the three bolts attaching the front lower engine mounting to the engine.
10. On the end of the engine you will see a cast-iron plate covering the cambelt, held in by five bolts. The top three will come out by lifting the engine slightly with the jack, however the bottom two are too long to come out - this is why officially it's an engine-out job.
11. I undid the bolts then cut them with a hacksaw, this allowed me to remove the plate. My father-in-law is a qualified fabricator and welded the bolts back together, he then shortened the 8mm one by 3mm and the 10mm one by 6mm - both bolts go into a cast iron fitting and are not as strength critical as the top three bolts. We cut a channel from the outside edge of the plate to the two lower bolt holes to help with refitting them later.
12. The cambelt and associated parts are now accessible, mark the camshaft sprocket and crankshaft sprocket with a paint pen (with corresponding marks on the housings) to preserve the timing relationship. Remove the nut holding the cambelt tensioner, the cambelt can then be removed. At this point you should also replace the water pump and both cambelt tensioners for peace of mind.
13. Fit the new cambelt and tensioners etc, make sure the timing marks you made earlier still line up. The cambelt is tensioned by moving the baseplate of the moving tensioner until the pointer is aligned with the centre of the hole in the baseplate, then tighten the centre nut. Due to access this is a two person job. Turn the crankshaft through two revolutions and recheck the timing marks and belt tension.
14. When refitting the plate on the end of the engine you will also need assistance - put the plate loosely in position, held by the top centre bolt. Get your assistant to put a long lever between the chassis leg and the plate and lever the engine as far across as it will go. Put the lower bolts at an angle in the channel you cut earlier, as the engine moves across you should be able to get them located in the holes and back in.
15. And simply refit...
16. The only point of note during the refit is to make sure you fit the lower front engine mounting before fitting the OS one. Oh, and have some plasters standing by for your knuckles
17. The biggest worry for me was whether it could be done - with the modifications I mentioned it can be, but it's still not an easy job. At least I'll know what to do next time