

I'll do the best I can to explain as it may be of some help.
1. First thing to do is loosen off the hub nut before you lift the wheel off the ground because if you don't the only way you will get it off is by someone putting their foot on the brake.
2. While there is still plenty of weight on the car remove the lower ball joint nut. It's a 17mm.
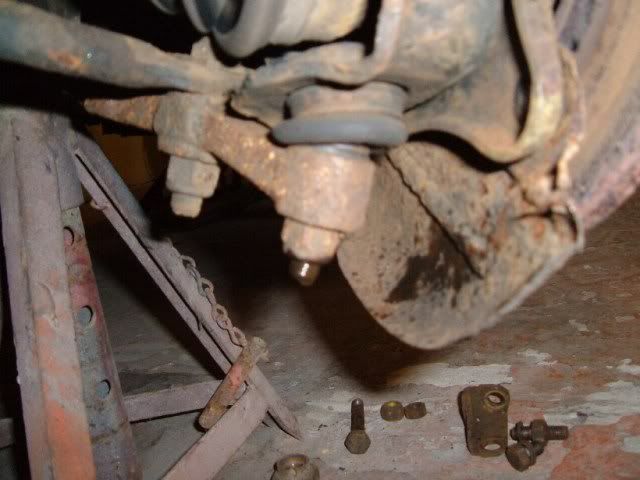
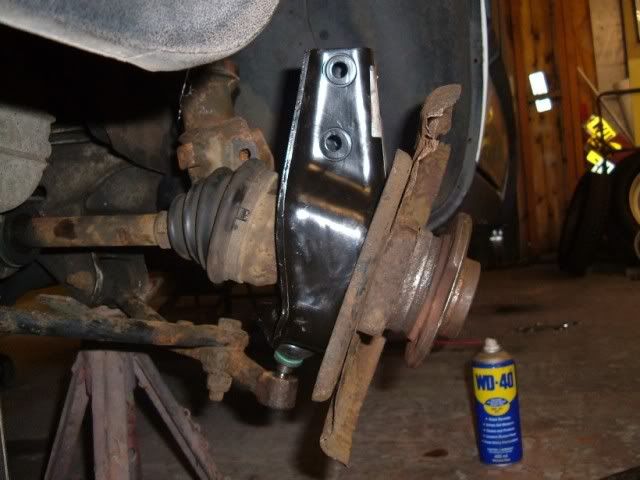
3. Next the brake caliper has to be removed. You can either split the caliper or take it all off as one. I'd take it off as one if your not replacing pads or disc.
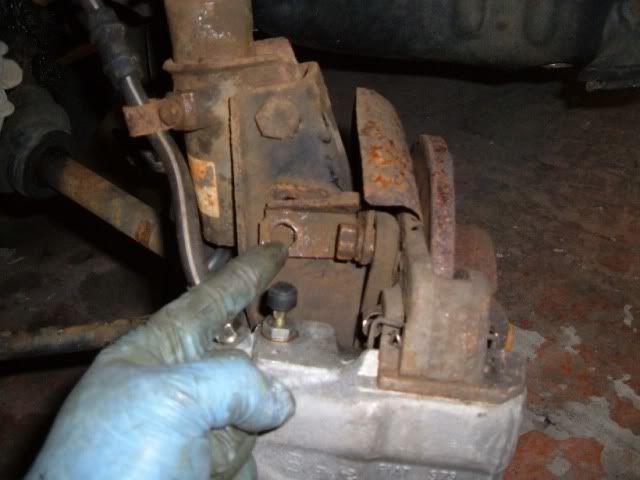
There is an L shaped bracket that hold the top nut of the caliper to the bottom nut/bolt of the strut. You need to remove the first nut on the caliper and then the nut on the strut mount to get the bracket off. These again are 17mm. (I'm pointing at the bracket in the photo).
Once the bracket is off you will be able to see that there is a double ended threaded bolt that has to be taken off to release the caliper. Again it's 17mm but it's a tight fit to get a socket into the groove so be careful not to damage the nut head by not getting the socket on far enough. Lose the bottom caliper bolt off before taking the top one completely off.
Then gently tap the caliper off if you have a slightly worn disc to get it over the end groove that's bound to be there by now.
4. Caliper off now take the hub nut off. Then it's only a matter of taking off the 12mm locating bolt and pulling the disc off, or again if it's been on a long time, tapping it off with a decent hammer.
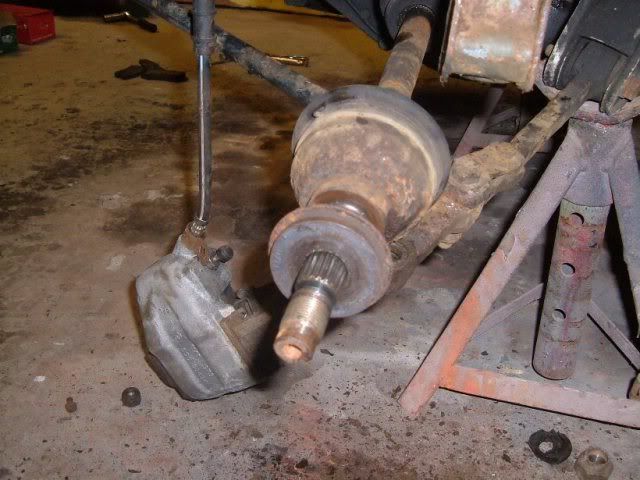
5. You'll now be left with the driveshaft pointing out at you.
Now you need to remove the top nut/bolt through the strut and pull the bottom one out. The strut will now be resting on the driveshaft rubber gater so be careful you don't damage it. You can push the strut to the rear slightly which takes the pressure off the rubber.
A decent prise bar would be handy if you have it as you now need to prise the ball joint out of it's socket. Sylvias was stuck fast so I had to use a taste of WD to help loosen it and as I wasn't using the ball joint again a few good thumps (well a lot actually) was needed to get the joint to pop out. As soon it does pop though the whole unit should come out in you lap.
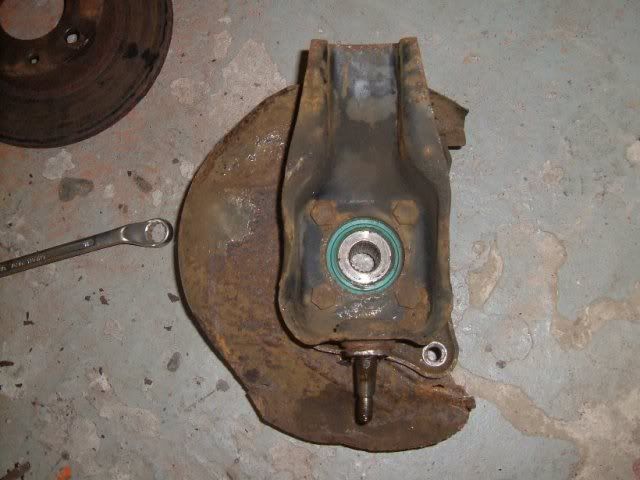
Now you'll be left with this.
6. You need to remove the hub now from the ball joint frame. It's held on with 4 13mm bolts. They are located pretty tightly to the sides of the frame so again be careful how you remove them so you don't damage the heads.
I've used the same photo as above so you can see the bolts.
Just remember which way the backing plate came off when bolting the hub to the new frame.
7. When you have the new frame all bolted up to the hub, push the hub onto the driveshaft and at the same time set the ball joint into the hole. Oh and be sure if you used WD to make sure you have dried off all traces of it as there is the possibility of the ball joint spinning when your trying to tighten up the new nut. I've done this before and it's a pain.
8. From there it's just a matter of reversing all the above to get everything else back on.
As always I'm sure there are other ways of doing the job but this is the easiest way I have found to do it. Hope this has been of some help.
1. First thing to do is loosen off the hub nut before you lift the wheel off the ground because if you don't the only way you will get it off is by someone putting their foot on the brake.
2. While there is still plenty of weight on the car remove the lower ball joint nut. It's a 17mm.
3. Next the brake caliper has to be removed. You can either split the caliper or take it all off as one. I'd take it off as one if your not replacing pads or disc.
There is an L shaped bracket that hold the top nut of the caliper to the bottom nut/bolt of the strut. You need to remove the first nut on the caliper and then the nut on the strut mount to get the bracket off. These again are 17mm. (I'm pointing at the bracket in the photo).
Once the bracket is off you will be able to see that there is a double ended threaded bolt that has to be taken off to release the caliper. Again it's 17mm but it's a tight fit to get a socket into the groove so be careful not to damage the nut head by not getting the socket on far enough. Lose the bottom caliper bolt off before taking the top one completely off.
Then gently tap the caliper off if you have a slightly worn disc to get it over the end groove that's bound to be there by now.
4. Caliper off now take the hub nut off. Then it's only a matter of taking off the 12mm locating bolt and pulling the disc off, or again if it's been on a long time, tapping it off with a decent hammer.
5. You'll now be left with the driveshaft pointing out at you.
Now you need to remove the top nut/bolt through the strut and pull the bottom one out. The strut will now be resting on the driveshaft rubber gater so be careful you don't damage it. You can push the strut to the rear slightly which takes the pressure off the rubber.
A decent prise bar would be handy if you have it as you now need to prise the ball joint out of it's socket. Sylvias was stuck fast so I had to use a taste of WD to help loosen it and as I wasn't using the ball joint again a few good thumps (well a lot actually) was needed to get the joint to pop out. As soon it does pop though the whole unit should come out in you lap.
Now you'll be left with this.
6. You need to remove the hub now from the ball joint frame. It's held on with 4 13mm bolts. They are located pretty tightly to the sides of the frame so again be careful how you remove them so you don't damage the heads.
I've used the same photo as above so you can see the bolts.
Just remember which way the backing plate came off when bolting the hub to the new frame.
7. When you have the new frame all bolted up to the hub, push the hub onto the driveshaft and at the same time set the ball joint into the hole. Oh and be sure if you used WD to make sure you have dried off all traces of it as there is the possibility of the ball joint spinning when your trying to tighten up the new nut. I've done this before and it's a pain.
8. From there it's just a matter of reversing all the above to get everything else back on.
As always I'm sure there are other ways of doing the job but this is the easiest way I have found to do it. Hope this has been of some help.