- Joined
- Jun 29, 2014
- Messages
- 56
- Points
- 75
You will need :
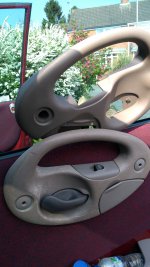
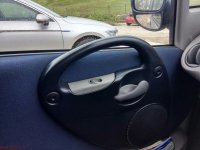
The gearstick surround
I split my top off carefully with the kitchen knives to avoid mucking up the gearstick glove, but if you invert this, it can be done without doing this. I found gluing the two parts together rather difficult using cyanoacrylate gel superglue.
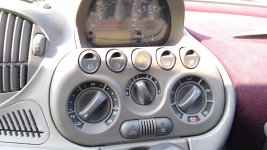
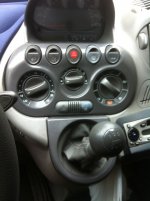
The heater control panel
Remove the button cluster and the heater sensor / aircon button unit noting the position of the two types of screws on both these bits.
I didn't dare try removing the white light distribution moulding on the back of the dash panel, the letters etc are impervious to methanol so it wasn't necessary. It is also the reason I couldn't immerse or wash the unit, once liquid gets into this part, it will never come out again, and may well cause lights to fail and/or get dirt and plastic/paint residue on the optical surfaces reducing or preventing the backlit effect. If someone knows how to remove this I will be very interested to know.
Don't try and do the knobs unless you are really desperate and the buttons are nearly impossible although easy to remove - the thin "soft touch" finish on the buttons needs to be removed with lots of acetone (the meths doesn't work) and then polished with a silicone free fine abrasive to get a reasonable finish. This takes forever, so I have only done two so far!
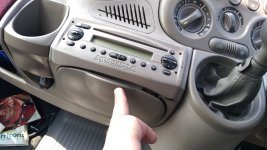
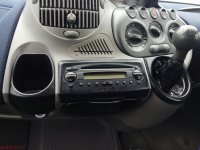
The radio control panel housing
Remove it from the front of the radio and handle gently or you will snap off the little and large plastic lugs on the back! Mine came down to a pleasant black finish, but my wife's is much older and the black finish was worn off in places down to a grey colour base plastic!!
2000 pairs of surgical gloves
4 copies of the Sunday papers
A hot sunny day (it softens the gunge and you must do this outside!!!!!)
2 old fashioned rounded end knives (see Granny's kitchen drawer)
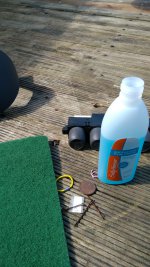
A litre of lamp grade methanol, preferably without colourant (don't use acetone, it's too aggressive and leaves streaks)
10 wooden ice lolly sticks or equivalents
4 old toothbrushes
a small bladed screwdriver
Old towelling cut into smallish squares (you probably need about 20)
A roll of kitchen paper
A handy rubbish sack next to where you are sitting
Old clothes
About 2-4 hours free time
Lotsa patience
A loving, caring and supportive family (tea, more rags etc)
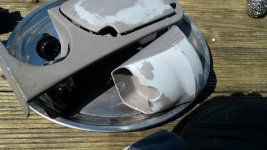
When the plastic is warm, gently scrape off the surface gunge using the lolly stick/rounded fine bladed kitchen knives/small screwdrivers wiping the residue on a strip of meths soaked towelling on a firm base (not easy - this stuff is sticky!!). Go easy, or you will gouge the surface.
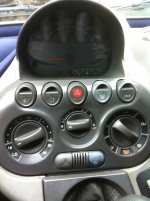
Use ample quantities of meths on the towelling to get down to the first undercoat (probably light grey), the towelling will wash off the residual gunge, which is mega-sticky. As the meth evaporates, the relatively dry and not-so-sticky undercoat can be scraped gently and then wiped/rubbed/scrubbed off on the meths soaked towelling leaving a pleasant, relatively dark not - too - shiny plastic finish (see photo).
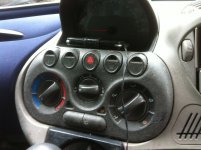
The little slots and the edges of the heater/fan bits require a delicate hand and a fine screwdriver with the toothbrush and copious meths to get all the crap off.
A final wipe down with warm soapy water and a final wipe down with warm clean water and towel dry.
Wait a day or so to dry off before refitting
The gearstick surround
I split my top off carefully with the kitchen knives to avoid mucking up the gearstick glove, but if you invert this, it can be done without doing this. I found gluing the two parts together rather difficult using cyanoacrylate gel superglue.
The heater control panel
Remove the button cluster and the heater sensor / aircon button unit noting the position of the two types of screws on both these bits.
I didn't dare try removing the white light distribution moulding on the back of the dash panel, the letters etc are impervious to methanol so it wasn't necessary. It is also the reason I couldn't immerse or wash the unit, once liquid gets into this part, it will never come out again, and may well cause lights to fail and/or get dirt and plastic/paint residue on the optical surfaces reducing or preventing the backlit effect. If someone knows how to remove this I will be very interested to know.
Don't try and do the knobs unless you are really desperate and the buttons are nearly impossible although easy to remove - the thin "soft touch" finish on the buttons needs to be removed with lots of acetone (the meths doesn't work) and then polished with a silicone free fine abrasive to get a reasonable finish. This takes forever, so I have only done two so far!
The radio control panel housing
Remove it from the front of the radio and handle gently or you will snap off the little and large plastic lugs on the back! Mine came down to a pleasant black finish, but my wife's is much older and the black finish was worn off in places down to a grey colour base plastic!!
2000 pairs of surgical gloves
4 copies of the Sunday papers
A hot sunny day (it softens the gunge and you must do this outside!!!!!)
2 old fashioned rounded end knives (see Granny's kitchen drawer)
A litre of lamp grade methanol, preferably without colourant (don't use acetone, it's too aggressive and leaves streaks)
10 wooden ice lolly sticks or equivalents
4 old toothbrushes
a small bladed screwdriver
Old towelling cut into smallish squares (you probably need about 20)
A roll of kitchen paper
A handy rubbish sack next to where you are sitting
Old clothes
About 2-4 hours free time
Lotsa patience
A loving, caring and supportive family (tea, more rags etc)
When the plastic is warm, gently scrape off the surface gunge using the lolly stick/rounded fine bladed kitchen knives/small screwdrivers wiping the residue on a strip of meths soaked towelling on a firm base (not easy - this stuff is sticky!!). Go easy, or you will gouge the surface.
Use ample quantities of meths on the towelling to get down to the first undercoat (probably light grey), the towelling will wash off the residual gunge, which is mega-sticky. As the meth evaporates, the relatively dry and not-so-sticky undercoat can be scraped gently and then wiped/rubbed/scrubbed off on the meths soaked towelling leaving a pleasant, relatively dark not - too - shiny plastic finish (see photo).
The little slots and the edges of the heater/fan bits require a delicate hand and a fine screwdriver with the toothbrush and copious meths to get all the crap off.
A final wipe down with warm soapy water and a final wipe down with warm clean water and towel dry.
Wait a day or so to dry off before refitting
Attachments
Last edited: