I had 4th gear syndrome in my old multi, swarf collected in place that obstructed gear rod, remove swarf, great fix, just take off end casing, easy with gbox in car. Some people have had new gearboxes...


You are using an out of date browser. It may not display this or other websites correctly.
You should upgrade or use an alternative browser.
You should upgrade or use an alternative browser.
Technical Multipla JTD 1.9 Clutch Replacement (in progress...)
- Thread starter MarkX
- Start date
Currently reading:
Technical Multipla JTD 1.9 Clutch Replacement (in progress...)
There's a known issue with crud & swarf getting stuck in and around the end casing on these gearboxes. Sometimes, the bits get in the way of the selector rod movement needed to get 4th gear. The end result is that you can't get into 4th. The box was originally designed as a 4 speed; 5th was a later addition and is housed in the 'cap' on the NS end of the gearbox. This is where the sh*t collects, so removing it and cleaning it out (and the parts exposed when you remove it) usually cures the 4th gear selection problem.
Thanks for clearly explaining that. Will give it a go if I get time this weekend.
I'm surprised just how much wear there is on the outside of the top bush. Has that made the hole in the bellhousing go ovoid?
Ovoid - not that I can tell, however I tried test fitting the clutch fork assembly in the bellhousing this afternoon - the fork bottom bearing/bush is nice and tight in its bellhousing hole suggesting no/little wear, but the fork top bearing/bush is loose in its bellhousing hole suggesting some wear.
Also, going back a few posts - the 'hole' through the middle of all the pressure plate fingers on the outgoing clutch looks WAY bigger than that on the new LUK item, and the wear pattern on the Valeo looks severe. Have the fingers been completely worn through and fallen off?
Just checked the Valeo clutch cover, and the answer seems to be NO. Two reasons: all the ends of the clutch fingers are clean square cut, and in a perfect circle, obviously unchanged from when they were manufactured, and I found no broken pieces of metal looking like finger ends in the bellhousing when I cleaned it out.
Last edited:
Progress Today...
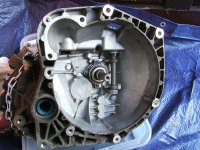
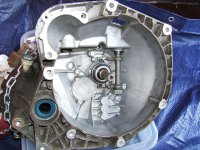
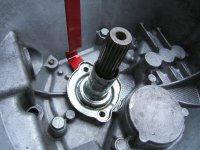
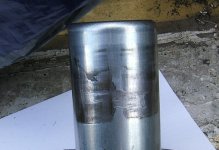
Cleaned out the inside of the bellhousing: I spent a few hours Today cleaning the crud out of the bellhousing insides. White spirit, J-clothes, Wilkos "cheerio germs" wipes, kitchen roll and cut up pound shop scouring pads/sponges to get into all the nooks and crannies. Now nice and shiny (see pics).
Test fitted the clutch fork and release bearing assembly: After cleaning the bellhousing I couldn't resist installing the clutch fork components - bearings/bushes, clutch fork, clutch lever and release bearing - to test it all working. I moved the clutch lever back and forth and the release bearing was moved nicely up and down the gearbox input shaft by the clutch fork (see pic).
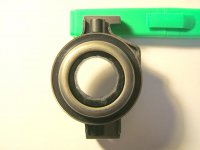
One observation: the inside hole in the LUK release bearing is not concentric with the inner or outer metal rings of the release bearing. Is this deliberate or a manufacturing error? The centre of the hole/plastic ring is 1-2mm North of the centre of the bearing inner or outer metal ring (see pic).
Mark
Cleaned out the inside of the bellhousing: I spent a few hours Today cleaning the crud out of the bellhousing insides. White spirit, J-clothes, Wilkos "cheerio germs" wipes, kitchen roll and cut up pound shop scouring pads/sponges to get into all the nooks and crannies. Now nice and shiny (see pics).
Test fitted the clutch fork and release bearing assembly: After cleaning the bellhousing I couldn't resist installing the clutch fork components - bearings/bushes, clutch fork, clutch lever and release bearing - to test it all working. I moved the clutch lever back and forth and the release bearing was moved nicely up and down the gearbox input shaft by the clutch fork (see pic).
One observation: the inside hole in the LUK release bearing is not concentric with the inner or outer metal rings of the release bearing. Is this deliberate or a manufacturing error? The centre of the hole/plastic ring is 1-2mm North of the centre of the bearing inner or outer metal ring (see pic).
Mark
Attachments
Last edited:
Hello Folks,
Progress over the last 2 days...
- Cleaned outside of bellhousing/gearbox
- Cleaned inside gearbox end cover
- Clutch fork
Cleaned outside of bellhousing/gearbox: I spent yesterday cleaning the crud off the outside of the gearbox. Now nice and shiny, a lot of elbow grease required.
Cleaned inside gearbox end cover: As suggested by other Forum-ers, I removed the gearbox end cover - 5 x 13mm M8 bolts of varying lengths, and 1 x 10mm M8 bolt - and cleaned inside. The end cover - which came off easily with a little prizing - was stuck to the gearbox body with a very hard, bright green sealant which I carefully scraped off with a Stanley knife blade. The insides didn't look too bad, no discernable swarf, but there was a thin black layer of muck? over everything which I wiped off. I resealed the cover with RTV and a little thread lock on the bolts.
Clutch fork: I have decided that I'm going to fit a new clutch fork, which will mean that everything inside the clutch bellhousing - rear crankshaft oil seal, flywheel, flywheel bolts, clutch kit, fork, fork bushes and input shaft bearing - will be new for old (apart from the clutch cover bolts which I am legitimately re-using). It's an £80 hit, but I'd hate to go through all this work only for the only old part inside - the clutch fork - to fail or cause problems. I can't order the fork until business starts again tomorrow, ETA Wednesday (I hope). Car back together/on its feet/wheels! by close of play Thursday, touch wood.
Just for a laugh Today I got a valuation for my '01 reg Multipla on a certain car valuation website: £225! How insulting! It wouldn't even buy the flywheel for it from a partstealer...
Mark
Last edited:
Hello,
Latest update...
- Clutch fork
- Gearbox input shaft sleeve
- Release bearing
Clutch fork: The new clutch fork has arrived. I tried test fitting the clutch fork assembly, and the fork fits snug and tight in the fork bearings/bushes. I could have started putting everything back together Yesterday, however...
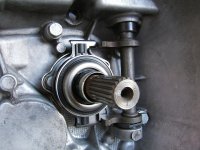
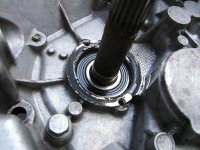
Gearbox input shaft sleeve: ...when I removed the gearbox input shaft sleeve from the bellhousing, I noticed that it is quite worn, with a distinct hollow worn into the sleeve at one point (see pics). I tried sliding the release bearing up and down the sleeve and it sticks when it hits the hollow. As a replacement is only £12 from Fiat, I decided to replace it. But it means another 2 days lost while I wait for delivery. I am surprised, and a bit irritated, that nothing has been mentioned in the threads I've been following about wear to the input shaft sleeve, and the possible need to replace it. Well now it has been mentioned. But to be fair I should say that there has been some very good advice offered on this Forum without which I would not have attempted this job.
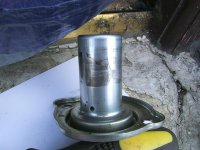
FYI: The sleeve is attached to the bellhousing with 2 x 10mm bolts. Mine was also stuck down with black RTV requiring some gentle prizing to detach the sleeve from the bellhousing. To remove the gasket from the holder I placed a large flat screwdriver behind the seal and whacked the handle of the screwdriver on the floor to force out the gasket (see pics). I then cleaned the old RTV off the sleeve and bellhousing ready for installation of the new sleeve and gasket. I also need to source a socket to install the new gasket.
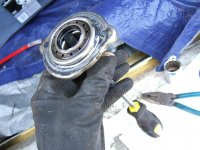
Release bearing: I mentioned in a previous post that the plastic hole in my LUK release bearing (the hole that the sleeve fits through) is not concentric with the outer metal rings of the bearing. I found out why Today - while I was playing around with the clutch fork assembly I noticed that the bearing moved sideways relative to the plastic centre ring - it's a self-centering bearing!
Mark
Latest update...
- Clutch fork
- Gearbox input shaft sleeve
- Release bearing
Clutch fork: The new clutch fork has arrived. I tried test fitting the clutch fork assembly, and the fork fits snug and tight in the fork bearings/bushes. I could have started putting everything back together Yesterday, however...
Gearbox input shaft sleeve: ...when I removed the gearbox input shaft sleeve from the bellhousing, I noticed that it is quite worn, with a distinct hollow worn into the sleeve at one point (see pics). I tried sliding the release bearing up and down the sleeve and it sticks when it hits the hollow. As a replacement is only £12 from Fiat, I decided to replace it. But it means another 2 days lost while I wait for delivery. I am surprised, and a bit irritated, that nothing has been mentioned in the threads I've been following about wear to the input shaft sleeve, and the possible need to replace it. Well now it has been mentioned. But to be fair I should say that there has been some very good advice offered on this Forum without which I would not have attempted this job.
FYI: The sleeve is attached to the bellhousing with 2 x 10mm bolts. Mine was also stuck down with black RTV requiring some gentle prizing to detach the sleeve from the bellhousing. To remove the gasket from the holder I placed a large flat screwdriver behind the seal and whacked the handle of the screwdriver on the floor to force out the gasket (see pics). I then cleaned the old RTV off the sleeve and bellhousing ready for installation of the new sleeve and gasket. I also need to source a socket to install the new gasket.
Release bearing: I mentioned in a previous post that the plastic hole in my LUK release bearing (the hole that the sleeve fits through) is not concentric with the outer metal rings of the bearing. I found out why Today - while I was playing around with the clutch fork assembly I noticed that the bearing moved sideways relative to the plastic centre ring - it's a self-centering bearing!
Mark
Attachments
Last edited:
- Joined
- Feb 1, 2008
- Messages
- 755
- Points
- 175
If you turn the input shaft with the bearing on show...does the bearing outer shell spin in the housing? This is the problem I had
If you turn the input shaft with the bearing on show...does the bearing outer shell spin in the housing? This is the problem I had
Just checked... No it's just the inner shell (nearest the input shaft) that turns with the input shaft, the outer (nearest the housing) stays static.
Mark
- Joined
- Feb 1, 2008
- Messages
- 755
- Points
- 175
Good
Progress Today...
Booked car in for MOT prep: The car is still in pieces, and the gearbox is still sitting in my house, but what the hell...
Removed windscreen washer pump: Not able to do anything on the clutch Today as I'm waiting for parts, I had a look at the non-functional windscreen washer pump. Ordered a new pump which tested OK connected directly to the car battery. Reversed polarity to check the pump squirts in both directions. More annoying - when I detached and tested the old pump it works OK as well, maybe not quite as powerful as the new one, but it works. So if water's not getting to the windscreen there must be a blockage somewhere?
FYI: To access the pump: https://www.fiatforum.com/multipla/132795-washer-pump.html?p=3460245
Last edited:
Blockage - or a leak. When it's all connected up & working, have you had a look under the car? Also, disconnect the pipes from the two T-shaped windscreen washer jets to see if water then comes through the pipes. The jets can get blocked. Not cheap to replace, either, so worth spending a minute or two with a needle to try to clean them out.
I've just bought a set of (6) bearings & (3) seals - and the guide tube - for my gearbox rebuild. I can post part numbers and bearing dimensions if anyone's interested. That said, I had a quick look online using the bearing dims and drew a blank with most of them; obviously not common bearing sizes.
Also, until I actually get the gearbox apart, I won't be able to tell you which bearing goes where!
Also, until I actually get the gearbox apart, I won't be able to tell you which bearing goes where!
Progress Today...
Clutch:
- Travelled to Fiat dealer to pick up parts
- Searched for socket to install gearbox OS output shaft oil seal
- Installed DMF
- Installed new gearbox input shaft sleeve/input shaft oil seal holder
also...
MOT:
- Bought windscreen washer tubing
- Ordered pair of front suspension arms
Travelled to Fiat dealer to pick up parts: Namely a new gearbox input shaft sleeve/input shaft oil seal holder, and a gearbox OS output shaft oil seal. The input shaft sleeve came with an oil seal pre-installed which was nice, so I traded in the oil seal I'd previously bought separately. And I returned the wrong OS output shaft oil seal which Fiat had supplied. Only £6-ish extra for the new parts, but it cost me £16 to get to Fiat on the bus!
Searched for socket to install gearbox OS output shaft oil seal: Had a look in Halfords, they had a 36mm and a 38mm, but no 37mm which I think is the right size - sods law! (FYI: Halfords told me they will shortly be doing away with the sale of individual sockets, going for complete socket sets only - bummer! Don't know if this is nationwide or just my local store?) Local partstealers hadn't got a 37mm socket, so on the way home I bought a couple of plastic castor cups from Wilkos to try instead (£1 for two). Being plastic they might shatter as I'm driving home the oil seal (or not) so the cunning plan is to stuff the drive shaft hole with a clean rag to prevent any "shrapnel" getting into the gearbox.
Installed DMF: Well this was a lot harder work than I'd expected. Firstly, the DMF is quite a heavy lump of metal (I know because I dropped the old one on my finger when taking it off. Still, better to damage my finger than an expensive DMF) so I set up my DIY hoist to lift it up into position. "Winching" the DMF up from ground level to the right height seemed like overkill, so I set up a coat hook cable-tied (x3 ties) to the hoist shackle at the correct height for DMF installation, and just manually lifted the DMF onto the coat hook using one of the holes in the front of the DMF.
(Aside: It hadn't escaped my attention that there are two thick copper strips attached to the back of the LUK DMF in seemingly random positions. I didn't know what they were, or whether they were supposed to be there, so I rang LUK UK (phone number in previous post) technical support to enquire. Answer: They are weights used to balance the DMF just like weights used to balance car wheels. It was obvious as soon as he said it)
Note: There is a locating dowel to ensure correct installation of the DMF.
I located the DMF on the locating dowel, and then loosely inserted the 6 DMF bolts. I then tightened all 6 bolts in stages: 50Nm, 70Nm, 90Nm, 110Nm, 120Nm, 130Nm and finally 135Nm/136Nm. Took a lot of grunt from me. My torque wrench goes up to 210Nm but the handle is nowhere near long enough to give the necessary leverage. Also as the LUK bolt heads sit in a recess/hole, as you tighten a bolt the outer mass moves relative the inner mass through which the bolts pass, restricting access to the heads of other bolts. After tightening a bolt you have to reverse the wrench direction to move the DMF and line up the next bolt head with it's access hole - what a pain! In contrast, with the Valeo DMF, all the DMF bolts sit in a big common open circle.
Almost forgot to mention... it rained Today. You may recall that I am servicing the car on a normal street with the NS/gearbox perched over a gutter. I was so absorbed installing the DMF that I didn't notice a small stream running along the gutter and over my back and legs. I was soaking wet through but at least I finished the task.
Installed new gearbox input shaft sleeve/input shaft oil seal holder: Applied black RTV to the base of the oil seal holder, and thread lock to the 2 x 10mm bolts. Smoothed the outer surface of the sleeve with a plastic scouring pad. Applied a little gearbox oil to the seal, slid the sleeve onto the gearbox input shaft, and bolted it on to the bellhousing (10-12Nm). Cleaned off excess RTV and thread lock.
Bought windscreen washer tubing: From Halfords (£2). Background: No washer water getting to windscreen. The washer pump is working, so there must be a blockage or leak between the pump and windscreen. For MOT purposes the plan is to circumvent the existing blockage/leak with new tubing cable-tied in an artistic route TBD round the engine compartment. Or... could the windscreen washer nozzles be blocked? We shall see... FYI: Apparently no windscreen squirty device is an automatic MOT fail.
Ordered pair of front suspension arms: Local partstealer: £55 each, Ebay: £55 per pair!!! Unfortunately I can't wait till next Tuesday for delivery via cyberspace, so another local partstealer quoted me £40 each. SOLD! to the customer with the jacked up Multipla.
Mark
Last edited:
Sounds like you're making progress. When are you planning to refit the gearbox?
For the fitting of the OS output oil seal - would a piece of plastic basin waste pipe do the job? You could slit it along its length to reduce the diameter slightly.
For the fitting of the OS output oil seal - would a piece of plastic basin waste pipe do the job? You could slit it along its length to reduce the diameter slightly.
Sounds like you're making progress. When are you planning to refit the gearbox?
Tomorrow, weather permitting. Will try to to find a dry spot in the weather. Just got the clutch fork assembly to install (no problem) and the OS output oil seal to knock in.
For the fitting of the OS output oil seal - would a piece of plastic basin waste pipe do the job? You could slit it along its length to reduce the diameter slightly.
Well I don't know if you've installed an oil seal recently, but I found mine very tight to remove and install. Don't know if a plastic pipe would do the job - good idea, maybe... has it worked for you? My first attempt is almost all the way in, about 1-1.5mm short of being flush, but without a correct sized socket I've damaged the rubber a bit on the outer edge of the top of the seal. The inner rubber ring which contacts the driveshaft is undamaged. I'm thinking that if I can get it all the way in it'll be fine, and if it isn't I can replace it without having to remove the gearbox/bellhousing later.
The old seal didn't appear to be leaking, but on closer examination the inner rubber ring was noticeably floppier/degraded? than the firmer rubber on the new seal.
Re washers not working, normally it's blocked washer jets on a multi, unblocking with a pin has never been a great fix for me, so always new ones. However, recently I have had problems with a Ducato, in that the 2 way splitter from the pump , that has one way valves in it, ie ball bearings, was kyboshed, for some reason it did not allow the system to build up pressure, so water trickled out, changed it, sorted. Also remade all connections to jets and 2 way valve, by cutting 1cm of old pipe and re-attaching, to cut down on air leaks, seems stupid really, it's only a windscreen washer system, but it's so sensitive to leaks and blockages.
Alpitlum
New member
Not having a Multi any more I can't just nip outside and look but I'm sure the washer jets have a slotted end that fits a flat ended screwdriver, you can turn the washer jet internals through 180 and then operate the washer to help shift any trapped gunk..
MrMultipla
New member
- Joined
- Jul 7, 2011
- Messages
- 70
- Points
- 18
The Y splitter between the pump pipe and the two washer jet pipes has a one-way valve in it. It's just a bit of rubber and easily removed - crack the splitter valve apart, remove the rubber bit and join the splitter back together. Hey presto, squirty, not dribbly. The splitter is under the panel beneath the wipers. The hardest part is taking the wipers off to remove that panel - you'll need a heavy-duty wiper arm puller if they haven't been off for a while.
Removing the valve doesn't have any negative effect that I've noticed over the last year since I did it.
Removing the valve doesn't have any negative effect that I've noticed over the last year since I did it.
Hello Folks,
Progress Yesterday...
MOT:
- Picked up front suspension arms from partstealer
Clutch:
- Completed installation of OS output shaft oil seal
- Assembled clutch fork assembly
- Installed clutch plate and cover
- Attempted gearbox installation
Picked up front suspension arms from partstealer: ...and he gave me a bendy funnel for free! (to renew the gearbox oil).
Completed installation of OS output shaft oil seal: Drove the seal home using a mallet hitting a tight roll of paper which in turn hit the old oil seal which hit the castor which hit the new oil seal (don't try this at home!).
Assembled clutch fork assembly: New fork, new bushes, new circlip for clutch lever, new release bearing. The fork was painted with a dark grey rough paint. I used a plastic scouring pad ro remove the paint from the ends of the fork arms which push the release bearing, and the tops of the fork arms which support the brackets on the release bearing. Lithium grease added inside the fork bushes.
Installed clutch plate and cover: Used the Sealey Universal Clutch Aligning Tool. Read on the 'net that some people think that alignment by eye using some simple tools is as good or better. Installed on flywheel OK. Made a simple tool from a couple of sockets and piece of cardboard to check whether clutch plate is central or not.
Will find out when I try to fit the gearbox. Fingers crossed....
Attempted gearbox installation: Late in the day so took a risk and tried to install the gearbox. Even dropping the front subframe 4cm, I couldn't get the box over the front subframe. Struggled and struggled. Dark when I finished - 10pm - which didn't help. Left my hoist and gearbox suspended in place overnight. Very knackered.
Mark
Last edited:
Progress Today so far...
Gearbox/bellhousing installation: I have managed to manoeuvre the gearbox over the front subframe - it wasn't easy at all - and into position near to the clutch cover etc. but am unable so far to slide the box on. I don't think it's a question of the input shaft not sliding into the clutch plate - the box hasn't gone on that far yet.
Until I got to this point I didn't realise how difficult this step would be. Basically you're manoeuvring a heavy object into a precise position working against gravity and without the proper equipment or training - not easy at all. And it feels like a two person job to me. The mobile mechanic isn't answering his phone, so I may have to wait till tomorrow to continue with the job.
Rain has stopped play for the moment, so I'm back inside having a frustration break...
Mark
Last edited: