Technical Multipla JTD 1.9 Clutch Replacement (in progress...)

Currently reading:
Technical Multipla JTD 1.9 Clutch Replacement (in progress...)

When removing inter cooler I found it best to secure the"captive" nuts with mole grips
As in my case they weren't quite as captive as they should have been
The 2 fixings are located behind the bumper on the wheel arch area
Best to loosen the bumper ( fixing underneath indicator)
And one underneath bumper ho allow better access to th intercooler fixings
 
Thanks Ben. Pardon my ignorance, but do water pipes go to the intercooler? What does the intercooler do?
 
Intercooler has no water pipes
I removed it to give clearance at the front to pull box forward and down
Probably would have cleared but didn't want to damage it
The intercooler cools the air generated by the turbo befor going into the inlet manifold
Cooler air = bigger bang = more power
 
Intercooler has no water pipes
I removed it to give clearance at the front to pull box forward and down
Probably would have cleared but didn't want to damage it
The intercooler cools the air generated by the turbo before going into the inlet manifold
Cooler air = bigger bang = more power

Thx for explaining that. Also if I remember my school physics: cooler air = denser air = more oxygen per cc = more complete combustion = bigger bang.

Progress Today:

To test neutralising the road camber OS to NS which was mentioned previously, I laid a 1.75m piece of 2x3 between the high point of the road on the OS, and the pavement on the NS (outer end of timber laid on the road, vertically in line with OS of car under driver's door-ish, and inner end of timber projecting about 15cm (6in) onto pavement). The result, tested with a spirit level, is a potentially near horizontal platform for my axle stands.

I've bought 2 (cut to size) 1.75m long x 22.5cm (9in) wide scaffolding boards (thx for the tip Ben) off my local scaffolding firm, plus some pieces of offcut to wedge and support the boards underneath (£10 total inc delivery of boards and me home). I intend to lay the boards side-by-side giving a 45cm wide platform for my axle stands. I've also bought some heavy duty coach screws and nails to attach the supports under the boards.

Tomorrow I am hoping to get my "Cat Rescue" neighbours (see earlier post) to help me move the car so that the NS rear wheel is also on the pavement, levelling the rear of the car horizontally OS to NS. That's the first job. Then make a level platform to support the front of the car.

I intend to lay the 2 removed front wheels with some thick timber on top under the car as a safety device in case the axle stands give way. The wheels and timber combined should be thicker than my chest/head/wallet (I wish!).

Axle stands and safety: I now have a total of 6 axle stands at my disposal: 2 x 2T central pillar and pin, 2 x 3T central pillar and pin, and... 2 x borrowed - which have a central pillar rack and cam/lever mechanism. In my opinion, the latter are intrinsically unsafe (this type are still sold in Halfords I saw last time I was in there). 2 reasons: 1) The latching mechanism is completely hidden from view so you cannot tell by sight whether the mechanism is securely latched into place, and 2) If you knock the locking lever by accident (there is no additional backup safety mechanism), down comes the central pillar - and the car. It may have been one of these latter stands that failed last weekend... In comparison, with the pillar and pin design, you can see immediately whether you've locked the pillar in place with the locking pin, or not. Also if there's a split pin in the end of the locking pin, it should be impossible for the stand to fail, except through faulty manufacture, overloading or misuse.

Weather this weekend looks promising. Fingers crossed.
 
Last edited:
Hello Folks,

Another day - OK half day, 4 hours - working on the old Multipla. I completed 2 jobs Today:

- Levelled the car at the rear (2 hrs).
- Undid the top starter motor bolt (2 hrs).

Levelled the car at the rear:
I used my "Cat Rescue" neighbour - Thanks P - (see earlier post) to help me move the car so that the NS rear wheel is on the pavement as well as the NS front, levelling the rear of the car horizontally OS to NS. (Thanks whichever Forumer suggested this). Someone demanded more pics instead of words, so here's the end result (below).

Now that's what I call horizontal !

Until Today I had the spare wheel at the NS rear, because the original tyre had a slow leak and was taken off for repair. I reinstated the original NS rear wheel & tyre Today, but noticed after putting the wheel back on that the tyre was again flat -naughty garage, they said they'd fixed the leak. As I was worried that it might deflate during repairs causing potential disaster, I swapped it with the NS front wheel & tyre. I noticed while swapping wheels, using the spare as an intermediate, how much smaller in diameter the spare is than the normal wheels. As well as the road camber this was obviously another reason why the rear of the car had such a lean to the NS with the spare wheel on. Sorted.

For those of you reading this who have no interest in cars, clutches or Multiplas, and just stumbled on this article by chance after typing "Cat Rescue" into your search engine (Notice I used the term "search engine" instead of the "G....." word - they're not getting any free publicity from me!), to bring you up to date... apparently the cat has tried to escape again but was caught in the nick of time. If I get any further updates I will of course keep you informed.

So back to the story... car now level at the back.

I then got bored, and on the excuse that I needed some more tools and things, I got the bus into my local town. Result: provisions, cheap lager, and a £1 wood saw from Poundland for the scaffolding Tomorrow. Will I never learn !

(Continued in next post...)
 

Attachments

  • DSCF1118 25%.JPG
    DSCF1118 25%.JPG
    77.2 KB · Views: 25
  • DSCF1121 25%.JPG
    DSCF1121 25%.JPG
    36.5 KB · Views: 27
  • DSCF1122 25%.JPG
    DSCF1122 25%.JPG
    37.6 KB · Views: 28
Last edited:
Section 24 Remove the starter motor bolts (Part 1): Undo starter motor top bolt:
So back home and feeling guilty, I had another go at the dreaded, hidden, top starter motor bolt. The problems with this bolt are: a) You can't see it, it can only be located by touch, b) Direct access to it with a spanner or wrench is very difficult, there is very little space behind the top of the engine to operate a tool or get your hands in, there are pipes/conduits all over at the back of the engine, and c) Even if you can get a tool on the bolt head, it is difficult to get any leverage/force on it, and the tool can only be rotated through a small angle.

I did succeed however, and here's how: I used 2 tools:

- A 20cm long 3/8" drive socket wrench with a 13mm socket (see pic below), and:

- A contraption I devised from 2 x 13mm spanners cable-tied together at an angle with sturdy cable ties (see pic below). Note that it is a combination spanner with an open and closed end. This tool provided extra leverage and more angles to get at and turn the bolt head, than a single 13mm spanner. The total length of this tool end-to-end is 26cm. Each spanner is 17.5cm long. A surprisingly sturdy bit of kit given its construction (just tested it in my hands now and there is no give at all).

I used each tool in turn to very slowly undo the bolt - slowly because the bolt was VERY tight, and as stated you can only move each tool through a very small angle at a time. I had my left hand over the top of the engine, holding, guiding and pushing the handle of the tool being used, and my right hand through a right-angled bracket just above the bolt head holding the tool in place on the bolt head, and also pushing. Note: I have large but not huge sized hands. After I'd undone the bolt about half a turn it turned much more easily, a few more turns with the tools and it could be undone easily by hand using the 3/8" 13mm socket (minus wrench) to give extra grip/torque. Result !

Note: I did first try a short, stubby 13mm spanner and a short stubby wrench (£3 at Homebase) and 13mm socket, but with these tools being short in length I could only get my right hand on either tool and couldn't get enough force/leverage to move the bolt. These shorter tools were impossible to reach with my left hand over the top of the engine.

So another couple of steps forward. More tomorrow, weather permitting.
 

Attachments

  • DSCF1125 25%.JPG
    DSCF1125 25%.JPG
    30.8 KB · Views: 31
  • DSCF1124-001 25%.JPG
    DSCF1124-001 25%.JPG
    24 KB · Views: 36
Last edited:
Hello again,

Progress Today (3 hrs work):

- Drained engine oil and gearbox oil
- Tested undoing the NS suspension
- Tested jacking up and supporting the front of the car

Notes for Novices, Section 25 (Part 1) Drain the gearbox oil: I had already loosened the gearbox oil plugs in an earlier post with the Laser double-ended hex sump key (PN 1576) no problem. Instead of paying a pound for a bendy funnel in Poundland (my local Pland didn't have any), I made a drain funnel out of a 1L plastic Asda energy drink bottle - cut the top third off the bottle and invert to give a (free) funnel. Amazingly the funnel fitted exactly into the mouth of my collection bottle - a clean, dry, 2L plastic milk bottle. It actually clicked into place (See pics below).

Notes for Novices, Section 25 (Part 2) Drain the engine oil: The engine oil sump plug I wasn't worried about as I tackled this in a previous thread - 5ft breaker bar to extend the sump plug socket wrench handle (carefully). Note: I renewed the sump plug and washer at the last oil change. Once the plug was loosened a turn or two, I could undo it the rest of the way by hand. I drained the engine oil into a clean, dry, plastic washing up basin, then transferred the oil into 2 more dry, clean, plastic 2L milk bottles using my DIY funnel (See pics below). I'm keeping the oil as it's nearly new, changed just before my clutch went bang.

Incidently, I don't understand why Notes for Novices uses a vacuum pump to drain the gearbox oil, or why he/she drains the engine oil through the dipstick tube? Was the sump plug stuck or something? I just used gravity to drain both oils once the drain plugs were removed.

(Continued in next post...)
 

Attachments

  • DSCF1129 25%.JPG
    DSCF1129 25%.JPG
    104.2 KB · Views: 18
  • DSCF1127 25%.JPG
    DSCF1127 25%.JPG
    85.5 KB · Views: 21
  • DSCF1128 25%.JPG
    DSCF1128 25%.JPG
    127.6 KB · Views: 18
Last edited:
Notes for Novices, Section 27 Break the NS suspension: I thought I would test undoing things before I take apart the suspension proper. I first jacked up the NS front and removed the wheel.

a) The tie-rod end: Notes for Novices says: "Replace the nut on the first few threads and a tap with a hammer will free it". If that means the ball joint, you must be joking! It was stuck solid. It's a job for a ball joint splitter, and I don't have one anymore boo hoo. Off to the partstealers tomorrow.

b) "Clean up and remove the top nut on the drop-link": Loosened the nut, but lost the will to live and took it no further.

Will do a complete NS suspension dismantle later when I have all the tools I need.

(Continued in next post...)
 
Notes for Novices, Section 2 Jack the car up and support on axle stands so the front sub-frame is 400mm above the floor: After the near disaster last weekend, with this step, which is the most important safety-wise, I decided to proceed with more care, caution and planning.

This was a trial run, using my scaffolding boards, chocks, axle stands and jacks, to test safely jacking up and then securely supporting the front of the car.

Scaffolding boards: I found a good position for my scaffolding boards, laid between the NS pavement and OS road, to the rear of the front subframe near/under the front jacking points (See pics). The 2 boards, each 22.5cm wide x 1.75m long, laid side-by-side, supported by chocks underneath - are near as damn it level lengthways NS to OS, and across.

Axle stands: My 3T axle stands will sit in the middle of the 2 boards directly under and supporting the NS and OS longitudinal beams to the rear of the front subframe (See pic).

Jacking up: To jack up the front of the car I first tried the 2T trolley jack in the middle of the front cross-beam to which the front subframe is attached. Unfortunately, at full height, the trolley jack didn't raise the car high enough to give the recommended clearance below the front subframe (400mm) as suggested by Notes for Novices (See pic). Plan B was to try raising the car on one side using the Fiat-supplied car jack under a front jacking point. The foot of the jack sat securely on one of the scaffolding boards, which sat solidly on the road. This didn't raise the car high enough either, but the addition of a thick piece of wood under the jack will fix that. (I haven't forgotten raising the other side of the car in case you were wondering !). I've decided that the safest and best way to raise the car is by using 2 Fiat car jacks, one under each of the front jacking points. And then position the 3T axle stands as described above. The Fiat jack is probably the best jack I personally have seen supplied with a car. Very well made, strong piece of kit in my opinion (See pic). On Ebay they sell for about £25 only. Worth the money when it's my safety at stake. With 2 Fiat jacks I can raise the car on both sides slowly and safely to exactly the height I want. Once the axle stands are in place I'll leave one jack in place under the NS front jacking point for additional security, and the other jack can support the engine as suggested by a Forum-er in an earlier post.

One other safety tip, which didn't occur to me before last week's near disaster: leave the front wheels in place on the car until the car is safely jacked up and supported on it's stands (obviously slacken the wheel nuts first before jacking up).

And, as I learned Today, if you're jacking up using a trolley jack, do it nice and slowly so that: a) The jack settles nicely into a secure position on it's wheels, and b) As the car is raised, there are no sudden shifts in the car's weight/balance to bring things crashing down.

That's it for Today.
 

Attachments

  • DSCF1136 25%.JPG
    DSCF1136 25%.JPG
    86.8 KB · Views: 42
  • DSCF1137 25%.JPG
    DSCF1137 25%.JPG
    100.9 KB · Views: 49
  • DSCF1135 25%.JPG
    DSCF1135 25%.JPG
    87.9 KB · Views: 50
  • DSCF1140 25%.JPG
    DSCF1140 25%.JPG
    159.6 KB · Views: 47
Last edited:
Progress Today...

Pricing/sourcing parts.

Parts ordered from local partstealer (All prices inc VAT):
- 2 x Track rod end (£11-50 each)
- 2 x Drop link (£10-58 each)
- Ball joint splitter (£6)
- 2L gearbox oil (dunno yet)

Parts ordered from Fiat main dealer:
- Gearbox i/p driveshaft seal (~£7)
- Gearbox o/s driveshaft seal (~£7)
- Clutch fork top and bottom nylon sleeves (forgot, about £5)

Declined:
- Clutch fork (£80 odd - Ouch!)
- Fiat Multipla car jack (£50 odd) (£25-30 on Ebay)
 
Spent Today ordering vital parts for the project (hard to believe it took all day nearly):

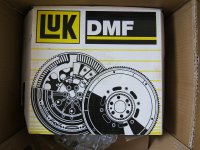
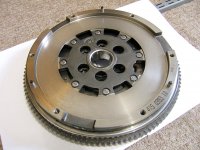
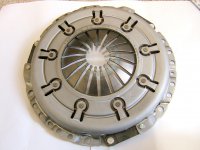
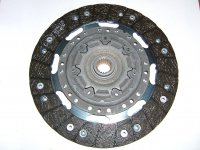
Matching LUK DMF and Clutch Kit: for Multipla 1.9 JTD 110 2001 Reg. from www.buypartsby.co.uk:

LUK DMF PN: 415039310 (£161)
LUK Clutch Kit PN: 623329600 (£77)

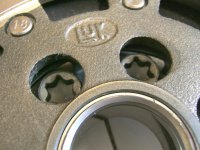
The engine code is needed to be sure of ordering the right parts. I found the engine code printed on the model plate fixed at the back of the engine bay under the bonnet lip: 186A6.

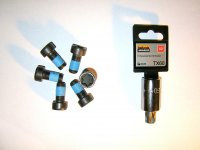
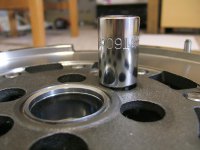
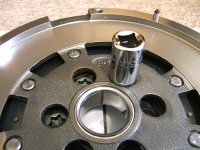
DMF bolts: I rang LUK UK (T. 01432 264264) to obtain the part no. for the matching LUK DMF bolts (PN: 411012210). Very helpful technical guy at LUK. I remembered to ask for the DMF and clutch cover bolt torque settings: 136 Nm and 25-30 Nm. He wasn't certain about the clutch cover bolt setting, so I'll double check at the Fiat main dealer tomorrow.

He also explained that matching the bolts to the DMF is important because DMF specification (thickness in this case) varies by model and manufacturer, so the bolts vary in length accordingly, he said.

To order the bolts, I went the long way round first (trawling the Internet, didn't like the prices or uncertain delivery times) before discovering the short way: rang my local partstealer who said £5 + VAT, will have them in first thing tomoz. Result !

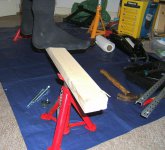
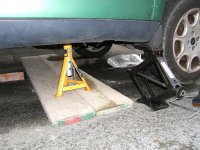
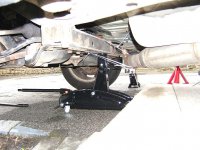
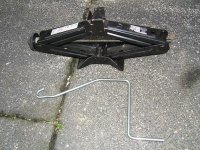
Fiat Multipla car jack: (Reminder: I'm going to use two) I think the Fiat main dealer quoted me £58-ish for a new Fiat car jack. I ordered a used one Today on Ebay for £22 including delivery. When I mentioned this to my local partstealer he made a very valid point: a secondhand jack will probably be in good condition because they're rarely used - how often do people get a puncture and have to change a wheel... Anyway Result No. 2 !

To finish the day I went along to my local partstealer to check whether my other bits and bobs had arrived. He tried to fob me off with 2 non-matching drop-links from 2 different manufacturers. Bit of a giveaway really - one was painted black, the other silver, so obvious even to me. I said no thanks, I'll have two the same if it's alright with you...

Gearbox oil: Came home with some vindscreen vipers (that's German for ...) and 2L of gearbox oil. He gave me Comma 75W-90 GL-5, the manual says 75W-80. Wonder if it'll make much difference? Anyway it was cheap at £5 a litre, so I could always run around with it for a while to flush the gearbox, and replace with some good stuff at a later date... What say you?

(Aside: My research tells me that the first number "75W" in the oil spec is the viscosity when cold (W = Winter), and the second number I ain't sure about, it can't be viscosity when warm cos' oil gets thinner as it heats up, or...? Anyway I discovered that there are heated arguments going on on t'Internet about the virtues of 75W-80 versus 75W-90 culminating in dueling matches with pistols at dawn. Presumably after a long previous day trainspotting... You'll never believe this, but the other day I actually saw a man bus-spotting at my local bus station! Just when you think the human species can't stoop any lower...)

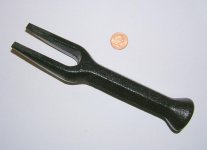
That's all for Today. Off to the Fiat main dealer tomorrow (well Today now, it's gone midnight) for driveshaft seals and clutch fork sleeves. Perhaps I'll have a sneaky peek at a bus number plate on the way to add to the excitement...

Mark X
 
Last edited:
Working on it during the week, eh? That's cheating! :)

Good to hear you've gone for all-LUK parts for the clutch & DMF. That could save you some grief in the coming days. Btw, when it comes to hunting around for parts, always stop off at Shop4Parts. Good advice, helpful people and they know Fiats/Alfas very well. Some say that they're overpriced (true enough, for some bits) but remember that if you're a donated member on this forum you'll get access to a code that gives you 10% of all orders from them (as long as it's listed on their website) and once that's taken into account, I find them good value. Top tip - get the Tutela Jarama 5L engine oil from them - it's what most Fiat main dealers use for their servicing, and it's dirt cheap. I've used it in mine for five years without any problems. They also do all the other Fiat approved oils, lubricants etc, so you don't have to fanny around trying to figure out what's the correct spec stuff for your car. The non-genuine parts they sell aren't made of cheese either, which is more than can be said for some of the things I've bought on ebay (are you listening, A2Z?). Shop4Parts min. order price for free delivery has just been reduced as well.

Before you ask, I have absolutely no interest in the company. I'm just a satisfied customer. :D

And the jacking arrangement looks far better now. What you had before made me very nervous. Can't understand your fascination with the Fiat scissor jack, but each to their own.
 
Last edited:
Top tip - get the Tutela Jarama 5L engine oil from them - it's what most Fiat main dealers use for their servicing, and it's dirt cheap.

Good advice and info. Thx widemouthfrog.
I will enquire about the Tutela oil Today at Fiat (note enquire only).

And the jacking arrangement looks far better now. What you had before made me very nervous.

Made you nervous... I'm on tranquillisers! Well OK whisky... I won't get under the car now unless I'm much happier. (Not happier as a result of the whisky, but then... :yum:)

Can't understand your fascination with the Fiat scissor jack, but each to their own.

If you'd seen the jack my neighbour used on his Renault Megane last week, there's no comparison with the Fiat jack: cheese vs girders.
 
Hello Folks,

Latest update...

Today I've been to collect my ordered bits from the local partstealer and Fiat.

DMF bolts: First a visit to the partstealer for my DMF bolts (See pic below). Cheap-as-chips (£5-64 inc VAT). Seen them for £11 on the 'net. Boy are they chunky! I was expecting grubscrew size. They are huge (depending on what kind of huge things you've experienced before), requiring a TX60 bit/socket. Also bought a pry bar to pry open the bellhousing (£3).

TX60 1/2" drive socket: Got a nice one from Halfords (£8) (See pic below). A pound cheaper than the partstealer. Well done Halfords, who would've thunk it...

Gearbox oil seals and clutch fork bushes: Bit of a journey on the bus to the nearest Fiat, but combined the trip with a half day out. Matron lets me out occasionally if I've been good. About £21 total for gearbox i/p shaft seal, gearbox o/s driveshaft seal, and 2 bushes.

Shopping, burger and fries: (Note: This was not included in Notes for Novices and is an optional extra) In the same locality, then back to Homebase for...

1m long M8 rod: (£2-50) This is one of the components for my cheap-as-chips DIY bellhousing lifting/shifting device. The design of which is still in my head. I shall reveal the groundbreaking design of this device in due course, unless it turns out to be a load of **** in which case I won't be revealing the groundbreaking design at all. I can give you one piece of information as a taster: it costs about £7-50 in total to make.

Watched in dismay as my bus home departed the bus station 30 seconds before my arrival. Not another one for an hour, so tried some real ale at the local real ale festival pub. I'm not even a real ale drinker. I can just imagine the algorithm running on the NSA Supercomputer filing me into the "Non-real ale drinker" = "Potential terrorist suspect" category as I type.

Expecting deliveries of jack, clutch and DMF tomorrow or Friday. Then the real fun starts...

Mark

PS. Forgot to ask about the Tutela oil.
 

Attachments

  • DSCF1146 50%.JPG
    DSCF1146 50%.JPG
    140.9 KB · Views: 29
Last edited:
Latest update for Today...

- Chased up non-delivered orders.
- Tested undoing NS suspension again.
- Collected order from partstealer.
- Started construction, and testing, of bellhousing lifter/shifter.

Chased up non-delivered orders:
Fiat jack has been dispatched and is in transit. ETA tomorrow.

Clutch kit and flywheel: Customer service guy went off to the warehouse to check, came back and said the order will arrive tomorrow. I'm guessing that the parts hadn't been shipped until I gave them a kick...? Grrr...

Tested undoing NS suspension again:
Drop link top nut undoes ok, 17mm socket on the front nut and 17mm spanner on the spanner flats behind the strut.

Tie rod end (NS): Made a schoolboy error. Undid the ball joint nut a little, then separated the ball joint from the hub arm with a separator fork (£6). Having split the ball joint, when I tried to undo the nut further, the tapered pin just span with the nut. Doh! (I haven't done this for a long time, can you tell?) Trying to avoid sawing off the end of the pin (or using a nut splitter), I searched on the 'net and found this video: How To Tighten (or Loosen) Ball Joints That Just Spin: Did someone make up that title, or did I just imagine it? Haven't tried it yet, will try tomorrow.

To separate a ball joint, I also found this technique which only requires the use of a hammer (yeah, I bet): The Easy Best Way to Separate a Ball Joint Tie Rod End: Can't wait to try it on the OS tie rod end ball joint. Anyone tried this already?

If you haven't used a separator fork before, having loosened the ball joint nut (sorry -completely removed the ball joint nut), you insert the fork between the ball joint and the hub arm and whack it in with a hammer to separate the joint/force the tapered pin out of the hole in the hub arm. Although cheap, simple to use and effective, the separator fork tends to damage the ball joint boot, which it did with me. So bear that in mind if you intend to use one. No problem because I'm replacing the tie rod ends anyway. Well I am now!

Collected order from partstealer:
2 x tie rod ends and 2 x drop links (the two drop links are now identical. Hurray! Give that man a coconut...)

Started construction, and testing, of bellhousing lifter/shifter:
Top secret! Busy drilling and screwing. Ooh err missus! To do a realistic load test - according to Notes for Novices Section 33 the bellhousing weighs 37kg or 81lbs without oil - I could buy a 6 stone bag of King Edwards, or I might have 37 empty 1 litre energy drink bottles stashed somewhere... (WOT !!!!) ...which I could fill with water. 1 litre of water weighs 1kg, therefore 37 litres = 37kg. I can reveal that there is a support beam for my device - which takes my weight (only twice the weight of the bellhousing) - so that component should be OK.

(NSA Supercomputer algorithm output: "suspect loves drilling and screwing, King Edwards, has an energy drink addiction, can do basic arithmetic, and has early stages of anorexia nervosa...")

That's all for now folks.

Mark
 

Attachments

  • DSCF1148 50%.JPG
    DSCF1148 50%.JPG
    202.8 KB · Views: 27
  • DSCF1149 50%.JPG
    DSCF1149 50%.JPG
    87.4 KB · Views: 20
Last edited:
Today's update:

- Delivery of Clutch Kit and DMF
- Chased Fiat jack non-delivery
- Researched clutch cover bolts
- Bought more stuff from partstealer
- Researched use of Wynns Brake Cleaner
- Cleaned DMF and Clutch Cover
- Tested fitting Clutch Cover on DMF
- Tested DMF Bolts and TX60 socket with DMF

Delivery of Clutch Kit and DMF
Both arrived first thing this morning (See pics below). The parts, in a box, were not in sealed bags, and no parts list was enclosed. The DMF part no. is printed on the front the DMF, so no doubts there. Rang LUK UK (number in previous post) to check that the clutch kit contained the correct parts. LUK said that the kit parts list is listed on the outside of the box the kit came in, that there would be part numbers beginning: 123..., 323..., 500..., and to ignore the last 2 digits printed on each part.

Taken from the label on the kit box:

1230474.. (matches PN on clutch cover)
3230699.. (matches PN on clutch plate)
5000202.. ???
9991103.. ???

I couldn't find a part number printed on the release bearing, but from appearances it looks like the right one.

What all the parts had in common is that they were pretty mucky. More on this below.

Chased Fiat jack non-delivery
Didn't arrive again Today. I want it to jack up the car safely. Phoned Ebay seller who chased the delivery company. ETA tomorrow or Monday. Not the fault of the seller. Can't start without it.

Researched clutch cover bolts
Because - I believe - the original DMF and clutch fitted to the Multipla is a Valeo (Note: Notes for Novices, Section 38, EuroCarParts suggests he/she replaced the original parts with another Valeo clutch kit and DMF), and I'm installing LUK parts, I didn't know whether the original clutch cover bolts would fit the LUK clutch cover and DMF. Note that the clutch cover bolts ("bolts" as in verb not noun) to the DMF. I rang LUK UK first to check. They said that they didn't have an LUK part number for the clutch cover bolts, which suggested to them, they said, that you must use the existing clutch cover bolts. I then rang 2 local partstealers who both said "main dealer only". So finally I rang Fiat who, consulting a Fiat mechanic, said: they reuse the original clutch cover bolts (applying new thread sealant).

Conclusion: Reuse the existing clutch cover bolts. We shall see...

Bought more stuff from partstealer
Granville Lock Thread (£3) for clutch cover bolts, drive shaft bolts, and whatever else. Also bought Wynn's Brake and Clutch Cleaner (500ml aerosol) (£3).

Researched use of Wynns Brake and Clutch Cleaner
I wanted to know whether you can use it directly on the brake and clutch friction material. The partstealer seemed uncertain, so I rang Wynn's UK (Tel: 02476 472634) who directed me to a local specialist. Answer: Yes, you can use it directly on the brake and clutch friction material. For full instructions I advise readers to consult Wynn's directly as I did.

Cleaned DMF and Clutch Cover
Both were quite dirty, particularly the surfaces which contact the clutch plate (See dirty cloth pic below), so I gave them a good clean. I will apply the Wynns Brake and Clutch Cleaner shortly before final installation of the DMF and clutch cover.

Tested fitting Clutch Cover on DMF
The outer face of the DMF divides into 3 identical thirds. There is a locating dowel in each third of the DMF onto which 3 holes in the clutch cover locate. There are lots of holes on the circumference of the clutch cover, but the correct fitting is obvious once you've played around for a bit. Clue: 3 flat springs on the circumference of the clutch cover fit into 3 recesses on the circumference of the DMF. If you've fitted the clutch cover correctly, the 6 clutch cover bolt holes - these are the 6 holes in the 6 lowest sections on the circumference of the clutch cover - not including the 3 holes for the locating dowels - then line up with the corresponding holes in the DMF. If I've made it sound complicated, it's not. Try it.

Note: When I first tried to fit the clutch cover, it appeared that it would fit on the DMF in only one of the three possible ways. But later I discovered that this is because the cover sticks a little on the dowels. So as you're fitting, jiggle the cover a bit, and it will fit on the DMF in any of the three possible ways. Only gentle force required. You'll know when you've got the cover on all the way, when all 6 cover bolt sections on the cover contact the surface of the DMF.

Tested DMF Bolts and TX60 socket with DMF

Before Today, not having seen the DMF, or a fitted DMF before, I wondered whether the DMF bolt heads sat proud of/on top of the DMF surface or whether they sat in recesses, and if they sat in recesses would my TX60 socket be able to reach the bolt heads. Well guess what, the bolts sit in deep recesses (See pics below), with the bolt heads being more than 1cm below the front (gearbox-facing) surface of the DMF. Luckily the TX60 bit in my TX60 1/2" drive socket reaches the bolt heads with a couple of mm to spare (Spooky! How the fudge did Halfords guess what I was doing?!). If that's too close for comfort for you, I have seen a TX60 socket with a long TX60 bit (it was a partstealer's quid more than my Halfords socket so NO SALE!).
(See pics below).

Keeping a close eye on the weather forecast to get 2 days of reasonable weather for the repairs.

That's it for Today.

Mark
 

Attachments

  • DSCF1166 50%.JPG
    DSCF1166 50%.JPG
    241.2 KB · Views: 19
  • DSCF1158 50%.JPG
    DSCF1158 50%.JPG
    221.9 KB · Views: 29
  • DSCF1165 50%.JPG
    DSCF1165 50%.JPG
    178.1 KB · Views: 22
  • DSCF1168 50%.JPG
    DSCF1168 50%.JPG
    274.7 KB · Views: 22
  • DSCF1171 50%.JPG
    DSCF1171 50%.JPG
    120.1 KB · Views: 18
  • DSCF1155 50%.JPG
    DSCF1155 50%.JPG
    174.9 KB · Views: 22
  • DSCF1156 50%.JPG
    DSCF1156 50%.JPG
    249.8 KB · Views: 21
  • DSCF1160 50%.JPG
    DSCF1160 50%.JPG
    261.2 KB · Views: 19
  • DSCF1161 50%.JPG
    DSCF1161 50%.JPG
    415.1 KB · Views: 17
  • DSCF1170-002 50%.JPG
    DSCF1170-002 50%.JPG
    105.7 KB · Views: 20
Last edited:
FYI: DMF pic. Looks like a quality piece of engineering, whether it performs like one only time will tell...

DSCF1158 25% Key 3.JPG
 
Last edited:
My LUK DMF hasn't given any trouble since it was fitted (along with an LUK clutch). The thing to look at when you get it all apart is the condition of the 'fingers' in the centre of the clutch. Mine & several others had quite a deep groove worn into them by the clutch release bearing, even after a relatively short period of time:
https://www.fiatforum.com/multipla/273835-clutch-problems.html
https://www.fiatforum.com/multipla/340116-worn-clutch-fingers-after-only-22k-miles.html
https://www.fiatforum.com/multipla/325710-clutch-replacement-additional-notes.html

Whether this is intentional or not and is viewed as 'bedding in' is perhaps a topic for another discussion - after all, until these grooves are worn into the fingers, the release bearing is making only a point/line contact with each one. As Portland Bill says, it could be the result of the release bearing not being held concentric to the clutch, in which case the clutch fork arm and its bearings may be the culprit (I've bitten the bullet, bought all three and they're in an ever-growing pile of bits waiting for my big Spring clean in May :D).

I'm on my second clutch in the 5+ years I've had the car. The first one only did about 22k miles before giving problems. I intend to get to the seat of the problem in May. The previous 2 clutches have been fitted by a non-franchised Fiat specialist with a good reputation, so I'll be interested to see how I get on. Engine will be coming out too.....
 
Back
Top