Technical Alternator housing cracked...

Currently reading:
Technical Alternator housing cracked...

Joined
Oct 9, 2009
Messages
1,247
Points
301
Location
South Bucks
Whilst investigating a squeeky pulley/belt yesterday, this poked me in the eye...
Alternator1.jpg

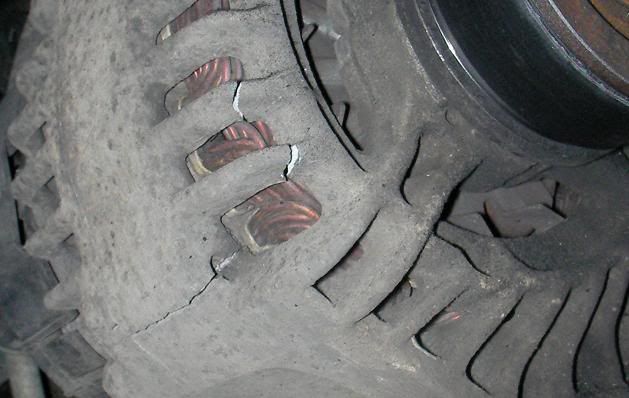
It looks to be superficial (hopefully), as the cracking is nowhere near the mountings or bearings.
The Alternator is working fine.

After a bit of searching, I see that a few people have asked about removing/replacing the Alternator ('02 115 JTD) in the past, but no-one seems to have actually done one themselves (or at least they haven't answered).
Anyone done one now, and would care to tell us what has to come off/out?
Thanks.

The (ancillary) belt problem is the tensioner pulley, it's out of line (angle-wise) with all the other pulleys.
Either the bearing is shot, or the mounting is damaged.
It'll need replacing whatever it is.
The belt skips about wildly at the tensioner, and the edge of the belt stripped off a couple of days ago (one complete 'V' strip has gone).

My Daughter was doing some driving practice in it last month, and stalled it so violently at one point that the belt just snapped :eek:.
I'm guessing that's what also damaged the tensioner. :rolleyes:

Edit; Just found cooky257's excellent Alternator guide, thanks mate (y)
 
Last edited:
the 2 small fins that are cracked are fairly fresh
the main crack looks a lot older tho
your wise to replace
K
 
I expect the two webs went when my Daughter stalled it, as you rightly say, the main crack has been there quite a while.
That type of Alloy corrosion (Exfoliation) will almost always lead to cracking, as it expands below the surface, putting pressure on the material until it fails.
I might just remove the Alternator, clean it up, and treat the corrosion.
 
Replaced the tensioner (£23) and the belt (£18) today, no more squeeking (y)
There is a gap at one side of the (original) tensioner body, so the arm and jockey wheel were at a slight angle.

I also noticed that the fixed plastic idler wheel was rubbing on the cam belt cover, it was a couple of mm too far left compared with the other pulley wheels.
Could see no reason for it so I just put a couple of thin washers between the centre bush and the enging block.
Also took the opportunity to regrease the bearings in it while it was off.
 
if its alloy it can be welded ???? but would you take the risk or would you buy a new one ????
 
Just driven down to Portugal without any issues at all but whilst here noticed an annoying but very quiet squeaking noise from around the offside front wheel. I took the wheel off and it was then I noticed a crack in the alternator exactly the same as the photo in this thread.
Apart from the little squeak ( which isn't present all the time) everything is working fine however I have the return trip to the UK to do. I have put to copper wire across the crack which has actually closed it slightly.
Some of the threads mention its not load bearing and others say they last a long time before failing - my question is do I attempt the return trip as it is or try and source an alternator in Portugal and fit it?

Any advice gained through experience would be appreciated

Thanks in advance
 
They all seem to crack in the same location. In contrary to your first post I removed my alternator twice whilst doing my clutch (which I had to do twice due to a faulty DMF). Removing the alternator is the easiest way to get to the starter motor top bolts.

Anyhow before you remove the alternator take off the aux belt and turn the alternator pulley. If you feel any resistance the housing is not only cracked but also distorted. This seems to be caused by excessive and out of linearity force applied by the bottom bolt. As the alt bolts are not used to tension the belt, they simply need to be sound and not necessarily super tight. As such leaving the top bolt tight (preferably torqued if you can get a 3/8" drive in there with a suitable torque wrench) loosen the bottom bolt. You should now feel that the pulley runs smooth. Now find another nut the same size as the original, preferably a nylock. tighten the original nut just to the point where the pulley starts to run rough and then slack off until it just runs smooth again. Then use the second nut as a lock nut to ensure the bolt stays on. Doing this should see you get a good few more thousand miles out of that alternator.

Now if you do need to remove it, take off the exhaust. Some Plusgass on the front three manifold nuts, should see them come off easily enough and the rear two, certainly on my car, came off without any drama. This provides plenty of clearance to manoeuvre the alt out. The top bolt secures the alt to a bracket. Be warned that there is a spacer there. Ensure this goes back on and in the right place.
 
Last edited:
It does seem strange that they all suffer the same demise. As such it is possible that Giovanni and Rafael had a bit too much Tuscany wine when they were working on the mounting.

I discovered this purely by chance during my removal process. With the alt off the car the armature spun beautifully. Then I put it back in and whilst refitting the belt I noticed a very definitive roughness. The cure was as I outlined above.
 
From threads some time ago, it is likely that the cracked housing is the result of the freewheeling pulley giving up.
Due to the vibrations from diesel engines, many manufacturers are fitting freewheeling pulleys to the alternators to reduce the shock loadings. The pulley freewheel mechanism wears out, and the cracked alternator is the result. Checking the freewheel by hand will rarely show a fault. Ebay has them for a lot of cars, especially VWs. Measure diameter, number of ribs, internal bore size, and offset. I think there are fewer than we might think.

So when replacing the alternator, get a new pulley too.
 
I too read that, however the problem with that theory is that in my particular case mine was not fitted with an overrun bearing. Maybe this came on later models than my 53 plate?? However the fact that alleviating the tension on the bottom bolt solved the issue tells me that something was pulling the casing out of kilter. The only thing this can be is alignment. Now if you have something which is subject to constant vibration, load and heat as well as having to cope with stress due to applied force on its casing, something is going to give and I personally believe this is where the crack comes from. They all seem to crack in the exact same place ??
 
Just fitted the new alternator which, has been mentioned in previous threads was bigger than the one I removed.
Following removal of only the dip stick tube and the front exhaust pipe the old one easily came out the gap, however been about 4mm bigger the new one would just not go in so I simply placed a trolley jack under the exhaust manifold flange and gently jacked the engine up which very quickly gave more than enough room to get the new alternator in - simples!

I'm happy now to take on the return trip to the UK starting Wednesday.

Thanks again for all the great posts which make, what could be difficult jobs, a tad simpler.
 
Back
Top