s-l1600-3.jpg

Panda (Classic) Pandani - 1000CL restoration

Introduction

Right, I've decided to start a thread showing the restoration of Pandani; my 1990 1000CL which I bought in Shipley last August for £421 via eBay.

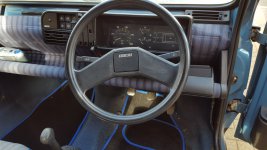
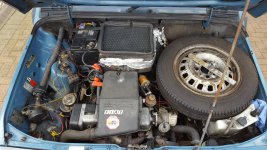
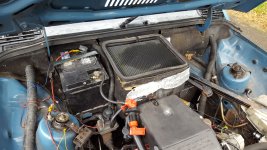
These are the photos from the original eBay advert.

s-l1600-3.jpg

s-l1600-5.jpg

s-l1600-8.jpg

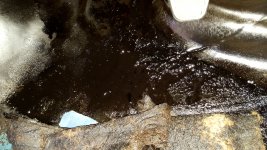
It came with an MOT and drives great but once I got it home and a detailed inspection was carried out it was evident that it may not get through the next MOT due to rot in the floor pan. I knew I was going to have to spend money on any Panda so I wasn't surprised by the work that is needed and pleased I got one at a good price that drives. :D I was happy to get a Panda after being Pandaless for nearly 20 years and was looking forward to the restoration ahead.

Coming over on Liverpool ferry
20160822_063306.jpg
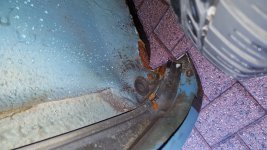
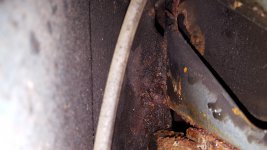
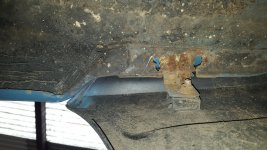
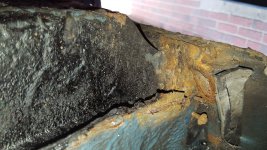
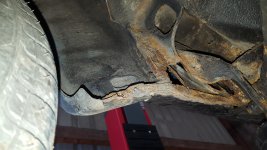
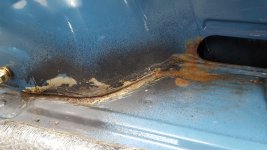
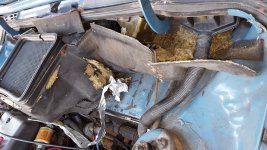
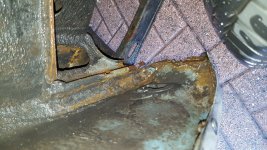
Home at last and detailed inspection begins
20160824_172743.jpg

Before any work is started I then spent the following 4 months buying small pieces of trim and parts as well as obtaining quotes for a full exterior respray along with welding and patching. After spending a small fortune on eBay for parts and trim and thanks to Binhoker, not only for parts from his Panda 'Lipstick' but for directing me to a scrapyard near Ballycastle (probably the only one in NI that has a classic Panda), I've obtained almost everything I need to get started.

The project is intended to be a slow one for next year or two despite having almost all the stuff I need mainly due to other commitments etc. that I'm sure many of us will be too well familiar. Pandani's currently SORNed and hibernating in the garage after the welding and respray was completed a week before Christmas and I intend to have her on the road in the spring allbeit with plenty more work still needing done then.:)

I've obtained some good advice from others including people on Fiat Forum and it's well appreciated.
I think I've gotten away reasonably lightly with regards to rust and rot when I see the state of some members' cars, especially the 4x4s which have suffered some serious abuse.

Sills in good condition for 26 years...
20160824_173216.jpg

...until you see below...
20160916_161514.jpg


...and the sill's end. Apart from the obvious sill repair, there's a whole section of about half the panel behind the plastic trim rotten out that can't be seen here.
20160824_173233.jpg

The rear driver's side arch/sill was by far the worst rot that needed attention, so not too bad when all's considered.:)

I'd the usual mice nest made from insulation in the engine compartment that so many others have encountered, a sea of liquid bitumen below the driver's footwell and a pretty well knackered carpet and seating fabric; the interior was very grubby and needed a deep clean. The electrics need a good tidy up and I want to add a few small extras along with a radio cassette to make the car look 'of its time'.

The black underseal that's been applied by a previous owner must have done some good for the main part of the floor pan as there's no hidden rust nasties lurking below as may be expected. Happy days.:D

Engine runs well (apart from some piston slap when cold) but needs some fine tuning to get it to its best. At the moment the focus is on getting the bodywork complete, some Dinitrol into the cavities and the exterior trim refitted.
 

Attachments

  • 20161009_153151.jpg
    20161009_153151.jpg
    4.7 MB · Views: 195
  • 20161007_175414.jpg
    20161007_175414.jpg
    8.5 MB · Views: 119
  • 20160916_161452.jpg
    20160916_161452.jpg
    2.1 MB · Views: 153
  • 20161009_122419.jpg
    20161009_122419.jpg
    5.6 MB · Views: 178
  • 20160827_120846.jpg
    20160827_120846.jpg
    4.5 MB · Views: 180
  • 20160916_161528.jpg
    20160916_161528.jpg
    5.7 MB · Views: 172
  • 20161007_152649.jpg
    20161007_152649.jpg
    4.3 MB · Views: 219
  • 20160904_135535.jpg
    20160904_135535.jpg
    5.1 MB · Views: 188
  • 20161009_153049.jpg
    20161009_153049.jpg
    7.1 MB · Views: 134
  • 20161008_145023.jpg
    20161008_145023.jpg
    5.8 MB · Views: 194
  • 20160824_172812.jpg
    20160824_172812.jpg
    4.3 MB · Views: 559
  • 20160824_172125.jpg
    20160824_172125.jpg
    4.4 MB · Views: 206
  • 20160903_162416.jpg
    20160903_162416.jpg
    4.5 MB · Views: 209
  • 20161008_143502.jpg
    20161008_143502.jpg
    7.5 MB · Views: 307
PHOTOS DURING BODYWORK STAGE

Only major work required to the body work was the bottom of the driver side rear wheel arch and the sill, this was in very bad condition and was totally rotten and totally gone behind the plastic stone guard hiding it; a new section's been made and nicely welded in position.

20161207_144544.jpg 20161207_144535.jpg

Small bit of rot at rear bumper mounting bracket not yet dealt with at time of photo.

20161207_144551.jpg

Welding carried out and sealed at bottom of passenger side rear arch and sill.

20161207_144634.jpg

I've no photos of the remainder of the minimal amount of welding carried out to the floor pan nor the new door skins. On eBay I'd obtained original Fiat door skins to replace the rotten ones and these were old new stock that had been lying about in a warehouse, John Charters who was doing the work did a really professional job that can't be faulted.(y)

Below shows the preparation prior to respray.

20161219_125645.jpg 20161219_125543.jpg 20161207_144713.jpg
 
COMPLETED PAINT JOB

John and his team have done a superb job that I'm sure anyone will agree, not only in the paint job but also removing dents and attending to small imperfections that I didn't notice until they were pointed out to me. Dunmurry Crash Repair/John Charters came highly recommended to me so for any of you in the area (Lisburn, Belfast area) needing bodywork done, give him a call.

20161221_170411.jpg 20161222_131102.jpg

20161221_170423.jpg 20161222_131035.jpg

The rear screen was replaced with a second hand one which I'd obtained from Binhoker, the windscreen was replaced also with a second hand one as the original shattered during refitting thanks to a stone chip.

This sorry looking Panda 750 was what donated me a replacement windscreen, it's whereabouts kindly mentioned to me by Binhoker; I think it was used for keeping chickens in judging by its interior:confused: After driving all the way to Armoy I took my opportunity of getting a few other pieces like the wax stat from the air filter as well as a new wheel as one of mine is leaking air due to a badly rusted rim and a few other small pieces.

20161207_103359.jpg 20161207_103335.jpg

Pandani's now stored in the garage which is ideal as I want the paint to fully cure (I believe it takes a few months to 'gas off') before waxing her, during these few months I'll reassemble the trim and interior ready for the spring and summer. I've a new rear axle which I'll get fitted in the spring (£99 from Partsworld - bargain (y)) as well as getting the seats reupholstered which may prove difficult as I want to match the existing fabric. Not forgetting I've also to get new tyres due to them cracking with age, all the wheels blasted and repainted, the electrics tidied up and who knows what else I'll decide to do as I go along.

Really love the deep shine of the paint; it really does look brand new.:D Thanks to Kolza for advice on removing and refitting the black roof rails; easy when you know how.
20170107_131648.jpg 20170107_131906.jpg

Had to get this on; I was pleased to get a new old stock 'Panda 1000CL' badge on eBay as well as a new rear 'Fiat' badge. Would anyone know where to get a new 'Fiat' badge for the radiator grille as mine is terribly scored and faded?

20170107_132611.jpg
 
Looks like they did a great job. That paint has certainly brightened up the car, nice shiny new 1000CL badge you got there too!

I had a look for a new Fiat badge for my post-facelift grille on my Panda but had no luck. I know Blu managed to find one on eBay but he was lucky as they don't come up often! A search just now threw up nothing from Ricambio/Partsworld or even on eBay. Good luck finding one, one will come around at some point, just keep looking :)

Looks like they're like hens teeth to get which is a pity as a new one is really what I want :( I was thinking of trying that stuff that is used to clear up cloudy soft top windows and other plastics that have aged, maybe that's really all it would need as the acrylic has been badly scored.:idea:
 
HEADLINING REPLACEMENT

The headlining was in very poor condition with dirt, score marks and a large sag at the rear. No amount of cleaning would have restored it to an acceptable standard especially with the score marks all over it. Thankfully Binhoker's Lipstick Panda yielded a half decent replacement which once cleaned with Autoglym Interior Cleaner came up very well, it's not perfect but a damn sight better than what was there. The photo below shows Binhoker's cleaned headlining against my filthy one.:)

20170103_132226.jpg

I used Jim Magill's tip of using self adhesive Velcro strips to sort out the sagging part of the headlining. I added some superglue to the strips that were attached to the headlining to ensure it would stay stuck as the felty texture of the headlining may not work too well with the self adhesive backing of the Velcro.

20170103_141121.jpg

Before fitting the headlining I installed the cable between my new dash cam position and its power supply which was positioned behind the large black plastic oval blanking section below the driver's seat belt real.

20170103_143115.jpg

The finished job looks well and the Velcro's removed the sagging section. A larger centre stud was used to hide the slightly damaged area around the original smaller stud which happened whilst taking it out of the donor car. :D

20170107_131724.jpg
 
DASH FABRIC REPAIR

OK, this was only a small annoyance but the repair was very effective; the corner of the dash fabric kept uncurling its self from where it was hooked on. To sort this out I glued the two pieces of the fabric that are folded against each other with just a small dot of superglue at it's far end to stop them separating, then a small piece of plastic was cut and this was glued to the fabric to form a projecting tab.

20170109_140649.jpg 20170109_140720.jpg

When the fabric's put back into position and the air vent's fitted the fabric is held neatly in the correct position.:D

20170109_140822.jpg

It's important to let the superglue set overnight as I've discovered in the past that even superglue can fail if you stress the joint too soon.

Hardly an engineering marvel, but useful if you find yours doing the same.
 
3RD BRAKELIGHT

I'm wanting to keep Pandani mostly original, however I have made some exceptions such as fitting things from higher specced Pandas (clock, internally adjustable mirrors etc.) and also a 3rd brake light. I think safety reasons alone justify the 3rd brake light and I've managed to get a suitable one from Amazon for about £8 that is the correct size and style to match the Panda's boxy shape.

20170109_215951.jpg

The steel bracket wasn't suitable as supplied, however i modified it by bending it to suit the shape of the tailgate; cutting off the excess of one of the bracket's 'leafs' and then bending it to form a small box section, a hole was drilled and a small grommet fitted to allow the cable to go directly into the tailgate's hollow section through a larger hole that had been drilled into it. I primed and painted the bracket prior to refitting as well as shrouding the three cores of the exposed cable with black heat shrink tubing and it looks reasonably well.:) The cable was then jointed to another newly positioned extension cable within the tailgate hollow section that led down through the flexible tubing/conduit that links the tailgate wiring to the car body to enable connection to the brake light circuit. Getting the cable through the conduit was a real bitch of a job and you probably wouldn't want to waste your time trying the same.:mad: Maybe just running the cable outside the conduit would be a lot less grief.

20170109_140930.jpg 20170109_144107.jpg 20170109_141153.jpg
 
If you are looking for an original fiat linea accessori 3rd brake light let me know

Cheap here in Italy around €30

Love your updates!

[emoji106]


I didn't even think of that. I always assume that you can't get Panda stuff and even when I do look it's nearly always the wrong places.:mad:


If you wish I can find one for you.. I know you did a great job with the current LED light but the original fiat accessori one is just perfect to keep the originality of the car
 
Brand new old stock
£40 plus p+p
IMG_1484087489.841898.jpg
You will need the tailgate support
 
Second hand
Lights + tailgate support
£30 plus P+P
IMG_1484087584.558886.jpg
 
If you wish I can find one for you.. I know you did a great job with the current LED light but the original fiat accessori one is just perfect to keep the originality of the car

Thanks, but I won't as I've already gone ahead and fitted the one I got as you know and to make matters worse I bought a second one as they were so cheap, just to have as a spare. Yet again I always look in the wrong places for stuff thinking Panda stuff is rare to get.I remember fitting that Lineaccessori one in your photo to my Cinquecento many years ago.
 
I have a thread ongoing
PANDA PARTS REQUEST
In future if you need just post a request...
I will try and find it for you
[emoji16]
 
'NEW' CARPET

Yesterday I collected the carpet I previously got from Binhoker about three months' ago after it was steam cleaned (3 times) to get out all the dirt and grease. Looks nearly new.:D Won't be fitting for a few months yet though, still have to Dinitrol the car and other personal commitments in next few months will hold me back. Nothing stopping me from buying stuff in preparation; another trip made today to Binhoker's for more small stuff off his donor car to have at the ready.
20170110_135033.jpg
I just need to get some kind of steel or rubber plate etc. to cover the worn area at the clutch and stop it going the way the original did with a hole right through it as indicated by the white plastic bag that's been stuck to the carpet's underside.
20161008_171141.jpg 20161008_150503.jpg
 
Last edited:
DASH CAM
We've all seen these before, but I thought I'd quickly show how I concealed my new dash cam wiring by placing it behind the headlining and hard-wiring it to avoid using the 12V socket. The dash cam bracket was stuck to the painted steel section of the roof to avoid impacting on the windscreen too much and it fits there nicely between the interior light and sunvisor,

20170111_161138.jpg 20170103_143115.jpg

The power supply and fuse were fitted to the back of the large blanking plate that is below the driver's seat belt real, so providing easy access if required but also concealing all the wiring. The yellow 'parking guard' wire was connected with the red +12V wire as I wasn't using the 'parking guard' feature but still wanted the yellow wire to be protected by a suitable fuse instead of the main circuit fuse at the fuse box which would be too large for the small size of the yellow wire in the event of a fault to earth.:( Really the manufacturer should have included an inline fuse for the yellow wire as well as the red.:confused: The power supply was in turn connected to the brown/white striped cable (feed to rear wiper motor) therefore the camera only comes on when the car's running.

20170111_155205.jpg
 
Back
Top