image.jpg

Panda (Classic) My 1000S

Introduction

My 1000S
Sorry- another dreadfully enthralling under-arch photo...
I have not got as far as I would have liked due to one thing and another, but today I managed an hour to get the newly-arrived shocks installed with the restored parts, and replacement gaiters and lower arms.
Maybe I'll see it back on all four wheels by the weekend, ready for the Spanish MoT in the very near future.

I have managed to fix the annoying driver's door rattle ( the door rattles in its frame) by installing a thicker section weather strip. Snug again!

There are also some 20mm wheel spacers for the rear wheels to fill out the arches; yes I realise this is a potential sore point for some, and yes, i'm over 40, and yes I'm putting them on purely to satisfy my eye, naysayers may keep shtum as I've read all of the discussions before.. ;))

Can't wait to get it rollin'
Then we can have a proper photo session :)
 

Attachments

  • image.jpg
    image.jpg
    714.1 KB · Views: 46
Now that the wheels spacers (20mm) are on, there is an ugly deep hole where lurks the rusty hub nut...
After a bit of experiment I came up with a hub cap from a beer can. Liquid inspiration indeed.

Chop the bottom off a beer can, Spanish beer works fine for this.
Cut it down to the base relief diameter, a few mm wider than the hub hole diameter.
Tease it in using a tubular block and a soft mallet.
Problem is that by the time you get to the fourth wheel you're a bit sloshed.

Apologies for a post per photo, it's the only way my phone lets me do it on yhis site!
Saludos
 

Attachments

  • image.jpg
    image.jpg
    250.2 KB · Views: 34
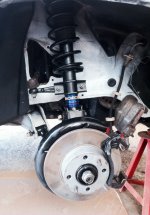
Now that i have changed the front dampers, i have moved to the rear. The dampers were not to bad but I have installed new monroes anyway. Whilst in there I decided to check out the rusty springs, and suddenly decided to see how cutting them down a little might affect the ride ( and the looks of course).

I removed a half- circle from the bottom of each coil, and now have the rear end about 20mm lower.
After a blast on my favourite road, I can report that the handling is transformed. This may likely also be due to the rear spacers and new dampers all around, but I am well impressed. The car feels very neutral on a dry surface, minimal scrubbing and high stability. Certainly a little firmer.
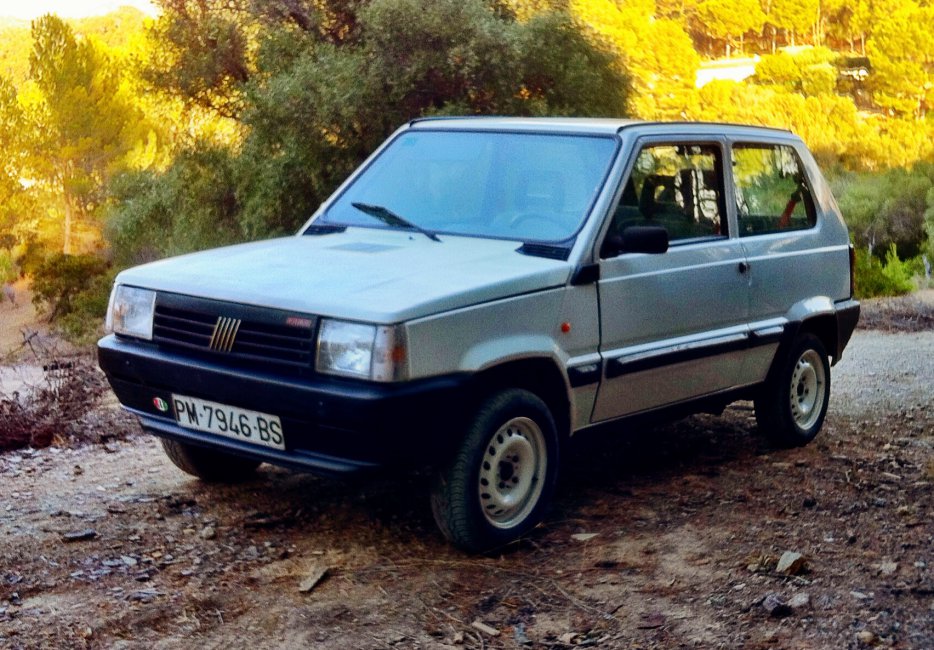
I'm well impressed by this little car. Really impressed.
 

Attachments

  • image.jpg
    image.jpg
    652.2 KB · Views: 26
Hello everyone
Now that the mechanicals are fettled, it's time to get on with some bodywork.
The body is really good, but there was some misalignment in the front RH corner, due to the misshapen front wing..
So out came the wire brush to remove the suspected bodyfiller.
I found loads of filler, and not surprising as it came up like this...
 

Attachments

  • image.jpg
    image.jpg
    421.6 KB · Views: 28
Last edited:
I had just bought a panel beaters kit as I am fixing up a few cars, and decided to 'practice' on the Panda's relatively flat and square form. At least the crooked front end is now true, but my skills aren't up to the fine finishing yet, so a bit of putty had to be used.
I'm very happy with the result, but it'll need a bit more fine sanding and filling before body colour goes on.
Comments welcome!
 

Attachments

  • image.jpg
    image.jpg
    563.8 KB · Views: 33
Been a while, since which there have been no novelties. The panda is proving to be a worthy addition to the household, daily trips to the shops, picking up the kids from school, and some daily commuting .
Great!
Today I finally get around to front wheel alignment, long needed.
I add a photo of the now finished front wing repair.

Thanks!
 

Attachments

  • IMG_0179.JPG
    IMG_0179.JPG
    1.2 MB · Views: 21
Back
Top