This post contains affiliate links which may earn a commission at no additional cost to you.


You are using an out of date browser. It may not display this or other websites correctly.
You should upgrade or use an alternative browser.
You should upgrade or use an alternative browser.
General Spare wheel carrier on ebay
- Thread starter envy
- Start date
Currently reading:
General Spare wheel carrier on ebay
You beat me to it.
I was going to mention that as well.
LUIGI
I was going to mention that as well.
LUIGI
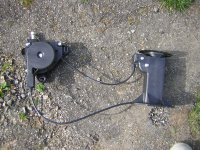
This listing is for the mechanism and the threaded wheel carrier which fixes to the wheel and detaches from the lowering cable shown. The Peugeot list price of these is £86.83 for the mechanism and £25.86 for the carrier +VAT.
There should be 3 spacing/locating brackets, 12 fixing nuts and 2 support screws to complete the installation. If these aren't included in the auction, I have the Peugeot part numbers, the list price for these bits totals £44.71 +VAT.
I paid £144.54 for everything (20-25% ex-employee discount) from Peugeot MD.
Hi Quboffin. I missed out during bidding on that one, so I made a best offer on the next one they listed,which was accepted. Glad I did, as the one after mine went for over £60!!!
Anyway,I'd be very grateful if you could tell me just what other bits I will need, with P/Nos if possible.
I have the 16" MyLife alloys on my Qubo. Would you know which other FIAT wheels would be suitable as a spare?
Many thanks in advance for any pointers.
Anyway,I'd be very grateful if you could tell me just what other bits I will need, with P/Nos if possible.
I have the 16" MyLife alloys on my Qubo. Would you know which other FIAT wheels would be suitable as a spare?
Many thanks in advance for any pointers.
Hi Doblovert, glad you got the carrier. ")
I presume they didn't send you the 3 locating brackets (which stop the wheel moving around when its raised), the 2 plastic turnscrews (which secure the T bracket to the wheel) and the 12 nuts.
I only have Peugeot part numbers:
2 front brackets P1607946880
1 rear bracket P1607946780
2 plastic turnscrews P1608899380
6 nyloc nuts (I think they're 8mm) P243923 - 3 for the lift mechanism and 3 for winding winch.
6 nyloc nuts (I think they're 6mm) P693658 for the brackets.
If you look under the floor you'll see the studs and it's pretty obvious where the parts go. TBH the locating brackets aren't essential and of course you can use any nuts that fit. Pull out the 2 grommets next to the tailgate catch, the winding winch nut goes in there.
I have the same 16" wheels as you but I bought a new 15" Steel Bipper/Nemo wheel on ebay (£26) and fitted a 185/65/15", tyre which has almost identical circumference as the 16" tyres fitted to the alloys.
Whatever wheel you get, make sure it has the two locating holes in addition to the 4 studs!
Well, I now have my carrier- it went to a friend in UK who has delivered it to me here in France, along with a steel 15" Nemo wheel and 185/65/15 tyre,as suggested.
Yep, sure enough- and God knows why when the carrier was removed from a car for LPG installation- there are no fitting instructions, and all the suggested plates/nuts are NOT included- so I'll be waiting a while yet to hang the wheel beneath the car, the boot is half-full of spare wheel!
I can see clearly where the winding part goes, can I just bolt this on with three nyloc nuts and ordinary washers? (likewise the second part)
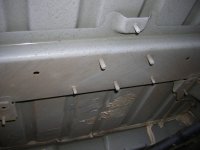
There are, however, no less than EIGHT bolts where the retaining part goes (see pic of underside of my car- what on earth are they all for, and which ones do I attach the retainer to? (I'm guessing the 3 points at the upper part of the pic,the 2 side by side and the single detached point, but to be sure.... and what are the 5 remaining bolts, three in line and two detached,one either side, for?)
Thanks
Yep, sure enough- and God knows why when the carrier was removed from a car for LPG installation- there are no fitting instructions, and all the suggested plates/nuts are NOT included- so I'll be waiting a while yet to hang the wheel beneath the car, the boot is half-full of spare wheel!
I can see clearly where the winding part goes, can I just bolt this on with three nyloc nuts and ordinary washers? (likewise the second part)
There are, however, no less than EIGHT bolts where the retaining part goes (see pic of underside of my car- what on earth are they all for, and which ones do I attach the retainer to? (I'm guessing the 3 points at the upper part of the pic,the 2 side by side and the single detached point, but to be sure.... and what are the 5 remaining bolts, three in line and two detached,one either side, for?)
Thanks
Attachments
Last edited:
Not sure, but just had a look at mine, and there are 4 brackets mounted (as it were 1 in each corner) which have rubber blocks on for the tyre/wheel to be pulled against......
Hope that may be of some help.
Cheers Qube O
Hope that may be of some help.
Cheers Qube O
Hi Doblovert, these photos show the bits you need and where they fit. Fitting the winder is as you say and Nyloc nuts/washers will be fine. See my previous post for part numbers. I agree, heaven knows why the LPG fitter couldn't have put all the bits in a bag and sent them with the carrier

You can see the location of the winch mechanism with the two front and 1 rear rubber-faced brackets which locate inside the wheel to hold it in place when it's raised. For some reason, the front brackets have 2 studs each but the rear bracket has one stud at the front with a bolt and captivated nut at the back - hence the 5 studs!

This is the spring loaded threaded T which fixes to the wheel with the 2 plastic turnscrews.

The large nipple on the end of the cable locates in the top of the T and is secured by the white nylon mushroom.
As you turn the winding mechanism, the wheel will be dragged along under the winch. The cable then lifts the wheel until the thread on the T engages with the winch. Continue to wind until you feel the clutch slip.
You can see the location of the winch mechanism with the two front and 1 rear rubber-faced brackets which locate inside the wheel to hold it in place when it's raised. For some reason, the front brackets have 2 studs each but the rear bracket has one stud at the front with a bolt and captivated nut at the back - hence the 5 studs!
This is the spring loaded threaded T which fixes to the wheel with the 2 plastic turnscrews.
The large nipple on the end of the cable locates in the top of the T and is secured by the white nylon mushroom.
As you turn the winding mechanism, the wheel will be dragged along under the winch. The cable then lifts the wheel until the thread on the T engages with the winch. Continue to wind until you feel the clutch slip.
Last edited:
Loads of qubos and fiorinos on ebay going for spares
LUIGI
LUIGI
Many thanks for your trouble in sending the underside pics- it's very helpful, shows me what bits are missing/I need, and tells me my assumption re which studs to use for the lifter was wrong-- DOH!!! I'm very grateful for the help.
I've tried getting a response several times by email from some of the scrappers- usually the mails just bounce,their inboxes are full/untended, or I get no response, and phoning from France can be difficult/expensive.
The spare sits nicely face down, it's just that the boot is not the largest in the world!!
Frankly, the whole thing is very annoying. I had a Bipper before,15" steel wheels, normal spare- so when I came to buy the Qubo,I had no real reason to expect no spare wheel.I bought it sight unseen from a main dealer,flew in and collected in the dark....
I'm not sure who to be most irritated by. FIAT for scrimping and making the spare an optional extra? The original and only other owner who scrimped,stupidly, on a £90 extra,when he'd have got far more "value" than £90 in spare wheel,carrier,jack,tools etc etc? The main dealer for not advertising that it had the stupid squirty repair system? The person selling the s/h carrier for not including all the parts?Or just plain old me, for not double checking everything first? I'll learn for future reference!
No problem, I'm glad to help.
I would think the wheel would be OK without the 3 brackets and the T would work without the plastic turnscrews which hold it onto the wheel, so you just need nuts & washers.
If you decide to buy them, you should be able to get the bits from a Peugeot dealer (there may be one or two in France ) using the part numbers above and cost will be around 50 Euro for all the items listed, unless you can get some discount.
The dealer I used could not order them without a Reg number so I got one from a Bipper which was parked on the forecourt.
Hope you get it sorted soon
I would think the wheel would be OK without the 3 brackets and the T would work without the plastic turnscrews which hold it onto the wheel, so you just need nuts & washers.
If you decide to buy them, you should be able to get the bits from a Peugeot dealer (there may be one or two in France
) using the part numbers above and cost will be around 50 Euro for all the items listed, unless you can get some discount.The dealer I used could not order them without a Reg number so I got one from a Bipper which was parked on the forecourt
.Hope you get it sorted soon
I,ll probably give it a go in the next few days without the brackets,just to see how crucial they really are. I have a good stock of washers and nyloc nuts.
If I need to get the bits from Pug,there should be no problem here in France, as my last car was a brand new Pug Bipper ,since sold, so I already know a reg number!! The trouble is, service in France is dreadful, and spares are an astronomical price.
I've actually messaged the seller of the s/h carrier, to see if they can sort me the other bits free, or cheaper ( and emailed Sturgess, who supplied the car, for a dealer price- hopefully on preferential terms for FF membership!)
I'm a bit busy presently with vehicles. Just replaced a hydraulic hose (awkward job) on my Pug 306 cabrio- it burst as I was demonstrating the roof operation to a prospective purchaser!- drat,or stronger words! Also, doing some bits and pieces of detailing on my Strada Abarth, between old car events, including painting and fitting new Abarth cam covers .Never a dull moment....................
- Joined
- Mar 14, 2013
- Messages
- 13
- Points
- 56
Hi Doblovert, these photos show the bits you need and where they fit. Fitting the winder is as you say and Nyloc nuts/washers will be fine. See my previous post for part numbers. I agree, heaven knows why the LPG fitter couldn't have put all the bits in a bag and sent them with the carrier
View attachment 134298
You can see the location of the winch mechanism with the two front and 1 rear rubber-faced brackets which locate inside the wheel to hold it in place when it's raised. For some reason, the front brackets have 2 studs each but the rear bracket has one stud at the front with a bolt and captivated nut at the back - hence the 5 studs!
View attachment 134299
This is the spring loaded threaded T which fixes to the wheel with the 2 plastic turnscrews.
View attachment 134300
The large nipple on the end of the cable locates in the top of the T and is secured by the white nylon mushroom.
As you turn the winding mechanism, the wheel will be dragged along under the winch. The cable then lifts the wheel until the thread on the T engages with the winch. Continue to wind until you feel the clutch slip.
Very useful photos Quboffin.
I've just had a spare wheel carrier fitted to my Qubo by a (used to be a Fiat) garage.
Garage had omitted to order the plastic ‘T’ that attaches the wheel to the cable so had to go back again to have that fitted.
When I got home I found there were no plastic turnscrews to fix the wheel to the ‘T’.
Screws were posted out to me which look like those in your photos but they do not seem to fit in anywhere on my spare wheel.
My spare wheel is an alloy (garage were aware of that when carrier was fitted) and I suspect your photo is of a steel wheel.
Couple of questions, is the spare secure/safe without the turnscrews, and do you know if there is a different screw for use with an alloy wheel?
Thanks
Sue
Hi Sue,
Yes my spare is steel.
I don't know if there are different turnscrews for the alloy wheel, I can't remember seeing any in the parts list. Anyway they don't affect the security of the wheel once it's wound up into position, so no problem there.
They just make it easier to attach the winch wire to the 'T' as they hold it in the correct position on the wheel, prior to sliding it under the car.
To fit them you need to lower the spare and pull it out. This will loosen the 'T' and allow you to turn it so the two screw holes in the 'T' line up with two of the wheel stud holes (see my third picture). You should then be able to push the turnscrews through the back of the wheel through the stud holes and screw them into the 'T' below. So the turnscrews are inside the wheel when it's raised i.e. you can't see them.
Hope this helps
- Joined
- Mar 14, 2013
- Messages
- 13
- Points
- 56
Hi Sue,
Yes my spare is steel.
I don't know if there are different turnscrews for the alloy wheel, I can't remember seeing any in the parts list. Anyway they don't affect the security of the wheel once it's wound up into position, so no problem there.
They just make it easier to attach the winch wire to the 'T' as they hold it in the correct position on the wheel, prior to sliding it under the car.
To fit them you need to lower the spare and pull it out. This will loosen the 'T' and allow you to turn it so the two screw holes in the 'T' line up with two of the wheel stud holes (see my third picture). You should then be able to push the turnscrews through the back of the wheel through the stud holes and screw them into the 'T' below. So the turnscrews are inside the wheel when it's raised i.e. you can't see them.
Hope this helps
Thanks for coming back so quickly Quboffin. There’s no way I can get the supplied plastic screws to fit but am pleased to hear that not using them won’t affect the security of the wheel. I’ve had a few practices getting the wheel up/down and it is easy enough but the wheel does have a tendency to tilt when it’s lifted which is annoying as it needs two people to get it to fit snugly back underneath. I’ll keep looking but will not worry about it too much for the time being. I would go back to the garage but to be honest I think this site is much more use !
Thanks again
Similar threads
- Replies
- 0
- Views
- 567