Technical Clean your Boost Sensor now!

Currently reading:
Technical Clean your Boost Sensor now!

Hi G8RPI here,
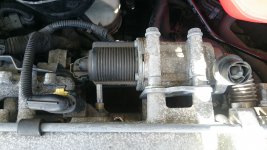
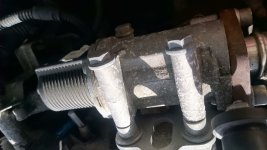
The T30 bit I used (shown in photos) is 25.2mm long. My Croma is a 2006 16V manual and I had no problem. It sounds like the 8V is a bit tighter on space. The bits are hardened so you would have to grind them down, rather than sawing, if you want to shorten one.
Anyone got a 8V photo to post?

Thanks g8rpi.
I will try within a week to post a photo of how it looks in mine 8v. Just not sure if I will know how to post it.
 
G8rpi, your cleaning job outcome looks outstanding, I had a look at your photos (thanks for posting them), it appears that in 16v versions there is more room for the torx bit. I can't even fit 25mm bit into the space between torx screw and egr valve shell. You will see on photo.
 
Thanks g8rpi.
I will try within a week to post a photo of how it looks in mine 8v. Just not sure if I will know how to post it.

Just click on the attachments button (looks like a paperclip) at the top of the message editing window. You can then browse to the image file on your PC. If you have image editing software you can reduce the file size by cropping the image and using "save for web" before you make the message.
 
Would just add for those not yet getting their hands dirty with Boost Sensor Cleaning then I will add:

1) DO NOT poke, prod, scrape or mechanically/physically try to remove the carbon crud

2) If deposits still look wet then you have two options. A) is to use spray brake fluid cleaner or B) gentle swilling of sensor head in diesel fuel AND/OR a combination of both.

3) If 2) does not work or you know you have long standing carbon deposits then one needs to soak JUST the sensor head in diesel fuel for 12 to 24 hours (or even longer).

For most and in my experience at every 12K mile service removing the sensor flushing/cleaning with Halfords(other) brake fluid cleaner quickly removes the craps and after the first full clean annual clean is dead easy and takes less than 5 minutes.

Warning again! NO pricking, poking, scraping etc should ever be used. (unless you know what you are doing and even the it is dangerous!)
 
I had a drive on a regular route today and cleaning the MAP sensor has made a difference. Based on the instant fuel consumption display, there is an improvement in low speed, <40MPH, consumption in particular. And my sensor was not all that dirty. I did some research and it is a dual manifold absolute air pressure and temperature sensor as I suspected. I second S130's comment about poking or scraping, it would be very easy to damage the yellow thermistor that senses temperature. It's also possible to force muck into the pressure sensor cavity where it will be virtually impossible to remove. I soaked mine with the probe pointing down into a small container of solvent and then brushed with a small toothbrush. White spirit is a good solvent to use, fairly safe and common. Try not to get liquid into the body of the sensor. The silicon sensor element is protected by a soft gel that may be affected by some solvents. Don't use an ultrasonic cleaner or submerge the unit in liquid.
I ordered a EGR restrictor today, that's the next job.
 
Last edited:
That will do fine, my son has an Alpha 159 with the same basic engine as the 150 16v in the Croma.I cleaned his and took a note of the numbers etc it was identical to mine.
 
It does come up spotless after solvent cleaning, so there's no need to buy a new one.

The new one would be covered in black goo after five minutes anyway - it's the EGR that spews soot all over it. I don't think there's any alternative to cleaning it every now and then.

Even if you disabled the EGR then there's probably ten years' worth of soot already hanging around in there.
 
This post contains affiliate links which may earn a commission at no additional cost to you.
It does come up spotless after solvent cleaning, so there's no need to buy a new one.

The new one would be covered in black goo after five minutes anyway - it's the EGR that spews soot all over it. I don't think there's any alternative to cleaning it every now and then.

Even if you disabled the EGR then there's probably ten years' worth of soot already hanging around in there.


My EGR is mechanically and electronically shut.
I like a new sensor, and clean the existing one, and keep it as a spare.


Anyway, the Mister-auto Bosch sensor is less than 50% of the Fiat price...!!
 
Last edited:
Took the opportunity of some decent enough weather this morning and had a go at cleaning mine.

Definitely too tight to the egr in the 1.9d 8v to get a T40 in but with the egr mounting bolts and some of the egr bolts out I could get enough clearance to get it undone. Probably a job worth doing whenever there's a need for some routine egr maintenance / cleaning.

Car's running much better now so a worthwhile job.

Changed the air and pollen filters as well which won't have done any harm.
 
Finaly I got around to shoot couple of photos and post them on.
That's how it looks like on my 1.9 Multijet 8v.
You see 25mm long torx bit which I can not fit in between screw and egr valve shell. Even 'operation' mentioned in above post is going to be tricky, because some screws on egr are seized (tried applying WD-40) other are really hard to reach, guess all made so awkward just to put off anyone who would want to do some DIY maintainance on modern car, I need to find more appropriate tools.
 

Attachments

  • DSC_0428.JPG
    DSC_0428.JPG
    2.9 MB · Views: 111
  • DSC_0429.JPG
    DSC_0429.JPG
    2.6 MB · Views: 84
  • DSC_0430.JPG
    DSC_0430.JPG
    2.8 MB · Views: 61
Hi Paulski, never had the problem of egr bolts seizing up probably because it has to be taken out so often :)

For anyone else looking to try this on the 8v 1.9D you don't need to take the egr out completely, just undo the 3 long bolts at the top and then the 2 that connect the top half of the pipework to the egr. That will give enough leverage to get a 1/4" T40 socket in to get it undone.

I will give it a go, thanks BrianMcL
 
I changed mine today for a new one, easy job on a 16V.
I was shocked about the amount of carbon/sooth covering the old sensor, amazing it still worked.....
So now I will clean the old one ( if possible...) and keep it as a spare.
Luckily my EGR is blanked, so I hope the new senor will stay clean for a long time.
 
Back
Top