Technical Seicento MPI 2002. Total brake failure, help needed

Currently reading:
Technical Seicento MPI 2002. Total brake failure, help needed

hope ive read your reply correct as I dont want to teach granny etc etc...
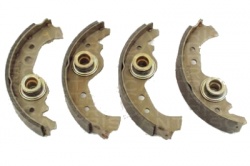
its those 2 large washers in the middle of each shoe - they sit on top of a spring loaded mechanism which allows the shoes to move out so far then return just enough to maintain a pedal. If you force the mechanism with a screwdriver (only a bit a time) you can get the shoes to sit in a position nearer to the drum so you don't have too much pedal travel. Make sure handbrake cable is slack before doing this then adjust cable only when you are happy. Do with care though or you're back to an overheating issue. Probably not Fiat advice but I've always done it and it works for me.
 
I don't have a shoe adjuster on mine to even each side out. So I have adjusted the handbrake cable adjuster to give 5 clicks so I can rule out any brake binding due to over adjustment if it happens again. Take a look at the photo in the link below.


https://www.flickr.com/photos/534470...posted-public/

Thanks for the tips.

You were very lucky that day.

What gets me is I had the OS/F steel brake pipe replaced for the MOT at the start of the year and asked them to do a full fluid change and they tested it and said it passed there special heat test and talked me out of it. It was jet black when I did the fluid change the other day.

Interestingly a fluid change sorted another problem out that I couldn't get to the bottom of. The car has been in the family for around 6 years. My sons girlfriend had it for at least 2 years before that. There has always been a thump when pressing the foot peddle down first thing in the morning, like it sticks and then its fine for the rest of the day. So its been like that for at least 8 years. It hasn't done it for the past 5 mornings since the new fluid change. How strange is that.

Thanks

Where is the spring mechanism?
Is it behind the shoe on the pole on the back plate that goes through the shoe or are they sandwiched on the shoes between the round disks?

If you look on this diagram below, it does not show the mechanism you mentioned. I don't remember seeing any when I replaced the shoes and the diagram is identical to how how my brakes look.

https://www.flickr.com/photos/53447058@N05/29675147303/in/dateposted-public/

Thanks
 
Last edited:
77362292.jpg


The big circular thing
 
a friction adjuster

D

I was having a good look at it and came to the same conclusion. I just couldn't understand how they worked.

Metalguru3, I will try your method this weekend and see if the rear braking can be improved.

Thanks all, for your help and advice with this. (y)
 
Last edited:
Agreed, its not obvious from looking at them how the self adjusters work

The washer fits over a pin on the backplate

The shoe can move relative to the fixed position of the washer because its only held there by friction - as soon as you see it move youll grasp the principle

Try it with just 1 shoe fitted to the backplate and no springs - much easier to see the operation then.

Failing that sit in front of your brakes and call me and ill talk you through it. PM me for my phone no. If you need to.

I'll give that ago. Heavey rain and work has stooped me getting on with it today. Hopefully I'll have time tomorrow if not it will be next weekend again before I have the time.

Thank you for the offer of phoning you. Hopefully it won't come to that but nice to know I have someone to talk me through it correctly if I need it. (y)

The sticking of the brake pedal came back again. It lasted nearly a week without doing it after the fluid change using the pressure bleeder. Did you ever get to the bottom of what was causing yours to do the same?
 
Last edited:
I never did. It does it every time i ise it after its stood overnight.

Its never caused me any issues thougjh and i did a road rally in it last week and brakes were 100%
 
I never did. It does it every time i ise it after its stood overnight.

Its never caused me any issues thougjh and i did a road rally in it last week and brakes were 100%

Mine does it when left all night as well. Then for the rest of the day nothing. Very strange. But after I did the full fluid change using the pressure bleeder on the master cylinder it stopped doing it for nearly a week.

Recently I pushed both front pistons back a little when I put a new set of front brake pads in and the next morning it was back again.

It's been the same for years but something changed that caused it to stop. Now I'm on a mission. If I ever find out I'll let you know.

Interesting about the road rally you did. Sounds good fun.
 
Last edited:
How strange - keeping an eye on this thread and mine had sudden and catastrophic brake failure yesterday.
I was doing owen motoring club's bright sparks autotest at curborough sprint course yesterday
Pedal went to the floor across the finish line on the first test
Turned out osf brake pipe had corroded behind the wheelarch cover and had burst.
Without a flaring tool, i had to cut the pipe by the master cylinder and crimp it flat
We finished the day on 1 caliper - a bit interesting in the wet!!
Managed 9th in class of 20 and 19th overall out of 40 in the slowest car there.
My daughter had an off and nearly rolled it when it dig in the mud.
Fixed it tonight for the princely sum of £8.00
 
I had my old Cinq in for a MOT test years ago and while testing the brakes on the resistance rollers they completely failed.
Found the pipe as above had popped behind the wheel arch cover.
Had it replaced, a tricky one as it goes around the back of the engine. but after that all good again.
Maybe worth a look to see if it is weeping.
 
Ive checked all of them now. It was a fiddle both pulling out the old one and fitting the new one - makes it easier by using copper though
 
I've got a flaring kit. Never used it before.

For future reference what sort of flair is it for the Sei and what sort and size fittings do I need to get?

Am I correct that I need to get some 5mm cooper pipe?

It was mentioned on the MOT advisory that the front Brake pipe is corroded to rear metal brake pipe. He doesn't mention what side. Is that the pipe that runs from the brake force distributor and connects to a straight join?

Thanks

Anyone got the answer to my questions above please?

Thanks
 
Some will be single flares, some will be double. Look at what you take off and match it.

3/16th pipe is what you need, metric fittings.

The MOT tester should have marked the pipe that concerns him with yellow crayon (They aren't allowed sharp objects). If he hasn't it should be obvious.

Pop a poly bag under the brake fluid cap and refit the cap before you remove the pipe. This will reduce brake fluid leakage.

Before starting anything make sure you dowse the bleed nipple in Plus gas or similar (not WD40) for several days.

Cheers

D

All noted. (y)

With the metric fitting what size are they?

Thanks
 
Back
Top