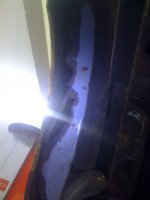
General Rust Hole Restoration

Currently reading:
General Rust Hole Restoration

Hi

Not much progress over the last few weeks being christmas. Started to make up some metal plates for the worst of the rust ready to be welded in. Also got myself a Panda to be collected soon for another project.

Pic shows chassis plates taped in place to make sure they fit, I'm guessing sellotape won't hold for MOT?

Thanks

Nath
 

Attachments

  • photo.JPG
    photo.JPG
    810.2 KB · Views: 104
Hi

Made some progress on the 'cento today. Called up Fluffy yesterday and no chance of getting any rear inner arches so started scraping around to see how bad the rot is. There is some metal to weld to so a friend started making up an arch section to be welded in which I think looks great, still needs some work to fit though.

The other arch isn't as bad and only needs a small plate putting in.

Won't be welded for a couple more weeks yet though but I really can't wait to get it done!

In the meantime I better start sanding the rear suspension and buy some poly bushes!

Here's pics of today's progress.
 

Attachments

  • photo.JPG
    photo.JPG
    503.4 KB · Views: 76
  • photo (2).JPG
    photo (2).JPG
    746 KB · Views: 79
There is one sure fire way of garanteeing it wont go again, body lead everything. I cut alot more than that out of mine, all went back in with two and a half kilos of lead.

As for the rear cross member, I painted mine with red oxide gloss and burned it in with the oxy torch while still wet. When that had dried i gave it a lick of bitumen based black paint and waxoyl over the top, no way it will rust now. Avoid powder coating under the car as stone chips will track underneath and bubble up like a rash. I have experience with bike frames. Paint is good but give a coat of self etch primer soon after sandblasting to ensure good even adhesion.

make sure to check the inside of the sill at the rear, as these rot from the inside out. Pull off the rear door panels and stick you're hand down there. Problem is worse on the near side as the sunroof drain runs there, the drain holes in the sill get blocked and water gets trapped.

Good luck with it.
 
Hi

Been a while but finally some progress!

The car has had new front arms with Polybushes, Apex shocks and springs. The rear suspension has been stripped, repainted, polybushes and apex suspension also.

I have also replaced the driveshaft oil seal which was leaking badly.

Best of all the welding is under way. The S bend in the chassis in nearly complete and the rear seatbelt area is nearly done too.

Still lots to do but in a few weeks we will be able to put the rear suspension on, fuel tank in and it will have wheels again! Can't wait to see how it looks on the new suspension.

Still got to find ARB brackets and a fuel filler neck as mine was leaking!

Will get some more pics up soon as it all comes together.

Thanks

Nath
 

Attachments

  • cinq2.JPG
    cinq2.JPG
    193.1 KB · Views: 83
Hi

I finally feel like i'm getting somwhere now. The welding should be all complete over the next few days then its a small amount of grinding/filling and lots of painting inside and out.

This pic shows the amount of work one side needed and the other was not much better. After the painting I have the task of reconnecting the fuel tank, suspension, brake lines etc and hoping the car starts! Its been out of use for 18months now.

Still got to find a fuel filler neck though, anyone know where a good place to start is? ebay has none.

Thanks

nath
 

Attachments

  • cinquecento.JPG
    cinquecento.JPG
    102.4 KB · Views: 93
Back
Top