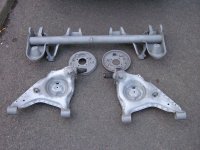
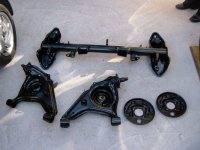
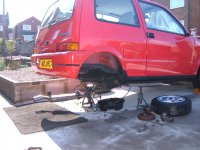
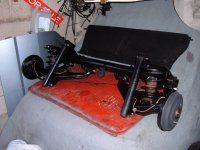
decided to tidy up the rear suspension on the sporting so i sent my spare rear beam and trailing arms to the sand blasters and the to be powder-galved fitted some new bushes with a tool i made and built it all up with new bolts just need a fine day to get it back on the car. front end next.


You are using an out of date browser. It may not display this or other websites correctly.
You should upgrade or use an alternative browser.
You should upgrade or use an alternative browser.
General sporting rear suspension tidy up.
- Thread starter urchin
- Start date
Currently reading:
General sporting rear suspension tidy up.
nice job ")
how expensive is sand blasting?
how expensive is sand blasting?
looks fantastic mate
now ive seen that ill be doing it too! all underneath my N/A cinq looks like that after 2 full weekend of axle stands and a paint brush
now ive seen that ill be doing it too! all underneath my N/A cinq looks like that after 2 full weekend of axle stands and a paint brush
- Joined
- Feb 16, 2005
- Messages
- 5,983
- Points
- 988
Great stuff
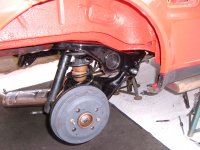
Those parts to tent to rust a fair bit. Most of its chunky, so no worries, but some of the drilled brackets for dampers etc can suffer. What you've done there is better than the factory with the coating, so should last longer than the rest of the car
Kristian
Those parts to tent to rust a fair bit. Most of its chunky, so no worries, but some of the drilled brackets for dampers etc can suffer. What you've done there is better than the factory with the coating, so should last longer than the rest of the car
Kristian
OP
OP
the beam came off a 51 plate seicento and it was near mint when i got it my original one had rotted through the blasting was done by a local company and cost me £25 but i do take alot of stuff to him so he did it me cheap, the coating cost £50 and the bolts a shocking £37!!!! but its well worth it if you intend to keep the car as i do, before it goes back on a ill tidy up the rear inner arches and chassis with some red paint i had left from when i had the bonnet painted.
the blasting was done by a local company and cost me £25 but i do take alot of stuff to him so he did it me cheap, the coating cost £50 and the bolts a shocking £37!!!! but its well worth it if you intend to keep the car as i do, before it goes back on a ill tidy up the rear inner arches and chassis with some red paint i had left from when i had the bonnet painted.You got a very good price on that! So, galvanised as well as powder coated, great!
I just spent a lot of time doing just a pair of rear arms manually, and they don't look anything like that good. Still have to waxoyl them and foam fill them!
Ah well, next time! Blue's beam and rear springs could do with a spruce up......
I just spent a lot of time doing just a pair of rear arms manually, and they don't look anything like that good. Still have to waxoyl them and foam fill them!
Ah well, next time! Blue's beam and rear springs could do with a spruce up......
OP
OP

fantastic mate looks A1
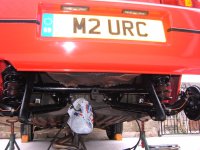
that is exactly the way i want my cinq to look.
I don't know if anyone is the same, i much prefer having a clear and tidy engine bay and a nice and shiny undernerth than a nice car body.
Ming
I don't know if anyone is the same, i much prefer having a clear and tidy engine bay and a nice and shiny undernerth than a nice car body.
Ming
fatty
New member
That looks amazing! Preservation as well as restoration nice one!!
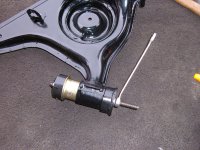
I am impressed with the bush refitting tool, did you do that on a lathe? what size was the threaded bar? M10? or M12 like the bolts that go through it
OP
OP
m12 its just two short bits of tube with washers welded to one end and then the threaded bar with a nut on each end it only took half an hour to make i have used it many many times but you can get the same results with some threaded bar and a couple of old sockets. the hard part is getting the old bushes out
Attachments

where did u get the two black round bit ????
Fancy making a set and sell me one ??
Ming
Fancy making a set and sell me one
??Ming
Similar threads
- Replies
- 10
- Views
- 324