Technical Help Replacing 2009 Bravo Drivers Door Mirror

Currently reading:
Technical Help Replacing 2009 Bravo Drivers Door Mirror

mjlt

New member
Joined
Dec 28, 2010
Messages
2
Points
1
Hi

Thanks to some clown driving like an idiot in the snow I'm just about to try to replace the drivers side door mirror on my 2009 Bravo. Having spent £130 on parts from the local dealership I'm trying to save the the £30 fitting charge for a new year drink :)

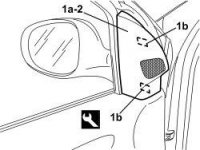
The mirror body appears to be secured using 3 bolts 2 of which are under the small speaker housing. Can anyone give me a clue how to get the housing off ?

Any other fitting tips would be much appreciated.

Thanks in advance.
 
none.gif
198000863.image
20.image
Removing ( Refitting ) 1. Release the corner cover (1a) releasing the inner retainers (1b) using the special tool.
Tool
Description
Function
Validity
1823015000
Knife
Retainer removal
2. Keep the corner cover.
none.gif
21.image
Refitting ( Removing ) - Check that the corner cover and inner retainers are not damaged.
- Fit the corner cover engaging the inner retainers.


1. Detach the electrical connection.
Description
Connector
1
DRIVER SIDE DOOR MIRROR
See P060 DRIVER'S DOOR MIRROR
1
PASSENGER SIDE DOOR MIRROR
See P061 PASSENGER DOOR MIRROR
2. Move door weatherstrip (2a) and unscrew front bolt (2b) securing door mirror.
3. Unscrew the rear bolts securing the door mirror.
4. Remove the door mirror, complete with cabling, from the door exterior.
none.gif
21.image
Refitting ( Removing ) - Check that the door mirror is not damaged.
- Place the door mirror with cabling in position.
- Tighten the bolts securing the door mirror.
- Position the door trim.
- Attach the electrical connection.
Op. 7005E12 CORNER COVER FOR ONE FRONT SIDE DOOR, LH OR RH - R.R.
- Check that the door mirror is working properly.
 
none.gif
198000863.image
20.image
Removing ( Refitting ) 1. Release the corner cover (1a) releasing the inner retainers (1b) using the special tool.
Tool
Description
Function
Validity
1823015000
Knife
Retainer removal
2. Keep the corner cover.
none.gif
21.image
Refitting ( Removing ) - Check that the corner cover and inner retainers are not damaged.
- Fit the corner cover engaging the inner retainers.


1. Detach the electrical connection.
Description
Connector
1
DRIVER SIDE DOOR MIRROR
See P060 DRIVER'S DOOR MIRROR
1
PASSENGER SIDE DOOR MIRROR
See P061 PASSENGER DOOR MIRROR
2. Move door weatherstrip (2a) and unscrew front bolt (2b) securing door mirror.
3. Unscrew the rear bolts securing the door mirror.
4. Remove the door mirror, complete with cabling, from the door exterior.
none.gif
21.image
Refitting ( Removing ) - Check that the door mirror is not damaged.
- Place the door mirror with cabling in position.
- Tighten the bolts securing the door mirror.
- Position the door trim.
- Attach the electrical connection.
Op. 7005E12 CORNER COVER FOR ONE FRONT SIDE DOOR, LH OR RH - R.R.
- Check that the door mirror is working properly.

I don't suppose you could print that section to PDF and attach it to the thread so we have the images, could you?
 
I don't suppose you could print that section to PDF and attach it to the thread so we have the images, could you?

I've tried, every time eLearn crashes:mad:

The best I can do is copy and paste the text, and email the pictures to myself, save to desktop------------here they are:
 

Attachments

  • 198000863.jpg
    198000863.jpg
    11.4 KB · Views: 781
  • 198000882.jpg
    198000882.jpg
    13.8 KB · Views: 784
OK - I think if I can get the cover off without damaging the retaining clips the rest will be straightforward. I'll give it another go.

Thanks for all the help - its much appreciated.
 
it seams impossible to take a snapshot of the screen when elearn is running.

I've tried, every time eLearn crashes:mad:

The best I can do is copy and paste the text, and email the pictures to myself, save to desktop------------here they are:

You two need cutePDF :p
 

Attachments

  • 7005R.pdf
    49.7 KB · Views: 210
I have recently had to do thins on my passenger side, give the cover that has the little tweeter speaker in it a good tug it should come off no problem then there is just to bolts to remove - (don't forget the one under the rubber seal)

EDIT: Also when putting the cap back on make sure the wires are correctly seated otherwise you will break the clips and chaff the wiring.
 
Last edited:
Back
Top