General Fiat Bravo 20v Turbo

Currently reading:
General Fiat Bravo 20v Turbo

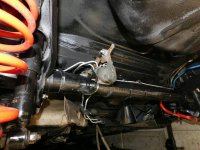
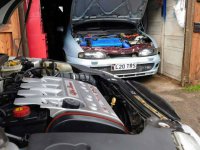
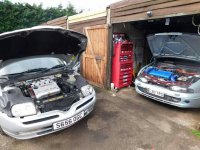
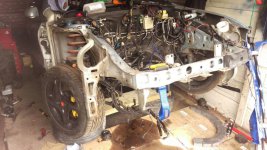
Yes still on old subframe as the time I got of work to swap them was taken up by the gearbox conversion

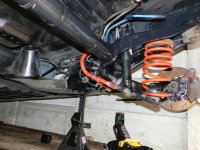
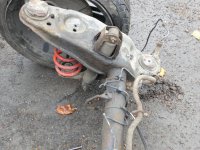
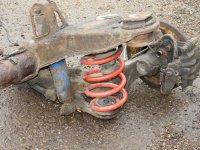
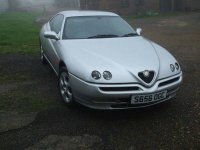
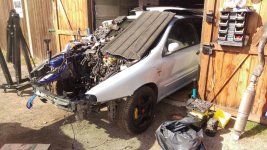
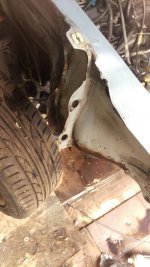
The suspension on the drivers side collapsed on Sunday taking the drivers wing and abit of the side skirt,
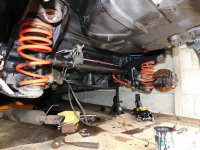
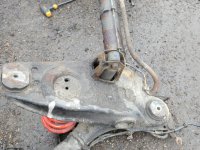
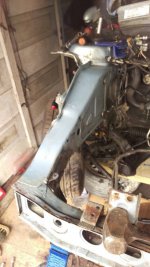
They are both abit tatty so rather than just replace one I'm going to replace both then get the whole front end painted apart fro. The bumper as that at the bodyshop already
 
Well I didn't actually realise how crap the lock is on a Coupe 20vt
Bought a 20vt steering rack and had it completely refurbished even sandblasted the body
It very darty now but a 3 point turn is now a 20 point turn lol

Rest of the front end left me yesterday to the bodyshop
Soo after Christmas the car will have a new front end
 

Attachments

  • 1445409749281.jpg
    1445409749281.jpg
    78.8 KB · Views: 49
Well rear subframe finally fitted
Old one is in very poor condition
 

Attachments

  • 1446136437282.jpg
    1446136437282.jpg
    124.2 KB · Views: 54
  • 1446136452887.jpg
    1446136452887.jpg
    113.3 KB · Views: 52
  • 1446136468134.jpg
    1446136468134.jpg
    124.2 KB · Views: 51
  • 1446136486918.jpg
    1446136486918.jpg
    130.4 KB · Views: 53
  • 1446136500953.jpg
    1446136500953.jpg
    162.7 KB · Views: 51
  • 1446136519400.jpg
    1446136519400.jpg
    134.7 KB · Views: 49
Looks like good progress, I'd love to have a tidy back end like that. I'm sure my Brava must be quite like yours was underneath - maybe I've had a go at rustproofing but I'm sure the subframe needs dropping, cleaning and new mounting bushes.

Is it all fairly straightforward to do? I suppose pressing in the bushes would be a bit of effort (couldn't do the whole job myself so would use my mechanic..)
 
The frame I got had recently had new bushes so I didn't have to worry as it looks really tight
The rest of the job is straight forward
Just dropped the tank undid the four mounting bolts and down it came :D

haha i love the easy version! :rolleyes:
for us mere mortals, to do this for a for a daily driver, this is somewhat more involved! i imagine a stripped down version of events would go something like this, take off back half of the exhaust from the catalytic converter, secure brake hydraulics and remove flexibles' from subframe, remove handbrake lines, ABS sensors, rummage in boot to remove the carpet (which is screwed down in the weekend), fold down back seats flat, unscrew fuel tank access cap, undo fuel lines and electrics from tank, (possibly siphon fuel out from the tank first) release the holding straps from tank, drop tank, and after all that (and maybe more) you at last, have access to the subframe :D if you have a spare just ready to put in place, you could count a day for all that and getting it back together afterwards, a proper weekend project for a if you have to refurbish the subframe once it's down i reckon.

how do you make these projects sound like childs play? :worship:
 
Quick update :

Car is now in the garage and awaiting stripping for the measurements for the roll cage
Also the engine will b coming out
Engine bay painted
The front subframe will be powder coated
With new anti roll bars and wishbones fully poly bushed .
Will be updating more frequently
As the interior is stripped and painted aswell
 

Attachments

  • 1453321237678.jpg
    1453321237678.jpg
    97.9 KB · Views: 41
Right ....haven't updated in a while soo here goes....

Engine is out .....conrods snapped on 3rd and fourth pistons
Soo a temporary refurbed engine with 38k miles will be going in with all new top rebuild ...ie headgasket, skimmed head valve guides redone

Also started stripping the front ....ready for painting
Wiring also started repairing as a shoddy job was done when the car was originally built

Alot of surface rust but thankfully nothing deeper

:Quick question has anyone removed the crash bar at the front ?? And that is slightly damaged from rot from the bumper support
 

Attachments

  • 1458748217772.jpg
    1458748217772.jpg
    118 KB · Views: 46
  • 1458748232153.jpg
    1458748232153.jpg
    96.8 KB · Views: 50
  • 1458748244543.jpg
    1458748244543.jpg
    65.4 KB · Views: 46
  • 1458748246404.jpg
    1458748246404.jpg
    65.4 KB · Views: 47
  • 1458748255693.jpg
    1458748255693.jpg
    67.4 KB · Views: 45
  • 1458748257153.jpg
    1458748257153.jpg
    67.4 KB · Views: 49
Right not been on the Fiat forum for a while, so thought o would update ......
The old shell has gone as was too rotten to deal with .....so I have reshelled the good bits into my 155 HGT shell .....

This includes a complete 147 HGT body wiring harness ...

Engine is almost ready to go back in .....
Just waiting on the oil cooler pipes and filter relocation kit
The Garrett GT2871r Turbo is on and also just needs oil lines completed
3 inch downpipe is also finished

Bits that still need finishing :
Vibratecnics engine mounts
Apexi AVCR boost controller
Helix organic clutch
Gearbox cables for my 6spd box
Rear Axel swap
Fuel tank swap

Should be ready for its first outing at Brooklands for the Italian car day IMAG0545.jpegIMAG0548.jpegIMG_20161007_172604.jpegIMAG0513.jpegIMAG0276.jpeg
IMAG0591.jpegIMAG0578.jpeg
 
Hi,
Im just doing the front end on mine with new wishbones, drop links and ARB bushes.
Even though the wishbones are new with bushes will you be cutting out the oem bushes and fitting Poly?
What makes will you be using as see Powerflex have a bad rep?
Cheers


Matt
 
Hi,
Im just doing the front end on mine with new wishbones, drop links and ARB bushes.
Even though the wishbones are new with bushes will you be cutting out the oem bushes and fitting Poly?
What makes will you be using as see Powerflex have a bad rep?
Cheers


Matt
My wishbone have powerflex Black line solid bushes ....they are brilliant .....they have been on my cars since 2010 .....all I do is every year on the summer is replace the balljoint boot and clean and replace the grease ....
 
Back
Top