General Floor pan rust

Currently reading:
General Floor pan rust

Seg10538

New member
Joined
Aug 7, 2014
Messages
74
Points
24
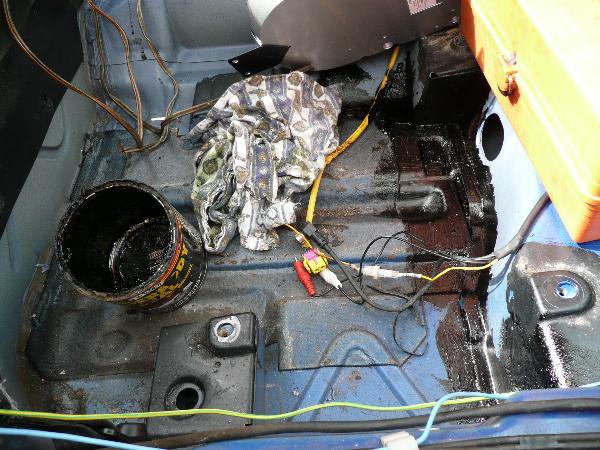
Hi everyone I have an option to buy a low mileage Barchetta with a new mot , but on closer inspection I noticed the floor in the drivers well is spongy and the floor looks either cracked or cut open, underneath there is at least one hole which is rusted through , is this something which is common on these and more importantly should I walk away ? It's a 'N' reg with really low miles
Cheers Shaun
 
If there is rust in the floorpan there may also be rust in the rear passenger side wheelarch which is much more difficult to weld properly than the floorpan. Have a real good luck up there with the wheel off, not forgetting this area also houses the fuel tank and the seat belt mount an mot failure if rusty.
I just welded a small patch in my floor not unexpected on a 17 year old Fiat really. .
 
Cheers, just had another look today and have decided to buy it ! Been an admirer of Fiats for years now and the Barchetta has been a model I've liked the look of for years.
 
if its got a new mot and holes in the floor with rust i would question new mot
 
Usually Henk at http://www.barchettaparts.com has all the sheet metal parts that may be required for the rust repair.

Brandy
Oldish thread but still relevant, so make sense (in my eyes) to continue it. I have a bit of floor welding to do, so some dismantling required. I know there can be an issue with disconnecting the seal belt sensor, if the battery is not disconnected first? I believe that is the case.
Any other gotchas I should know about before I start to reveal the metal floor from under its rubber protector? Thanks in advance.
p.s. I don't believe you can buy replacement body panels e.g. floor panel for Barchettas from Henk or anywhere else. Is that true?
Don't know if you've found the floor removal guide which might help?
Definitely disconnect the battery an hour or so before you start.
I wish you luck, I'll be taking on this job myself over the winter.
 
Don't know if you've found the floor removal guide which might help?
Definitely disconnect the battery an hour or so before you start.
I wish you luck, I'll be taking on this job myself over the winter.
Yeah, I have read that thanks. I'm wondering though if the whole floor covering needs to be removed, or if it will lift sufficiently to get to the floor for cutting out and welding in.
Not too concerned about this repair. I have done the passenger side wheelarch, and that is an absolute pig!
 
Just lifting the plastic floor will be enough to work on the sides, but feet area and places close to the transmission tunnel can be a b**ch.
 
Just lifting the plastic floor will be enough to work on the sides, but feet area and places close to the transmission tunnel can be a b**ch.
I've removed enough trim to be able to lift the floor and see the corrosion damage. Both sides is where the drain plug is in the floor underneath the seat base. Both sides to repair properly need a patch approx 200mm x 150mm.
The underside of the matt on the drivers side was very wet, almost certainly due to my hood being full of holes.
Needs a bit more room making to weld comfortably and then will be a relatively easy repair.
 
You can do what I did that that was to 1/2 then 1/4 the rear floor covering section.

With the seats remove and the rear centre console/glove box remove you can make neat cuts along the centre line and across the bulk heads underneath the seat.

This allows for the complete removal of the two rear sections of floor matting. Also make the lifting of the front sections easier.

Of course this type of butchery (or should I say skilled surgical incisions) is not ideal but if done properly all the cuts are hidden except for about 1 inch either side of the seat.

I also took the opportunity to re-route the seat wiring to come up and over the bulkhead area instead of coming through the hole in the rear floor mats which I sealed up so that any water in the rear sections never gets to the underside to cause damage.
I'll see how it goes today, don't want to cut anything if I don't have to.
I did notice there are rubber grommits in this part of the floor that allows water to drain away. In my case it didn't as the holes were covered with underseal.
Failing the MoT for this (minor) corrosion and actually done me a favour because 12 months down the line it would have been much worse.
 
I'll see how it goes today, don't want to cut anything if I don't have to.
I just removed almost whole interior couple weeks ago.

Removed seats, all plastic trims around floor. Rear plastic cover behind seats and all center console parts. This includes heater knobs and panel with radio.

Only cut needed to do was behind streering axle. It is only some 5 centimeters and is not visible after putting back everything. Whole floor covering comes out as one piece.

There is some posting of this and it told that there is needed to do another cut under heater unit. But that is not needed. There is one plastic rim on top of the central tunnel, under dashboard. It is hold by couple screws and after it is removed, no other cuttings needed except for streering axle.

- J
 
Back
Top