Styling Fron panel "Abarth" badges

Currently reading:
Styling Fron panel "Abarth" badges

the hobbler

Distinguished member
Joined
Jul 25, 2012
Messages
4,084
Points
1,013
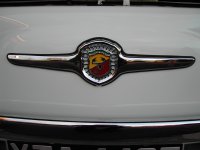
Some time ago, one of the Forum members showed some pictures of his 'front-panel' "Abarth" badge which had a thin black protective edging on it. It seemed that as this edging came with the badge, so he wasn't able to give any more details of it for us. Being that I didn't want the new paint on my front-panel damaged, and the system I had used before was successful, but a 'pain in the bum' to put on (the clear plastic protective that Porsche and Ferrari use on the front of their very wide rear wings to prevent stone damage), I looked for an easier alternative; and found it! I was ordering some electrical items from "Vehicle Wiring Products" (VERY good little catalogue--FOC upon request), and there on page 9 was the answer. They call it 'Edge protection beading'--part number 'PSI'. It is a 5mm O/D beading to go over 0.8mm to 1.5mm panels. With careful use of the wife's hair-dryer to soften it up slightly it can be carefully worked round even the tight bend of the 'wings' of the badge. It looks good, and at only 57p per metre (+VAT) it is not expensive. Get a couple of metres and you will have enough to do a front badge and leave yourself with some to practice with--which I do recommend you do, especially around the end of the 'wings'.
thumb.gif
smile.gif
 
I did exactly that on my Giannini badge - superglued in place - great minds Tom.....
 
I found that (on the 'Abarth' badge admittedly) I didn't need to use super-glue. After a practice with a short length of edging (going round the sharp bend at the end of the wing) and sorting out a technique, I used 'repair' (penny) washers on the outer 2 studs to hold the edging in place, and 2 short cross bars on the inner studs to do the same, and went round the badge slowly warming it up as I went; it stayed in place. Having got all the trim in place, but leaving a little opening at the bottom 'V' of the badge to (a) let out any condensation that may gather and (b) that bit WOULD be a bugger to do, I warmed up the whole badge/edging, again with the hair dryer, and then just let it all cool down. The edging retained its shape beautifully---and of course when it is on the car, the edging will be held in place by the pressure between the badge and the front panel.
thumb.gif
smile.gif
 
Greetings, Just done the same to my badge and I have to say even though it's a bit of a faff to get right the finish is worth the trouble. Unfortunately when I took my badge off the paintwork had been marked, it cleaned up some with a little 't'cut but not completely gone. I didn't even have to use the Mrs's hair dryer as I have a heat gun - just don't get too close or too hot(y)(y) Many thanks to Tom for the gear and inspiration.

Ian.
 

Attachments

  • DSCN2582.JPG
    DSCN2582.JPG
    911.6 KB · Views: 24
Back
Top