General Spotty Fiat 500

Currently reading:
General Spotty Fiat 500

The interior light is particularly effective

I'm going to try that, as Tony also remarked ages ago, how much better it is (could hardly be worse than original) :D
I found they were excellent in the dashboard indicator lights and I'm going to stick one in the speedo too.
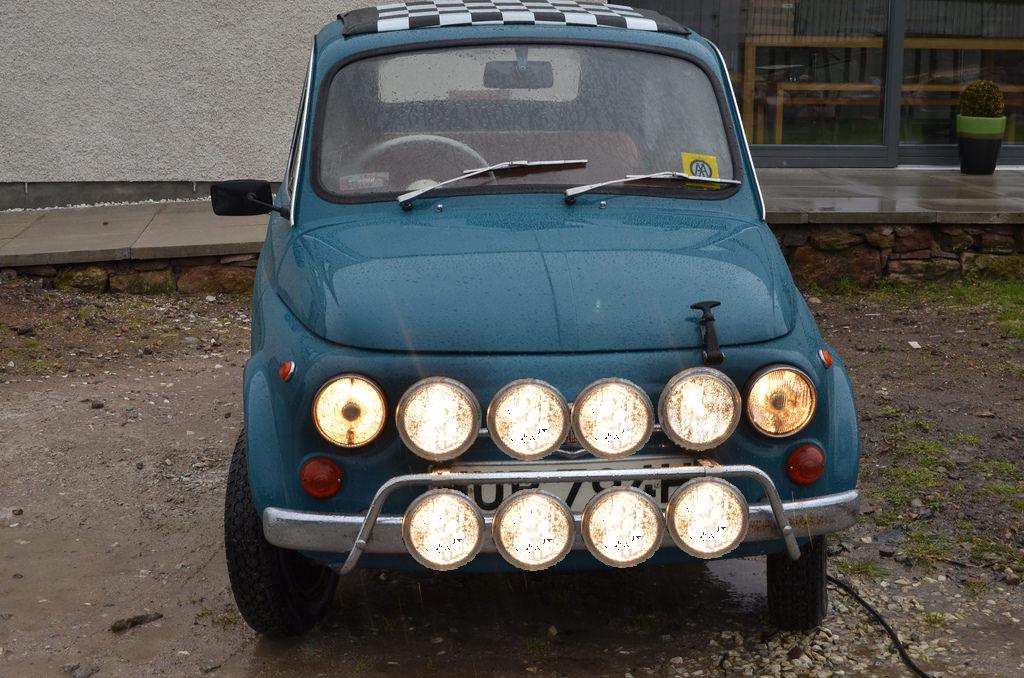
I've just been out for short rally spin in the dark and when I go down to normal driving lights I can hardly believe I ever managed safely before now.:eek:
In fact, in for a penny, in for a pound...I've gone the whole hog!!!
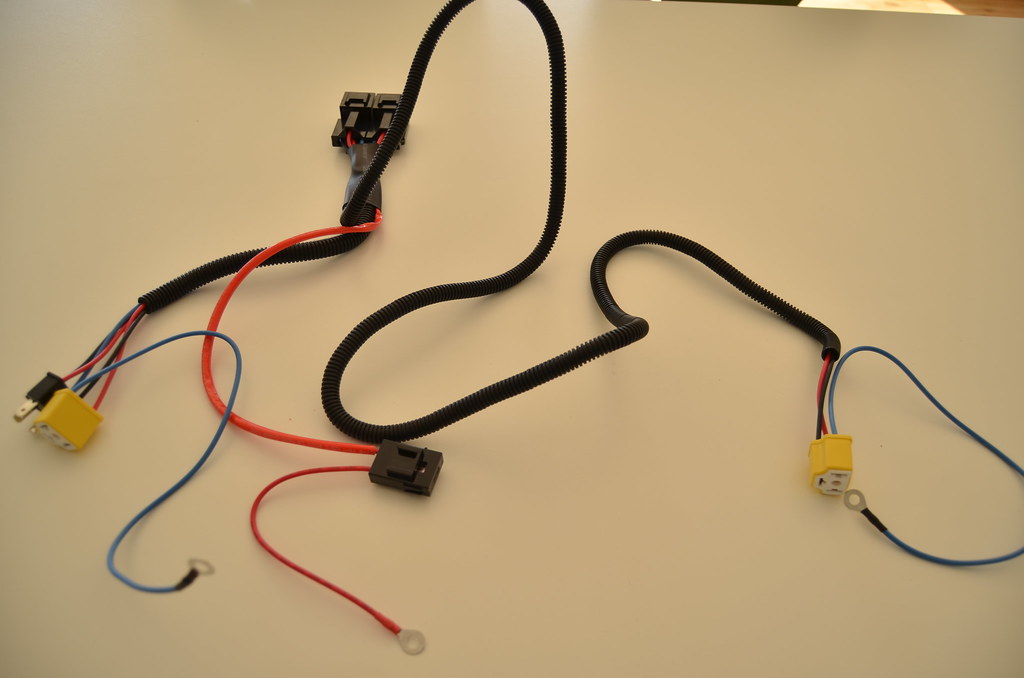
thefinalsolution by Peter Thompson, on Flickr


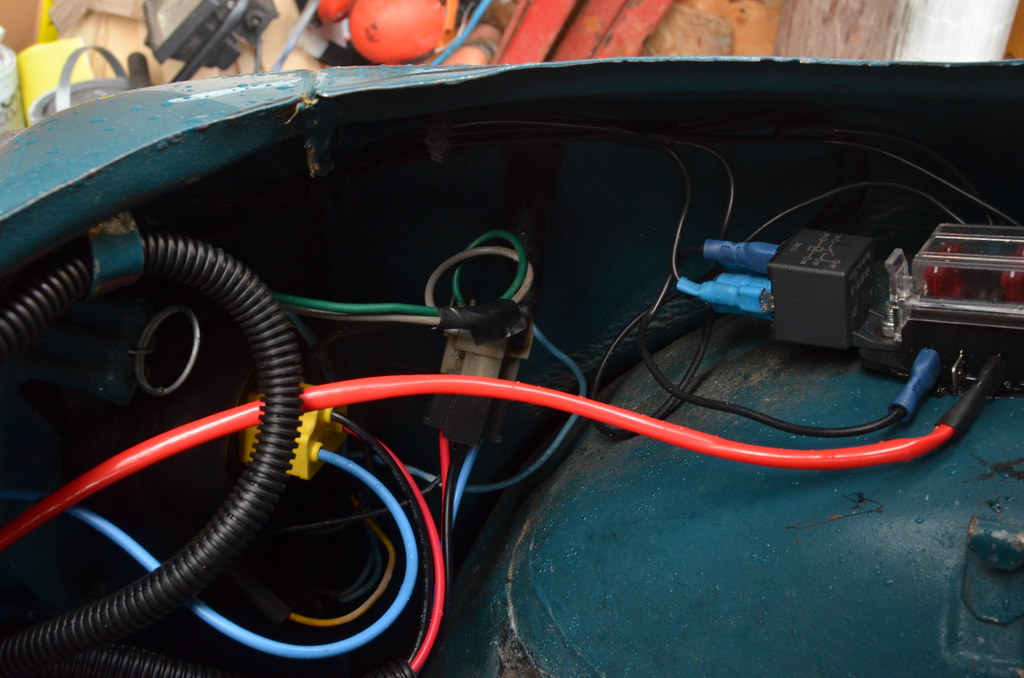
(courtesy of Mr. Bigvtwin996)
 
Last edited:
If you have an outbreak of surface rust on your bumper you can try this. Grab a small handful of aluminium, scrunch it up and dowse it in coke. Use it like a Brillo pad over the rusted area to remove any loose bits. The mild phosphoric acid in the coke will retard the rust and the aluminium particles that break off go a little way to restore the chrome effect. You can then wax over it for a little more protection.

I did that earlier today and the bumper disintegrated in my hands.......not really, I used it with some diluted phosphoric acid with instant improved results.(y)
 
Peter, just a thought, but do your lights dim and brighten with the generator coming online and offline?? Glad that you're happy with the stays looks like you've done a good job - now as Andrew says fit two more and really melt the tarmac :D:D:D

Ian.
 
Peter, just a thought, but do your lights dim and brighten with the generator coming online and offline?? Glad that you're happy with the stays looks like you've done a good job - now as Andrew says fit two more and really melt the tarmac :D:D:D

Ian.

The headights have always been up and down in brightness as the generator kicks in, but the new auxlliary lights don't seem to do that. I assume that this is because they are wired (through a relay) direct from the battery. So there is ittle wiring and fewer contacts through which to offer resistance.
I have enough bracket space to fit some suspended lights, eg. foglights, ut I'm going to call it a day at the current setup.
 
My Chinese loom has turned up. All I can say it is a £7 bargain. It's just right, as you can take the supply direct from the battery and tuck the relay away down there somewhere. I haven't had a chance to look at the switching side of things yet but I am sure it's self explanatory.
 
My wiring loom came today and it's everything I expected. I will be fitting it tomorrow, but today I took the risk on a long journey, (more elsewhere), which ended for the last two hours in the dark.
I kept checking the lighting toggle switch wasn't overheating....and it wasn't, and despite using 4 x 60w halogens for a lot of the time, the battery still has a good charge.
I don't think it would be wise to drive all night without upgrading to an alternator, but that's not likely as I already do more than enough in the daytime.:D:eek:
My previous drives with the Hellas were just local tests but this was a real journey an very dark and twisting roads. It was a revelation to be able to see properly and find they are even better than my modern car.
 
It's good isn't it for £7!!!

From my quick perusal last night that black plug with the red, black and blue leads, blue is earth, black and red are main and dipped beam but I haven't looked at the car loom to see which is which. So in theory just connect the red and black wires to the appropriate wires coming from the switch, connect the red fused wire to the battery + and connect earth wires at the headlights and plug in.

I was thinking of putting the relays near, the near side headlight somewhere and extending the battery wire a bit to allow that, then just run the loom across to the off side headlight behind the front panel where the existing loom is.

But I await your efforts tomorrow to see if you come up with a better plan!
 
Tony and me both bought a really clever accessory loom from eBay.
MAL_1115 by Peter Thompson, on Flickr
There are new connectors for the headlight bulbs whch are fed from two relays, one each for main and high beam.
MAL_1120 by Peter Thompson, on Flickr
The feed for the output from the relays comes direct from an eyeletted cable that connects to the positive battery terminal; I had to make a longer cable for this because of the locaton of my fusebox, glued to the wheelarch where my non-existent jack doesn't sit.
MAL_1118 by Peter Thompson, on Flickr
The relays are activated by wires that are fitted to an adaptor plug which fits in one of the original headlight bulb connectors. A fuse is provided in the live supply.
This is only what anyone does when fitting headlight relays; it's just that this is such a neat and professional setup.
I already have an accessory fusebox so I used this. I have some conveniently place earthing points where my recent accessory driving lamps are earthed. The relay component seems to sit well just behind the battery. To avoid it getting trapped or misaligned I used PU adhesive to bond it to the back of the front panel.
This left one, original headlightbulb connector spare, so I used a spade connector into this as the activation current for my accessory lights.
The headlights are now brighter as the resistance wthin the lighting switches has been bypassed. the only downside is that the indicator light on the dashboard for high beam stopped working. This is because I had replaced it with an LED; so back to old-fashioned, clockwork bulbs.(n) Not a problem really because there isn't going to be any doubt that the headlights are on.:eek:
 
Last edited:
So that red cable with the little eyelet, you connected up to the fuse box for the spots where obviously you already have 12v supply. Did you keep the inline fuse for the headlight loom or fuse it through the little fuse box?

Also is that black wire coming off the battery your 12v supply for the new fuse box?

What did you do with headlight connector from the cars loom for the other nearside headlight? Just left it loose?
 
The small, red, eyeletted cable was dispensed with. I have twin supply cables to separate fuses. This is in black cable which came in a bundle with the Hella lights. I didn't want the two sets of lights to share a cable because of the loading issue and if a fuse blows I always have one set of lights.
The old nearside headlight connector is the one I used with a male spade pushed into the socket for the main beam.

Is that not the offside in your picture with the male spade connector pushed in? Regardless, what did you do with the headlight connector from the car loom that isn't needed anymore?
 
Is that not the offside in your picture with the male spade connector pushed in? Regardless, what did you do with the headlight connector from the car loom that isn't needed anymore?

:D:D:D I drive on every side of the road and some roads just wide enough for Murf so N/S and O/S interchangeable.
The connector on the UK passenger side is now redundant...or would be if I hadn't used part of it as a relay activation feed for the spots. Basically it could be taped up out of the way.
The three-pin spade connector is pushed into the driver's side headlight connector.
By the way, check my lovely high beam indicator LED and it's now a DED for some reason.:(

Looking at the wiring diagram the high beam indicator is spurred off the passenger side headlight black green wire. I would stick a meter on that wire at the discarded connector, switch the lights on and see if you still have 12v's?
 
Or thinking about it further move the black three pin plug from the new loom from where it is plugged in at the moment on the driver side, over to the passenger side headlight connector and see if the main beam indicator comes back. If it will reach?????
 
Or thinking about it further move the black three pin plug from the new loom from where it is plugged in at the moment on the driver side, over to the passenger side headlight connector and see if the main beam indicator comes back. If it will reach?????

Good suggestion and mabe that's somewhere related to where i went wrong. But I have fitted a standard bulb in the blue indicator and it works. I re-checked if the suspect LED would work where another LED is still working in the green indicators indicator:eek: and that proved it was DED.

Maybe somewhere along the line the LED bulb got a current surge or something because it was working fine yesterday.:bang:
 
I think I finally completed this job and as always seems to happen, it's been a big learning curve. I now think that with all the modifications and having fitted an alternator, the original Fiat lights with halogens would have been adequate.
I'm not complaining though; in this video my Fiat comes straight after a "normal" car and you see the difference.:D

[ame]https://youtu.be/YvXO-5aY2xk[/ame]
 
Reminded me of freezing cold nights in Wales watching Jimmy Mcrae in a fully lit up Opel Manta 400....
 
It will be in the Nairn local papers tomorrow. "Strange Man in Fiat 500". A man has been spotted in a blue Fiat 500 filming local traffic at night. He was then observed to leave his camera at the side of the road, whilst he drove towards it lighting up all around him in a spectacular light display. Police are warning this man should not be approached!!!!!:D

Seriously though it is really bright, need to send you back out there to film whilst driving
 
Back
Top