the hobbler
Distinguished member
- Joined
- Jul 25, 2012
- Messages
- 4,070
- Points
- 1,011
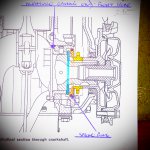
I would agree with Peter's suggestion---just be very careful. You are only trying to remove a 'gnat's cock' in amount, so use very fine emery-cloth, plenty of oil and a VERY delicate touch. You will find that you will end up stripping/rebuilding the bearing/crank-end assembly a number of times--you can ONLY take off, you can not put back! Keep everything scrupulously clean when you refit parts, and well lubricated. I build up en engine with either (a) Graphogen or, (b) a 50/50 mixture of a '30' oil and STP--the oil to lubricate, the STP to retain the lubrication on the required parts. Just remember--do NOT put the 'bit left over' into the engine until it is well run-in, or it won't run-in!")