Technical Oil Cooler Mod

Currently reading:
Technical Oil Cooler Mod

Joined
Dec 27, 2014
Messages
1,134
Points
364
Location
Ripon
Greetings,
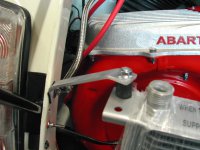
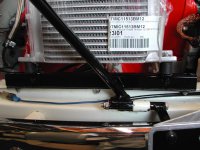
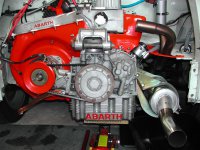
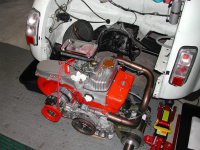
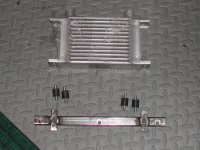
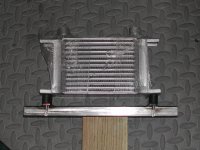
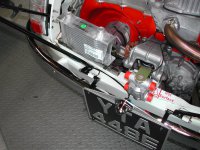
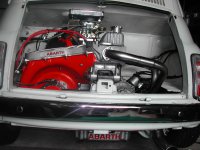
I have just started the fabrication of my oil cooler mount on the left side of the rear panel/crossmember. I'm satisfied that there will be sufficient airflow from under the car due to the shape of the protective apron under the alternator
(mine is low enough to perform as a scoop) and I'm sure that a simple 'lip' could be added to it to improve the airflow if required. I may also sort out some wire mesh if it looks like collecting the odd piece of debris. I've used a simple piece of mild steel box section and some small flat bar just to stand the cooler away from the left side engine lid prop on it's rubber bobbin mounts. There will also be two more bobbin mounts from the top fittings of the cooler to hold it steady and help absorb vibration. You will notice that the position of the thermostat is on the rear of the engine mount, there is sufficient room for piping to and from the pump and cooler. I'm using 1/2" BSP fittings as they are common, large enough not to restrict oil flow and M12 to 1/2 BSP fittings are available to fit to the engine casing. The actual piping will be bespoke, braided, short and neat. when I get my timing case/pump problem sorted I'll get back with more progress.

Ian.
 

Attachments

  • DSCN2435.jpg
    DSCN2435.jpg
    797 KB · Views: 168
  • DSCN2436.jpg
    DSCN2436.jpg
    781 KB · Views: 92
  • DSCN2440.jpg
    DSCN2440.jpg
    674.7 KB · Views: 157
  • DSCN2441.jpg
    DSCN2441.jpg
    719 KB · Views: 136
I am due to fit my oil cooler in the next couple of weeks and the advice from the UK Abarth specailist was "site the radiator under the floor and above the suspension on the nearside rear"

My initial plan had been to fit it under the front panel near the horn mounting and pipe through the car through the tunnel where akllm the other cables etc run.....
 
Andy;
If you look at the U-Tube film 'Abarth part 7' you will see that they have also put the oil-cooler under the rear of the car. Another place that I seen it successfully fitted is behind the 'under rear screen' grill. Lots of air gets sucked through and in a relatively cool place. It does however, depend on what size the body apertures behind the grill is--some cars have 4 small(ish) slots, some cars (like mine) have 2 large slots. With the 4 slot arrangement, you will have to remove the section between the upper and the lower slot, and possibly make a small removable panel to put back in place.
thumb.gif
smile.gif
 
Andy, Hobbler,

I wanted a compact system, without yards of piping hence the siting location. If the lower apron does not supply sufficient airflow I can fabricate an alloy plate 'tunnel' to feed the air directly to the cooler, or if things get really hot fit a small compact blower if required. I appreciate advice from any quarter, but the thought of having a long piping system seems more expensive, and to also run hardened pipes (braided) would be required for protection.

Ian.
 
I probably have not been paying enough attention to your rebuild but the engine pics look good. I guess that you are running a Panda 30 head there and I wondered what carb you have just out of picture and where you sourced the inlet manifold?
 
Toshi,

You are correct, it is a Panda 30 head fitted with a weber 30 DGF. The manifold is a low level item from '500 Mania' in Italy, the filter came from them too. I found that the original 'tilted' manifold gave very little clearance above the carb so I lowered the engine by 18mm with a alloy block too. Now everything fits. The picture show the carb, filter and manifold better.

Ian.
 

Attachments

  • DSCN2405.jpg
    DSCN2405.jpg
    604.1 KB · Views: 128
Ian - I share your opinions exactly.

My engine isn't in yet and the task list is massive.....I will mount mine underneath as the braided hoses are made up, and hopefully we can share some info on running temperatures and issues coming from our tuned engines.
Do you have the oil take off connections from the timing cover in your kit?
 
Ian,

I wouldn't worry about the screen if it were me.

The plastic your cooler is wrapped in will stop any detritus getting in!

Chris
 
Ian - I share your opinions exactly.

My engine isn't in yet and the task list is massive.....I will mount mine underneath as the braided hoses are made up, and hopefully we can share some info on running temperatures and issues coming from our tuned engines.
Do you have the oil take off connections from the timing cover in your kit?

Hi Andrew,

Sorry for the delay Busy,Busy, I have a complete kit including the spin-on filter on the timing cover. I have managed to source the correct M12 to 1/2 BSP adaptors so no problems there, the cooler mount is nearly done too. Bespoke pipes will follow. Thermostat mounting is a simple nut and bolt fix, but I will probably tie wrap the unit as well to stop any vibration problems. My modified timing case came from Italy without a pump so I got one from Axel G to fit, problem is it doesn't so I am sorting the fit out too. I hope to have this job complete before the end of summer - I'll get back once I am up and running with temperature info, thanks.

Ian.
 
Greetings,

A quick update, the oil cooler mount is fitted along with the rubber bobbins - see pic. I have decided to fabricate a simple vibration stay made from sheet alloy (3mm) fitted again with a rubber bobbin mount to help damp out any excess vibrations - see pic. The marque specialist declined to sort my timing case/pump problem so that is away elsewhere to get fitted and modded. Will post again when the bits get back.

Ian.
 

Attachments

  • DSCN2444.jpg
    DSCN2444.jpg
    738.8 KB · Views: 59
  • DSCN2443.jpg
    DSCN2443.jpg
    694.5 KB · Views: 60
Last edited:
Greetings, Timing case cover has arrived back from the specialist engineers I had selected - top job too! They carried out the fix to the alignment problem and completed the gear mod for the spin-on filter restriction, everything was assembled and tested too, again top job! Didn't want to take the risk with hacking away at the alloy so let the professionals do it. it seems that although the separate parts are new and well made (and they should go together) the all important alignment was out. Speaking to the actual engineer that performed the job, he had to assemble, turn, disassemble and then scrape, file and polish multiple times to get the whole thing to spin correctly and it does seem that many other 'aftermarket' parts for other makes of vehicle suffer from the same problem!! Got stuck into the preparation to change the timing cover, until I arrived at the job of removing the central hollow bolt that secures the oil filter body - at 32mm I have been stumped for the want of a large socket - bugger!
So I shall have to cadge one off of my local garage (maybe) the oil filter was quite clean so pleased there. I'll get back when I get the new timing cover on.

Ian.
 

Attachments

  • DSCN2446.jpg
    DSCN2446.jpg
    816.3 KB · Views: 105
  • DSCN2447.jpg
    DSCN2447.jpg
    676.5 KB · Views: 133
Hi - engine looking good in the pictures
Do you have a specification I could read...CR cc etc?
What's the expected output?
 
Greetings,
Thanks fiat500, yes got the, very cheap for Draper, 32mm socket via ebay and have just removed some skin from my hand trying to get the filter/pulley hollow bolt out of the crankshaft!!! Damn that's in tight!!! Having tried my long handled torque wrench set at the correct 149 Nm (according to mr haynes) no way will it budge - sod! I know it's a daft question, but do any of you engine builders know the direction (clockwise - anticlockwise viewed from the rear) to undo the bolt??? Just to make sure I am actually going the correct way?? Is it dependant on the pulley rotation??
Andrew, I'm afraid the info on my engine comes from the last owner who was not the builder - it's supposed to be 695cc - Panda 30 head skimmed (don't know how much) - forged pistons (again don't know the spec) valves larger (don't know sizes) CR is unknown - supposed to be 45bhp but I'll prove that when I get to the local rolling road. The engine is running very well with good colour on the plugs, I would like to see a proven minimum of 30bhp with this set up and as much as I can get with the rolling road tune up, sorry for the lack of info.

Ian.
 
Ian;
it is a normal right-hand thread----so looking from the rear, you will be UNDOING it ANTI-CLOCKWISE.
thumb.gif
smile.gif
 
Greetings,

Well, try as I might to get the filter/pulley bolt loose so far it's a fail. Removed the starter motor to get at the flywheel ring gear (funny to notice that the starter motor had "126 Bis" painted on it ??) anyway, no luck with jamming the ring gear with some mild steel bar, it still wouldn't budge. So I now have the engine out (it was my first time!!!) and I'm waiting for a flywheel locking tool to secure the damn thing before I turn to serious means - air hammer gun!!! Also found that my alloy rocker box rubber seal has given up the ghost (at the forward end) so that will be done while the donkey is on the floor (must get an engine stand too) Anyone got an idea of a good make of engine stand or are you all home made out there??
The flywheel lock has just been fitted having got here quick from ebay - now I need the air gun!!!

Regards to all

Ian.
 

Attachments

  • DSCN2448.jpg
    DSCN2448.jpg
    775.6 KB · Views: 71
Last edited:
If the flywheel lock and air gun don't work, I borrowed a chain wrench with a big long handle, wrapped around the pulley. Rested that on the floor and with another long handled socket wrench pushed down from about 6 inches above the chain wrench. That did the trick.
 
If the flywheel lock and air gun don't work, I borrowed a chain wrench with a big long handle, wrapped around the pulley. Rested that on the floor and with another long handled socket wrench pushed down from about 6 inches above the chain wrench. That did the trick.

That sounds like a good idea 1500500, thank God someone else has had the same problem. I'll get back with the result.
Ian.
 
Back
Top