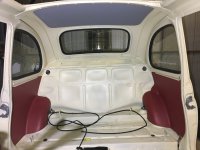
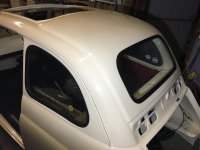
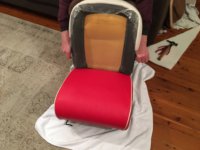
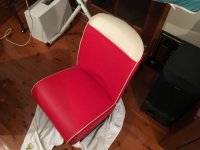
General Fiat 500F rejuvenation

Currently reading:
General Fiat 500F rejuvenation

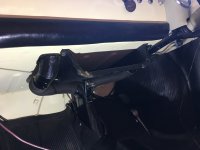
What toe-in and camber angles are you going to set the front suspension? I have found that just a fraction of toe-in (factory is 0-2mm) is best--mine is 0.5mm; and a fraction of POSITIVE camber when the car is siting with nobody in it. I have set my (lowered spring) lowered suspension so that the bubble in the camber gauge is JUST nudging positive camber (car empty)---that way when it has people in it, the camber goes to JUST negative. Too much negative camber, and it will show up on tyre wear! You might also find that by lowering and changing camber from factory you will lose some of the 'self-centreing' action.
Alternatively, you could try and find enough bags of spuds etc. to put in the front to represent a couple of people---but you will be surprised as to how many bags you will need!

Hi Tom.

Thanks

I had seen another post where you mentioned your set up so was going to dig that out once the car was back together.

A member of our club here has recently installed a wheel alignment hoist in a workshop that is small enough for Fiats so when the time comes we should be able th get it right.

Cheers
 
Pic
 

Attachments

  • A736C903-45C9-4D18-AC4A-CC191EEDAE6D.jpeg
    A736C903-45C9-4D18-AC4A-CC191EEDAE6D.jpeg
    2.8 MB · Views: 37
Productive weekend. Wiring, cables, steering column and brakes all connected but not bled yet.
 

Attachments

  • C7486170-74AE-4305-8269-161D773CAA36.jpeg
    C7486170-74AE-4305-8269-161D773CAA36.jpeg
    1.6 MB · Views: 35
Last edited:
Cables and pedal box.

One thing that really needed cleaning up was the accelerator pedal. It was really hard to move by hand. A bit of degreasing and light wire brushing where it runs in the plastic bushes made it much better.
 

Attachments

  • E6222734-60C2-4181-8B3D-8F9589B9C543.jpeg
    E6222734-60C2-4181-8B3D-8F9589B9C543.jpeg
    1.6 MB · Views: 31
I realise that you don't suffer down-under with water IN the car as much as we can on this side of the world, but 1 little dodge I learnt at Radbourne Racing was to put a thick(ish) washer under each of the accelerator pedal tube retaining lugs. This lifts the tube off the floor and makes it less susceptible to dampness, which makes the throttle rod seize in the nylon bushes. On one very cold day In my old 500, (many years ago) I had to initially drive the car on the ignition switch (try that trick whilst double-de-clutching!) until the inside of the car warmed up and the throttle freed off---had to do it, as I was a bit late leaving for work.
 
I realise that you don't suffer down-under with water IN the car as much as we can on this side of the world, but 1 little dodge I learnt at Radbourne Racing was to put a thick(ish) washer under each of the accelerator pedal tube retaining lugs. This lifts the tube off the floor and makes it less susceptible to dampness, which makes the throttle rod seize in the nylon bushes. On one very cold day In my old 500, (many years ago) I had to initially drive the car on the ignition switch (try that trick whilst double-de-clutching!) until the inside of the car warmed up and the throttle freed off---had to do it, as I was a bit late leaving for work.

Thank you. That’s a good idea. The accelerator always seemed harder to operate than i thought it should but I blamed the hard return spring

Cheers

Geoff
 
Last edited:
More progress today

I decided to use patinated and slightly torn original rubber floor mats rather than the tired carpet that I had before

A friend donated the wheel arch mats.

To give the rubber strength I stuck 5mm foil backed foam sound deadener to the mats.

I will use some second hand Fiat 1500 boot mat to create the tunnel cover, and pieces that sit in front of the back seat.
 

Attachments

  • 785F3448-5025-47EF-B567-BCAB91B90922.jpeg
    785F3448-5025-47EF-B567-BCAB91B90922.jpeg
    2.2 MB · Views: 42
Rear windows and roof lining installed. I used double sided tape for the roof lining. Will see how it goes.

I used original rubber for the windows. I did buy a new one for the rear screen but liked the look of the original.

I used the official Fiat rubber cord that was on my spare 1500 and it worked well.
 

Attachments

  • C54920D5-4945-47E7-8332-6ECC2B234F93.jpeg
    C54920D5-4945-47E7-8332-6ECC2B234F93.jpeg
    1.8 MB · Views: 34
Make sure you fit the windscreen washer button first before you put the knee pads on. The screws are fitted behind the knee pads. Speaking from experience

Damian
 
More progress. Tha back seat was not as easy to put back together as I thought but all good now.
 

Attachments

  • 67CAFF24-A524-43D2-B1CB-17240940BC99.jpeg
    67CAFF24-A524-43D2-B1CB-17240940BC99.jpeg
    1.6 MB · Views: 30
  • ADEF5F02-7D38-4807-85B0-522FA675CBD0.jpeg
    ADEF5F02-7D38-4807-85B0-522FA675CBD0.jpeg
    1.8 MB · Views: 32
  • 2BA4BEB8-7FE0-4C68-B600-FA03D3AD53F1.jpeg
    2BA4BEB8-7FE0-4C68-B600-FA03D3AD53F1.jpeg
    2.3 MB · Views: 29
  • 8A12A96A-49A7-4027-A309-1C338A8E6FC9.jpeg
    8A12A96A-49A7-4027-A309-1C338A8E6FC9.jpeg
    2.2 MB · Views: 35
  • F573E5CC-3653-4918-BC53-E46F817BA4CA.jpeg
    F573E5CC-3653-4918-BC53-E46F817BA4CA.jpeg
    1.4 MB · Views: 31
More progress. Not too many dramas fitting heater tubes and front lights... except the mount for passenger side headlight had been welded into the new front panel on a slight angle so my carello writing is not quite horizontal. When all up and running I will see where the lights point. I may have to elongate the holes.

I refitted my patinated under dash tray as I like the fraying cardboard look. It reminds me the car is over 50 years old.
 

Attachments

  • 91EB7087-5811-4B59-A35B-F4B530C44037.jpeg
    91EB7087-5811-4B59-A35B-F4B530C44037.jpeg
    1.8 MB · Views: 37
  • C348E7D7-5DD7-425E-B12F-28AC157AAC23.jpeg
    C348E7D7-5DD7-425E-B12F-28AC157AAC23.jpeg
    1.8 MB · Views: 43
  • 4403EAA3-F794-40D8-A50E-FB12570C8A97.jpeg
    4403EAA3-F794-40D8-A50E-FB12570C8A97.jpeg
    1.8 MB · Views: 32
  • 6DC388E4-354D-4A58-96E5-2E2F328E9E9E.jpeg
    6DC388E4-354D-4A58-96E5-2E2F328E9E9E.jpeg
    2.7 MB · Views: 38
  • 27D07493-99C9-4561-966E-C5B047E0D495.jpeg
    27D07493-99C9-4561-966E-C5B047E0D495.jpeg
    2.8 MB · Views: 26
  • 38864B20-EAB8-490A-A679-D4AB1E4B318D.jpeg
    38864B20-EAB8-490A-A679-D4AB1E4B318D.jpeg
    2.8 MB · Views: 25
  • 4311893F-D075-47F4-850D-3B00DD91A01B.jpeg
    4311893F-D075-47F4-850D-3B00DD91A01B.jpeg
    2.5 MB · Views: 31
Back
Top