Styling Rear seats

Currently reading:
Styling Rear seats

timgarman

Established member
Joined
Oct 8, 2012
Messages
712
Points
254
Location
Wanganui, New Zealand
Hi Folks

Following my request on guidance for covering the rear seats, here it is again.
Thanks, (Tony) for offering to post some info in a new thread. So here's the thread.

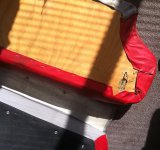
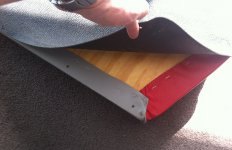
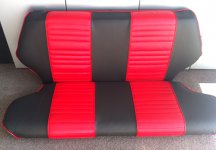
I managed the front seats ok, thinking they would be harder. Turns out the back ones are a bit less obvious. I have a set of covers from Ricambio UK which have straps that pull the cover tight under the plywood base. It's not clear how these attach (also the clips that clip them together were missing a few). A friend of mine suggested covering over the top of the original vinyl (since it's in quite good condition). The original vinyl is stapled to the bottom of the plywood base and holds it much tighter than the replacement covers / straps probably wood.

Help with this much appreciated.
Cheers, Tim
 
Do you have a plywood base on the bit you sit on Tim rather than the bit you lean on with your back?

If so the photos I have may not be relevant, as I had no wood on either of the read seats????

Tony
 
Hi Tim here are the pictures as promised. I didn't take any of me putting on the new covers but only the old ones for reference.

Firstly the seat back. It should have a black quite thick vinyl cover on it held on with rubber studs, you can remove them but some are likely to break, so maybe worth reinvesting some new ones but on your car it sounds like you have plywood for some reason. If you do have the black cover you can tart it up with some back to black bumper paint.

The seat cover itself is held on with little metal prongs that all the way around the outside on the metal back plate you can simply lift these up with a screwdriver and then bend up with a pair of pliers but be careful you don't break them off and remove the old seat cover.

You can see the little prongs below.


I found it best to put the new cover on and start at the top along the longest part of the seat, simply line up the cover into the right position and press the little metal prongs through the vinyl and once you have it straight bend the prongs down on to the vinyl. Leave the end ones on each side, as when you work on the first corner, you may find it necessary double over the vinyl on the end prongs to get the corner right.

Then work down the first side making sure the vinyl is tight but only go down as far as the first corner where it bends in for where the rear wing bends in for the wheel, as shown below. Don't bend over the prongs yet in case you need to tighten it up a little once you have done the other side. Then and go and do the same bit on the other side of the seat.


Then when you happy bend the prongs down. Then back to the other side and do the part the where the wheel intrudes into the car on the rear wing. Then go and do the opposite side. If remember correctly I had to trim some of the vinyl off the new covers when I got to this part. Once you get going you will get the knack its just a case of doing a little bit at a time and them doing the same bit on the opposite side and carry on working yourself down to the bottom of the seat.

The bottom is where I went wrong first time around as I hooked the vinyl onto the little prongs as below. This is wrong!!!!!!!


At the bottom there should be a white cotton piece attached to the bottom seam. Only this bit is wrapped around and attached the seat prongs on the seat back.

The vinyl hangs free and in the back of your car where the rear seats go you will find some similar little metal prongs on the rear panel along the bottom of where the seat back goes. When I first put my rear seats back in the was a gap between the seat back and the seat base that didn't look right as below.


It was then that I found out I had done it wrong but fortunately with these little prongs you can just bend them back up to rectify any mistakes. When you eventually fit the seat back, back in the car the vinyl flap that is hanging down is simply attached to the little prongs on the rear panel, this gets rid of the gap and looks much better. As below.


I will post on how to do the seat base tomorrow as it has taken me nearly an hour to do this post and I am about to have dinner.
 
Cheers Owen I must admit I had to repaint the rear panels as the colour match was so poor, it looks a lot better now.
 
Very helpful, thanks Tony. Thanks for spending all that time on the post, hope dinner was good to make up for it!

I'll post some pictures of my existing vinyl and plywood base shortly (probably tomorrow), as yours looks a little different to mine.

Tim
 
Further to previous post, here's a couple of pictures of my rear seats, upside down showing plywood base. Are these original or do I need to find a base like in Tony's picture (if it helps to fit the covers)? Since it won't be visible, I'm not too worried about originality.
Tim
 

Attachments

  • seats-back-back.jpg
    seats-back-back.jpg
    590.1 KB · Views: 27
  • seats-back-bottom.jpg
    seats-back-bottom.jpg
    354.6 KB · Views: 24
Further to previous post, here's a couple of pictures of my rear seats, upside down showing plywood base. Are these original or do I need to find a base like in Tony's picture (if it helps to fit the covers)? Since it won't be visible, I'm not too worried about originality.
Tim

No definitely not original Tim they have been recovered at sometime using a staple gun. As you said if you are not bothered about originality then go for the same method, you still have the black vinyl cover on the seat back so that when it folds down it appears the same.

The only bit I would change is on the seat back, the flap of vinyl I described on my previous post has been stapled onto the hardboard in your pictures. If you have the little metal prongs on the rear panel still, then I would use the plywood method and leave the vinyl flap so that when you put the seat back into the car you can stretch the vinyl down and get rid of the gap you get between the seat back and the seat base. It's a tiny detail but believe me it doesn't look right.

I won't bother posting on how the seat base is covered as the method the previous owner has used in using a stapling gun is so much simpler than the way fiat did it and you will probably get much better results. Just work from the front of the seat base making sure the cover is tight, in small stages before you staple and the do the opposite side again, then move on down a little further. You will see as you work you way down. It is just a check and recheck scenario.

Tony
 
Last edited:
Hi Tim,
I think the answer here is that everyone is correct...
NZ assembled Fiat 500's (Bambinas) were built with as much 'local content' as possible so they do differ in some areas to models that were factory built.
Locally manufactured parts included the glass, wiring, exhaust, tyres, carpets and upholstery.
From memory my very first 'Bambina' which was a 1966 model had a plywood backing on the rear seats- originally NZ 500 F's were made with a very fragile textured Vinyl (like a headlining material) on the seat faces which disintegrated rapidly so it is unlikely that it will still have the original material.
The 1972/73 models in NZ were imported fully assembled so if you can find a donor rear seat out of one of these your covers should fit as per the pictures.
Hope this solves the mystery!
 
All very helpful, thanks Tony and Damon.
I'll try again with the covering method Tony suggests and if this doesn't give the desired results I'll have a look around for an original rear seat.
Tim
 
Hi Tony

I take it the black base to your rear seat has the prongs on? This is a metal base? Since I don't have the base and it seems that the plywood replaces that on mine, I guess staples are the only solution, short of finding a replacement seat or base.

Your base has lots of ribbing or shaping. What's that for?
Tim
 
Done the rear seat back rest, which worked fine.

Working on the bit you sit on, and there was a large split in the plywood, so I decided to get a new sheet. Just in the process of cutting to shape. I've trimmed the foam off the old sheet with the kitchen electric carving knife, works a treat. So should be able to re-use. It looks to have been replaced at some point in the past. Just got to glue it to the new sheet then put the new cover on with staples and should be finished. Will post some photos, maybe over the weekend.
 
No definitely not original Tim they have been recovered at sometime using a staple gun. As you said if you are not bothered about originality then go for the same method, you still have the black vinyl cover on the seat back so that when it folds down it appears the same.

The only bit I would change is on the seat back, the flap of vinyl I described on my previous post has been stapled onto the hardboard in your pictures. If you have the little metal prongs on the rear panel still, then I would use the plywood method and leave the vinyl flap so that when you put the seat back into the car you can stretch the vinyl down and get rid of the gap you get between the seat back and the seat base. It's a tiny detail but believe me it doesn't look right.

I won't bother posting on how the seat base is covered as the method the previous owner has used in using a stapling gun is so much simpler than the way fiat did it and you will probably get much better results. Just work from the front of the seat base making sure the cover is tight, in small stages before you staple and the do the opposite side again, then move on down a little further. You will see as you work you way down. It is just a check and recheck scenario.

Tony
Hi Tony

I take it the black base to your rear seat has the prongs on? This is a metal base? Since I don't have the base and it seems that the plywood replaces that on mine, I guess staples are the only solution for me, short of finding a replacement seat or base.

Your base has lots of ribbing or shaping. What's that for?
Tim

No the seat covered is secured quite crudely with little bits of wire that go through the vinyl and then are wrapped around the seat frame. Stapling is probably are much cleaner solution.

I am guessing the ribbing stops the springs from sliding around too much?

Tony
 
No the seat covered is secured quite crudely with little bits of wire that go through the vinyl and then are wrapped around the seat frame. Stapling is probably are much cleaner solution.

I am guessing the ribbing stops the springs from sliding around too much?

Tony
Springs on the rear seats? No springs on mine. Foam on top of plywood (actually 7mm thick, not 10).
 
I have springs on both the seat squab and the back. I guess that is another difference in manufacture between NZ and Italy.
 
I guess you're right. And that would explain the different base you have at the back.

You're info on re-covering was still helpful though.
Tim
 
Back
Top