Technical Trivial Detail Questions to Help My Rebuild

Currently reading:
Technical Trivial Detail Questions to Help My Rebuild

Joined
Mar 7, 2005
Messages
6,240
Points
1,615
Location
Nairn
You can expect more of these as I slowly put my 500F back together.
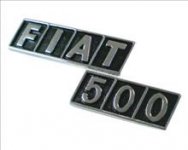
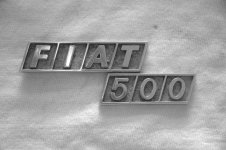
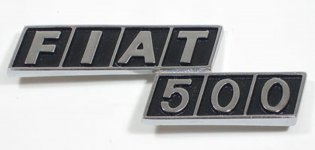
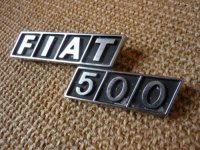
I have the later type "Fiat 500" block shaped badge on the bootlid. It appears these had black paint in the recessed part which has all flaked off. Just checking that this is correct and whether the paint was gloss or matt.?
 
Looking at the various badges on offer from most sources, this picture is from the Van der Laan parts list on their web. The badge in metal is indeed black and it would appear to be a 'satin' effect. :)

Cheers
Hugh Jarce
 

Attachments

  • FIAT 500 Badge.jpeg
    FIAT 500 Badge.jpeg
    5.8 KB · Views: 144
Mine plus a few others - mine is the 'unpainted' one.

The new ones have the area around the letters filled with what looks like gloss black acrylic, but as Hugh has illustrated, the originals were matt black paint.

I replaced mine with a rather pretentious '695' badge :D

Chris
 

Attachments

  • Rear badge 1.jpg
    Rear badge 1.jpg
    464.8 KB · Views: 23
  • Rear badge 3.jpg
    Rear badge 3.jpg
    120.1 KB · Views: 23
  • Rear badge 4.jpg
    Rear badge 4.jpg
    55.3 KB · Views: 23
  • Rear badge 5.jpg
    Rear badge 5.jpg
    86.8 KB · Views: 21
The Household Operations Manager is at work at the moment and although she has been surprisingly understanding re: rust and dust on worktops, the current level of debris will need clearing before 4pm. :)

Latest finds in my big boxes of parts from 5 years ago include the headlamp assemblies, in which I have cleaned and replaced the reflectors, and the front badge.
KNO_5647 by peterthompson, on Flickr

KNO_5651 by peterthompson, on Flickr

I have always liked patinated cars, even before the current trend and I am trying to re-use as much as possible. have I gone too far with these on a freshly painted car? Self-doubt is setting in. The problem is that pattern parts are generally rubbish; I have already had a wire detaching from a terminal in my new lights and they haven't even been fitted yet:bang:
 
I can agree about using original parts although, sometimes they are beyond looking good enough. Those light surrounds you show would come up just right with some metal polish and wire wool, you'd get most of the marks off and they brighten up quite nicely. I did the same with the rear light protector bars on my 500L. There are still some areas on them that are dulled but the main areas of the bars came up as good as it gets with the wire wool treatment.
 
I tried the Hugh Jarce wire wool and autosol method on my quarter light windows today, (Fiat actually refer to them as ventilation panels). They had some little dimply surface rust on the chrome and it worked a treat, it virtually removed all of it. So thanks for that tip Hugh.

They were the one part of the car that I really didn't want to replace with aftermarket parts as I have read about a lot of issues with "new" parts.

Tony
 
Something I read about and have tried is using aluminium (baking) foil dipped in water to clean chrome. Apparently it creates a chemical reaction (way beyond my understanding) and sort of re-coats the chrome.
Seemed to work on my headlight rims, quarter lights and rim around speedo.

Tim
 
Hi Tim

I use fine wire wool and metal polish, I've even used cardboard with Brasso and that does a good job too. The best though and fastest is the wire wool and a decent metal polish treatment, oh and a fair amount of elbow grease, ha ha ha.

Cheers
Hugh Jarce
 
More info needed please.
1. It's so long since I have actually dealt with a battery on a 500 and as I didn't have the securing strap when I bought it. Any chance of an image of where both the hooks locate?
2.To cut any confusion, on the generator control box there are three terminals. Does the twinned lead go on the middle or the right hand terminal?
3. I think I might be missing a holder for the heat shield on the engine lid. I accidentally bought one of those non-original items and it isn't going to locate securely just like that, straight out of the bag.
4. To fit the stainless sill strips on the sills I would appreciate a detailed image and/or dimensions for locating this, ideally off an original car or one which has had new sills with pre-stamped holes on them. I am not even sure which way up the strips go.
I must say, it's delightful to have such huge problems now:p
 
Last edited:
I bought a battery clamp from van der Laan but I had to adapt a bit as it was a bit long. I had to use a die on the arms of the strap to increase the thread length and then cut off the ends to allow it to fit. I then attached the hooked ends, one side through to a bracket hole on the battery box at the front and the other through one of the ventilation holes on the panel.


On the generator regulator as below.


The heat shield you should have bend over lugs to hold it in place again as below.

 
Brilliant Tony. You solved all the issues. Still not sure the heat shield will work but I will try later.
I am also wondering what the type of headlamp bulbs are. I thought H4 halogen replacement
would be OK but wrong.
 
Brilliant Tony. You solved all the issues. Still not sure the heat shield will work but I will try later.
I am also wondering what the type of headlamp bulbs are. I thought H4 halogen replacement
would be OK but wrong.

I know what you mean Peter about halogen not being right in the originality context but when you are talking something that adds a bit of safety personally I can't see anything wrong it. It depends how often you are going to be driving at night and on what's sort of roads.

A lot of my driving I like to stick to country lanes when I can as the car really happy on them as you know by my previous video, so I went for Halogen.

I have read a previous thread about needing to fit relays because of concerns about whether the switch will be able to handle the additional current but personally I don't think it is necessary. I have never seen any seller of spare parts advising the need to fit relays.

The amount of current drawn on by a standard main beam of 45W is 3.75 amps. A Halogen bulb tends to be about 60W on high beam so will draw 5 amps. As each headlight is on a different fused circuit to each other along with front and rear sidelights and the dash indicator bulb, which total 12W, so an additional 1 amp which makes 6 amps being drawn on that circuit which is fused at 8 amp, so well within spec.

I know you have seen this before but others haven't but I will leave it to you to work out which is Halogen and which is standard.:idea:

 
Last edited:
I bought mine from Van der Laan but they are listing them at €12 each, there is no way I paid that for them. I bought them from there rather than Axel Gerstl because theirs were more expensive. But they seem to have reversed now where Axel are selling them for €5.90. Which is about what I paid for them.

The only thing you need to be careful of when fitting them is to make sure the pointy bit doesn't snag on the metal reflector inside the headlight and crack the bulb.
 
Back
Top