General Franko the 1971 500L

Currently reading:
General Franko the 1971 500L

You are right Tony,
it was after the pump.


That's another job to do.
redface.gif
 

Attachments

  • IMG_4036.JPG
    IMG_4036.JPG
    550.7 KB · Views: 40
The majority of them seem to between the pump and carb.

I just had a look at your 1st post, 9 March 2014, so you are just over 3 weeks away from the second anniversary. Not a bad achievement in 2 years to turn a rusty old 500, into what will be one of the best around.(y)
 
Doesn't time fly when you are having fun! I must admit it seems like longer but I went through a few quiet periods where I just couldn't get into the garage did to work etc.
overall I am quite happy with progress and aim to have if finished by the end of March.
Can't wait to get it on the road now.

Then I can start the next one?
 
Just had a look at my thread start date, June 2014, so there's my target date to finish, June 2016 and a two year restoration!
 
Franko must be desperate to get out of the garage now. It's a nice feeling sorting out the details but it does get annoying when you get those smaller and smaller last minute orders.
With three built-in gauze filters at the tank, pump and carb and a new petrol tank, I didn't see a need for an extra filter.
 
Can anyone assist me with my ignition lock?
this is the L model with the ignition lock on the column.
I forgot to note which cables went where.


I have one heavy red cable - constant positive
2 black cables that are connected - 1 to the light switch, 1 to the column switch
1 blue cable - goes to the dash light


Cant work out where the cables go.
Also cant work out the purpose of the position 4?


presumably
1 is off
2 is everything on
3 should be leave parking lights on whilst ignition switch off
4 ? key has to be in
 

Attachments

  • ignition lock.PNG
    ignition lock.PNG
    12.7 KB · Views: 31
Finally sorted the ignition.
Position 1 - all off
Position 2 - doesn't seem to do anything
Position 3 - leaving parking lights on , key can be removed
Position 4 - ignition on and everything else

What was throwing me was that the light circuit was connected to the same fuse as the ignition so every time I turned anything on the ignition came on.

So now all the lights, Ignition, wipers are working. Found the main light switch is a little temperamental, I've stripped it but is a little worn so a new one may be required.

The new headlamps with side light bulbs have already failed. One of the wires to the sidelight holder come off, so had to re solder it on. Now the other one is playing up do need to change the wire in that one.
Also the new flasher relay gave off a slight burning smell. The flashers were working so just thought maybe it's because it's new. But once I plugged the dash in I found the indicator bulb in the dash is not working ( already fitted new bulbs and checked continuity of the dash).
Replaced it with the original one from the car and all works fine. Dodgy new parts again?
 
I had that same problem with flasher units. I tried another new one from a different source and the dash light still didn't work. I found one bulb in my collection that does give a faint glow but no clicking from the relay.
Also..same problem with the headlights.:banghead:
 
Sean as discussed. It sits cleaner than that, I have just pulled it up so you can see it better. image.jpeg
 
Cheers Tony.
I think I will have to go along with a similar method for the lhd version.
Anyone got a photo of their lhd model throttle pedal and the hole in the carpet?
 
Cheers Steve,
I really need one of the hole that the pedal comes through.
if you could take one without the mat there that would be great.
Better still if you could take a close up of the hole in the carpet so I can see what kind of hole to cut.
 
I had a day off today as I had to take my car in for a service.
So this afternoon I decided to get on with the doors/windows.


Project 1/4 glass.


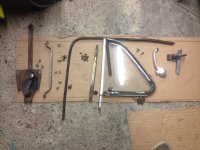
Stripped the door of all its components.
Found it easiest to undo the regulator, and drop the window.
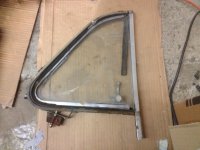
Undo the 2 screws holding the 1/4 glass frame in the door and then pull the frame back and then slide it out.
Then remove window surrounds and then remove the glass.


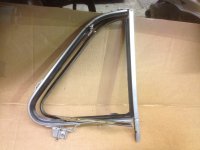
I have purchased the good quality 1/4 glass frames, seals & rubber tape, new handles and various other little pieces.
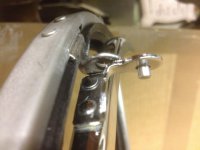
Unfortunately I purchased the ones with the catch on the mounting bracket.
Not a problem, the frames are the same but I now need to buy 2 catch pivots.
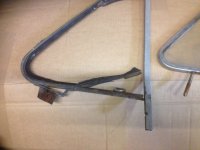
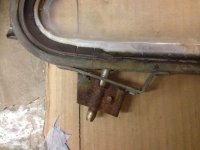
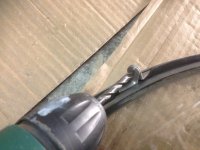
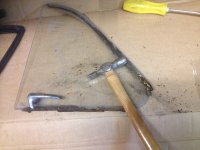
So to refurbish them I first off drilled out the stainless steel rivet.
Then undone the bolt that tightens the clamp around the frame spigot.
Remove the inner frame from the outer frame.
Remove the frame seal and the upright window seal.
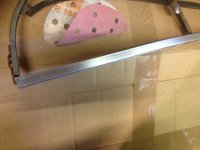
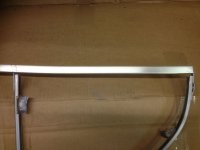
Clean the main frame up and give it a coat of paint.
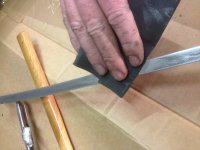
The upright aluminium runner was a little corroded and pitted and needed some tlc. So I sanded it with some 240 grit and then rubbed it down with some 800 wet & dry in the same direction to give it a nice clean surface with a little abrasion. I was going to polish it, but as with all aluminium it will tarnish. So I opted to spray it with clear lacquer. If you polish it first then lacquer it the paint will flake off at some point.
I was quite pleased with the result.
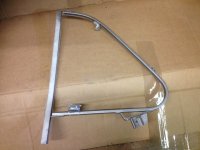
Next was to refit the seals, I usually used a spray bottle with water and washing up liquid, this makes everything go in so much easier.
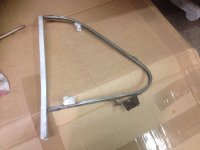
I think the next step is to fit the inner frame because if you fit the glass first it may not all fit inside the outer frame.
This is where I stop this part as the new rivets are smaller than the old ones. They literally go straight through the old hole. So I need to get my dad to make some new ones. Fecking pattern parts!
The removal of the inner frames was quite easy seeing as they were so rusty. They have a rubber strip that is glued to the glass and then the frame is pushed over the rubber with a little adhesive to hold it all in place.
Easiest way to remove it is tap it with a hammer, sliding the hammer head on the pane of glass so as not to have any accidents and smash the glass.
Mine broke in two and once all the old stuff was off I renmoved the glue and cleaned the glass with a Stanley blade and wire wool to get it all clean.
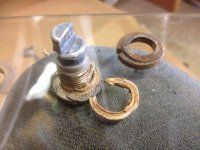
The handles are held on with a little grub screw that was seized so I drilled it out to remove it so I could then undo the nut holding the spigot on the glass.
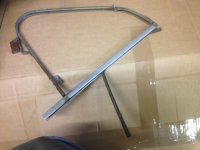
I now have both of them in the same position so once I get some rivets I will add the next step for those who haven't done this yet.
 

Attachments

  • IMG_6191.JPG
    IMG_6191.JPG
    2.3 MB · Views: 29
  • IMG_6186.JPG
    IMG_6186.JPG
    2.6 MB · Views: 35
  • IMG_6183.JPG
    IMG_6183.JPG
    2.5 MB · Views: 31
  • IMG_6185.JPG
    IMG_6185.JPG
    2.5 MB · Views: 36
  • IMG_6079.JPG
    IMG_6079.JPG
    2.5 MB · Views: 38
  • IMG_6194.JPG
    IMG_6194.JPG
    2.3 MB · Views: 28
  • IMG_6203.JPG
    IMG_6203.JPG
    2.1 MB · Views: 26
  • IMG_6195.JPG
    IMG_6195.JPG
    2.2 MB · Views: 28
  • IMG_6192.JPG
    IMG_6192.JPG
    2.2 MB · Views: 29
  • IMG_6220.JPG
    IMG_6220.JPG
    1.7 MB · Views: 31
  • IMG_6216.JPG
    IMG_6216.JPG
    2.5 MB · Views: 32
  • IMG_6215.JPG
    IMG_6215.JPG
    1.5 MB · Views: 32
  • IMG_6207.JPG
    IMG_6207.JPG
    1.5 MB · Views: 31
  • IMG_6206.JPG
    IMG_6206.JPG
    2.5 MB · Views: 31
  • IMG_6196.JPG
    IMG_6196.JPG
    2.6 MB · Views: 27
  • IMG_6197.JPG
    IMG_6197.JPG
    2.7 MB · Views: 31
  • IMG_6198.JPG
    IMG_6198.JPG
    2.4 MB · Views: 31
  • IMG_6202.JPG
    IMG_6202.JPG
    2.7 MB · Views: 29
It's supplied as a roll of rubber about 40 mm wide.
Looks a little wide but I think you glue it to the glass, then push the frame on it. When the glue has gone off, run a blade around it to trim it up.
 
It's supplied as a roll of rubber about 40 mm wide.
Looks a little wide but I think you glue it to the glass, then push the frame on it. When the glue has gone off, run a blade around it to trim it up.

Oh ok should look very nice. I have heard in the past that the rivets are a pain.
 
I can only support you regarding your 'love' of 'pattern parts'--some of them are a pain in the bum! I was very lucky when I was building up my (pattern)doors. At the time I was helping out by doing some part-time driving at a local M/Benz garage (1 0f the 2 that I have helped to set up from scratch) and I was allowed to use the workshop. as a result, I used the 'windscreen sealer' gun to fit the glass in my 1/4 lights. By using little plastic spacers to keep the glass central in the frame, it all went very easily, if initially a shade messy.
thumb.gif
smile.gif
 
Back
Top