Technical 126 Bis FIRE engine conversion.

Currently reading:
Technical 126 Bis FIRE engine conversion.

Hi all, well after a 3 year rollercoaster love affair with my 126 Bis, over the last few months i have completed a FIRE 999 engine conversion. Just a few small loose ends to tidy up looks wise, but all legal and registered as a 999cc and MOT'd. After 30 miles of testing its developed a misfire so am currently in the process of sorting that. Is anyone interested in me posting pics and info on here? I know the engine conversion subject is rather contentious but i can confirm that it can be completed sensibly and legally. ;)
 
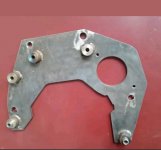
Firstly i purchased an adaptor plate on eBay. Then i hunted for a donor car. I've had a lot of experience with the FIRE engine so after the nightmare i had with the Bis (2 years rebuilding the engine including fitting Abarth internals and egnineering improvements, 11 miles into the first drive and the NEW rear crank bearing failed...it actually crumbled to pieces due to a manufacturing flaw. I was so upset that i garaged the car for 6 months.), i decided to fit a FIRE motor to avoid buying more faulty parts.
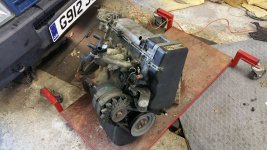
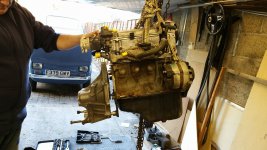
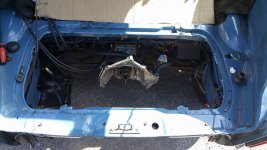
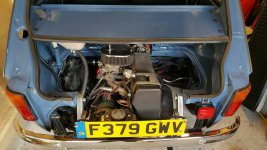
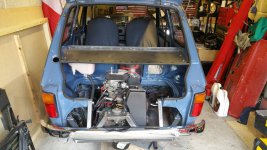
I didnt want to fit a 999, 1108 or 1242 at first as i was concerned about the torque through the gearbox, after all, the priority of this build was reliability not performance. However after struggling to locate a complete and running 750 Panda that would be a suitable donor (they were all to nice to break and also expensive), i began searching for a 999cc which is obviously far more common and more available as a carburettor power unit which lends itself to the age and style of the 126 quite nicely. I wanted a running car so i could try the engine out before the build. I found a 1990 UNO with 80k on the clock for a good price. I trailered it home from purchase.....and im so glad i did. The engine ran beautifully, but the front o/s wheel was spaced about 10mm wider than the left, the rear turrets had rust burst under the carpet trim and i counted 4 fuel leaks including petrol oozing through the layers of rust in the tank! It had just passed an 'MOT' too....anyway, the engine was a gem. And so began the build:
 

Attachments

  • 14907268_10153818773587172_2174079943131651975_n.jpg
    14907268_10153818773587172_2174079943131651975_n.jpg
    25.6 KB · Views: 335
  • 15003432_10153818441717172_419359098114403583_o.jpg
    15003432_10153818441717172_419359098114403583_o.jpg
    244.8 KB · Views: 307
  • 14940103_10153818776292172_6128541081439394566_o.jpg
    14940103_10153818776292172_6128541081439394566_o.jpg
    241.6 KB · Views: 306
  • 14940122_10153818773432172_3363685764215208783_o.jpg
    14940122_10153818773432172_3363685764215208783_o.jpg
    124.5 KB · Views: 337
  • 15137450_10153868384272172_8187507640415909561_o.jpg
    15137450_10153868384272172_8187507640415909561_o.jpg
    214.6 KB · Views: 354
The adaptor plates are available for the aircooled 126 models so the quickest and easiest course seemed to be to purchase an aircooled bellhousing and fit that to the Bis gearbox. I bought a used one for £20 (again, thanks ebay). In these pics you can see the adaptor plate fitted to the bellhousing and then all three parts together.
 

Attachments

  • 15195946_10153868384737172_8793393823363512667_o.jpg
    15195946_10153868384737172_8793393823363512667_o.jpg
    202 KB · Views: 505
  • 15137450_10153868384272172_8187507640415909561_o.jpg
    15137450_10153868384272172_8187507640415909561_o.jpg
    214.6 KB · Views: 265
  • 14940122_10153818773432172_3363685764215208783_o.jpg
    14940122_10153818773432172_3363685764215208783_o.jpg
    124.5 KB · Views: 257
The adaptor plate is a good template to add to. We added a top fixing point (under the thermostat) to the plate to support the top of the bell housing and then welded thin fillets all the way round the plate to protect the flywheel when fitted. The original aircooled lower flywheel cover also fits with this install. As an aside, the flywheel needed about 50 thou skimmed off the rear in order to clear the adaptor plate. I'm lucky, as although i am a mechanic my father is an engineer so he has done the bulk of the fabrication.
 
Last edited:
Bell housing fitting
 

Attachments

  • 17990731_10154272088477172_5754753308378163601_n.jpg
    17990731_10154272088477172_5754753308378163601_n.jpg
    73.6 KB · Views: 352
  • 17265280_10154155475347172_9138722147286603384_n.jpg
    17265280_10154155475347172_9138722147286603384_n.jpg
    90.8 KB · Views: 285
  • 17190584_10154155475442172_1688587352378018017_n.jpg
    17190584_10154155475442172_1688587352378018017_n.jpg
    103.7 KB · Views: 334
  • 17264588_10154155475357172_4628874701119993330_n.jpg
    17264588_10154155475357172_4628874701119993330_n.jpg
    86 KB · Views: 296
  • 17201412_10154142773852172_4415598137175145006_n.jpg
    17201412_10154142773852172_4415598137175145006_n.jpg
    76.1 KB · Views: 329
Cutting the chassis and first trial install minus flywheel and clutch.
 

Attachments

  • 18118646_10154272088572172_6830659633978586125_n.jpg
    18118646_10154272088572172_6830659633978586125_n.jpg
    90.1 KB · Views: 248
  • 18057884_10154272088677172_6488950295730806284_n.jpg
    18057884_10154272088677172_6488950295730806284_n.jpg
    115.7 KB · Views: 679
  • 18056786_10154272088872172_2231202340313741583_n.jpg
    18056786_10154272088872172_2231202340313741583_n.jpg
    97.2 KB · Views: 328
  • 18423727_10154314831222172_8351451023581004258_n (1).jpg
    18423727_10154314831222172_8351451023581004258_n (1).jpg
    65.9 KB · Views: 251
Measurements were taken before and after cutting and the chassis didn't even spring a millimetre. Clearly the distributor didnt fit, so we braced the middle of the car with a steel tube across the rear of the seat line, also down into the box section either side of the dizzy. Next we cut (after taking measurements) the box section that was fouling the dizzy and welded in some channelling. This left plenty of room for the dizzy and for an inspection panel.
 

Attachments

  • 18815178_10154382295972172_1779651109576676352_o (1).jpg
    18815178_10154382295972172_1779651109576676352_o (1).jpg
    224.9 KB · Views: 192
Last edited:
Next came the design of the rear subframe. There is lots of inspiration available on the net. I wanted this project to be reasonably quick and easy. Also i was aware of weight factors. I also wanted the project to include as many standard parts as possible (cables/mounts/hoses etc), whether 126 or Uno i didn't mind but i wanted to stay away from custom parts as much as possible to aid with future maintenance.
 

Attachments

  • 18199310_10154302494022172_7666959841712967625_n.jpg
    18199310_10154302494022172_7666959841712967625_n.jpg
    49.2 KB · Views: 218
  • 18222631_10154309591097172_6554790737319621456_n.jpg
    18222631_10154309591097172_6554790737319621456_n.jpg
    80.2 KB · Views: 220
  • 18198450_10154302493952172_8234985610270747516_n.jpg
    18198450_10154302493952172_8234985610270747516_n.jpg
    115.4 KB · Views: 288
  • 18278710_10154294387182172_8746135830333976641_o (1).jpg
    18278710_10154294387182172_8746135830333976641_o (1).jpg
    125.6 KB · Views: 300
  • 18193907_10154294387452172_383266672637860869_n.jpg
    18193907_10154294387452172_383266672637860869_n.jpg
    57.8 KB · Views: 305
We boxed the open rear chassis member ends and machined up some threaded inserts which were welded in to enable the subframe to act as a brace.
 

Attachments

  • 20170614_205039_1505508789997.jpg
    20170614_205039_1505508789997.jpg
    4 MB · Views: 205
  • 20170610_135117_1505508789395.jpg
    20170610_135117_1505508789395.jpg
    4.1 MB · Views: 185
  • 20170610_193128_1505508789610.jpg
    20170610_193128_1505508789610.jpg
    4.6 MB · Views: 260
  • 20170610_193135_1505508789733.jpg
    20170610_193135_1505508789733.jpg
    5.2 MB · Views: 168
  • 20170610_193141_1505508789883.jpg
    20170610_193141_1505508789883.jpg
    5 MB · Views: 149
Here you can see the braces on the subframe and the firewall.
 

Attachments

  • 20621010_10154573866652172_9102689685052464968_n.jpg
    20621010_10154573866652172_9102689685052464968_n.jpg
    79.1 KB · Views: 201
  • 20621261_10154573866757172_4666258563706416755_n.jpg
    20621261_10154573866757172_4666258563706416755_n.jpg
    43.7 KB · Views: 208
  • 20638039_10154573866572172_4730828897176704188_n.jpg
    20638039_10154573866572172_4730828897176704188_n.jpg
    64.9 KB · Views: 196
  • 19143270_10154422787477172_1918619012937501859_o.jpg
    19143270_10154422787477172_1918619012937501859_o.jpg
    226.2 KB · Views: 227
  • 18425257_10154314830497172_2282098094863936329_n.jpg
    18425257_10154314830497172_2282098094863936329_n.jpg
    70.5 KB · Views: 169
Top engine cover and sound deadening
 

Attachments

  • 20842297_10154603200157172_6569256941307224520_n.jpg
    20842297_10154603200157172_6569256941307224520_n.jpg
    76.1 KB · Views: 266
  • 20914392_10154602922812172_6554950896466188707_n.jpg
    20914392_10154602922812172_6554950896466188707_n.jpg
    78.2 KB · Views: 215
  • 20881810_10154588357792172_793054292180669331_n.jpg
    20881810_10154588357792172_793054292180669331_n.jpg
    37 KB · Views: 194
  • 20842212_10154602922712172_6114904332876264868_n.jpg
    20842212_10154602922712172_6114904332876264868_n.jpg
    81.8 KB · Views: 231
  • 20799167_10154588357882172_6493613557829249003_n.jpg
    20799167_10154588357882172_6493613557829249003_n.jpg
    86 KB · Views: 258
The engine developed a bad misfire after about 30 miles. After some fault finding it transpired to be that the old cambelt had jumped 2 teeth. I had a cambelt kit in stock so replaced it and also fitted a new dizzy as the auto advance was badly worn and seized. Id planned to change the belt over winter after putting in some test miles. However since this issue we are up to 140 miles without major issues. Fingers crossed....:D From having the engine removed from the Uno to having it fitted in the 126 able to drive took about 3 months of free time. If anyone has any questions, please feel free to ask. I've tried to cover the 'bulky' stuff in this thread, but there was plenty of other head scratching, e.g. cooling system, exhaust, wiring and admin: DVLA etc. Mega thanks to my father for his expertise, time and advice and my wife for putting up with me through the whole saga (y)(y)(y)
 

Attachments

  • 21369472_10154652476787172_3187164443570627113_n.jpg
    21369472_10154652476787172_3187164443570627113_n.jpg
    68.1 KB · Views: 240
  • 21463206_10154652477147172_1320859210489658395_n.jpg
    21463206_10154652477147172_1320859210489658395_n.jpg
    62.8 KB · Views: 164
Last edited:
This build has inspired me massively, I have an identical car to yours and all, with the same problem, buggured engine, what did you do for cooling, front mount or bis rad?
Really impressed
 
What a fantastic project! (y) The 126 is and always will be a difficult car to do an engine conversion on due to its space resrictions. Many, many poor attempts using bike and car engines usually come to nothing or badly executed to the point of being Undrivable. I've seen similar FIRE engined conversions before (but never in a BIS!) and I firmly believe that the FIRE is one of a handful of engines that can realisily work as it just about fits in there in the back (mid mounted ones are just a no-no for me). You've done a fantastic job and I'm well impressed that you have kept it very tasteful with the bumpers and wheels and resisted the urge to widen or modify the bodywork unnecessarily.

Great job (y)
 
Last edited:
Great car. Love it.

As an aside, I know at some point Fiat had a prototype front engine/front wheel drive 126 up and running. Has anyone tried, or does anyone know of anyone doing such a thing to their own 126?
 
Last edited:
Back
Top