General 1978 Spider Fuel Leak

Currently reading:
General 1978 Spider Fuel Leak

Keystone

New member
Joined
Dec 22, 2010
Messages
8
Points
3
Location
Hattiesburg, Mississippi
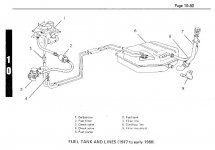
I have a fuel leak coming from between the filler tube and the fuel tank. I've ordered the rubber hose that connects the tube to the tank. Any tips on disassembly and reassembly?
 
Hi, Welcome to the FF.

Jack the car up the side of the filler so fuel doesn't pour out the tank when you remove the hose. Remove the protection shield, take old hose off and fit new hose. (y)

The clips may be corroded and may need to be cut off so have new ones ready.
.
 

Attachments

  • Spider Tank.JPG
    Spider Tank.JPG
    55.5 KB · Views: 96
Thanks! That's exactly what I needed. The picture is extremely helpful. Are the clips unique, or would standard radiator hose clamps work? Would some kind of silicone grease or liquid soap be useful in sliding the hose on?

Somewhat off topic I have to wonder if ethanol laced gas made this worse.
 
Thanks again. This forum is a lifesaver for such an orphan car. Last night sitting in Hattiesburg, Mississippi I posted a question about a 30 year old car. This morning I have my answer from London, England. Awesome!

In the 80's and 90's I was a frequent visitor to the UK including Wales and Scotland. The beer and "football" were great.

Wales :confused:, Scotland :confused:, where's that? Londoners don't know anywhere north of Watford.

Why put the quotes around the word "football"? It is the correct name for the game after-all. (y)
 
Davren and All,

This may not be as simple as I thought. I took the shield off and have very good access to the bottom clamp and connection. The top clamp and hose connection are very difficult to see or get at. I can get a hand up there, just barely. Loosening the screw adjuster on the clamp looks extremely difficult to impossible. It looks like the body quarter panel below the hose might need to come off, but it appears to be part of the fender.

I'm sure people have had to make this repair. Any secrets?
 
Sorry, I can't help you this time.

We had very few Spiders in the UK and I haven't worked on one since the late 1970s. I don't remember ever having to replace a tank filler pipe and the workshop manual I have doesn't offer any suggestions.

Hopefully, one of the Spider owners from your side of the pond will be able to help.
 
Keystone,
it will be tight to get your hands up there and fit the hose clip.
There is an alternative. The lower rear quarter panel is held on by a couple of self tappers around the periphery and an 8mm nut inside the rear arch.
Removing it gives lots of room to work.

However, removing this panel will probably crack the paintwork around the screws and the joints so if you can manage without removing it......

On the plus side, removing it would give you the opportunity to treat any rust and give it a coat of protective paint while you're in there
 
Hi Spannerdude,

As it turns out I was able to make the repair today and your tip is close to what I did. First, there is an oval plate of sorts in the trunk (boot) that surrounds the fuel filler tube adjacent to the floor of the trunk. Partially removing it makes it possible to see the top edge of the filler hose. If later on you have to push down on the hose you can. When you get the new hose on you can see if you have it pushed up enough.

Down below I bent the lower edge of the quarter panel out an inch or two. This made it possible to snake my hand and arm up to the top of the hose and clamp lying on my back. You can either see or feel but not both. It's an absolute bitch to turn the screw on the clamp. There is very little room to work. The clamp on the bottom is easy to see and remove once you take off the guard.

Once the clamps are removed the hose pulls off and out easily. I put a little silicone grease around the inside edge of the new hose. It goes on fairly easily. Pushing the hose up far enough takes a little time. You can look through the hole in the trunk to check if you are far enough up. Replacing and tightening the bottom clamp is easy. Tightening the upper clamp is a project. There is no room to work and you are going by feel. After tearing up my arm and hand sufficiently I completed the replacement. I replaced the stone guard and bent the sheet metal back.

The old hose had a split in the outside of the elbow, so I fixed the right problem.
 
Back
Top